| C H A P T E R 2 |
|
Installation Overview |
This chapter lists the steps in a typical Netra 240 server installation and contains the procedures that must be performed before installing the server in a rack.
This chapter contains these topics:
Each step in this task list refers you to the relevant section of the documentation for more information. Complete each step in the order listed.
1. Verify that you have received all of the components that ship with your server.
See TABLE 1-2 for a list of the ship kit contents.
2. Remove the shipping insert from the bezel and install the air filter.
See Installing the Bezel Air Filter for instructions.
3. Install any optional components shipped with your system.
If you have purchased optional components such as additional memory, install them prior to mounting the server in a rack. See Installing Optional Components for more information.
4. Mount the server into a rack or cabinet.
See Chapter 3 for rackmount installation instructions.
5. Connect the chassis grounding cable.
See Connecting the Chassis Grounding Cable.
6. Connect the serial, network, and all other data cables to the server.
See Connecting the Data Cables.
7. Assemble and connect the input power cables to the server.
See Chapter 5 for complete instructions.
8. Set up a terminal or console for installing your server.
See Chapter 6 for complete instructions.
9. Gather configuration information for your system.
See the Software Configuration Worksheet.
10. (Optional) Set any desired OpenBoot PROM configuration options.
You can control several aspects of system behavior through OpenBoot PROM commands and configuration variables. Refer to the OpenBoot 4.x Command Reference Manual (816-1177) and the Netra 240 Server System Administration Guide (817-2700) for OpenBoot command information.
11. Confirm that the Ethernet connection is attached to the server.
12. Check whether the rotary switch is in the Normal position.
See Setting the Rotary Switch.
13. Power on the server by either pressing the On/Standby button on the front panel or from a keyboard using the ALOM software.
14. Configure the server software.
The Solaris operating system is preinstalled on the server. When you power on, you are automatically guided through the Solaris operating system configuration procedure. See Configuring the Server for more information.
15. Install any required patch or patches to the server.
Refer to the Netra 240 Server Release Notes (817-3142) for a list of the required patches.
16. Load additional software from the Solaris media kit (optional).
The Solaris media kit (sold separately) includes several CDs containing software to help you operate, configure, and administer your server. See the documentation provided with the media kit for a complete listing of included software and detailed installation instructions.
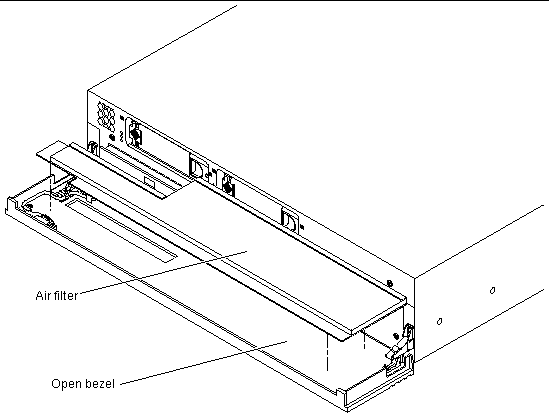
The Netra 240 server ships with a protective shipping insert located between the bezel and the front panel. You must remove this protective insert and replace it with an air filter before powering on the server.

|
Caution - Failure to remove the shipping insert from the front bezel can block the air from flowing through the server, which would seriously damage the server components. |
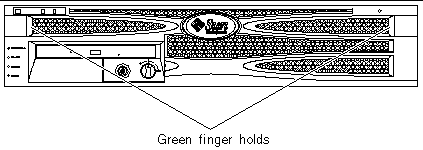
1. Grip the bezel at the two finger holds and rotate it down to its open position (FIGURE 2-1).

2. Carefully remove the shipping insert from the inside of the bezel.
3. Get the air filter that shipped with your server.
4. Snap the new air filter into place in the bezel (FIGURE 2-2).

The standard components of the Netra 240 server are installed at the factory. However, if you ordered options such as additional memory or a PCI card, these will be shipped separately. If possible, install these components prior to installing the server in a rack.
 Install any optional components shipped with your system.
If you ordered options that are not factory-installed, see the Netra 240 Server Service Manual (817-2699) for installation instructions.
|
Note - All internal components except disk drives must be installed by qualified service technicians only. |

|
Caution - To protect electronic components from electrostatic damage, which can permanently disable the system or require repair by Sun service technicians, note the following guidelines. |
Refer to the Netra 240 Server Service Manual for the list of optional components.
|
Note - The optional component list might be updated at any time. Refer to the Sun StoreSM web site (http://store.sun.com) for the most current list of Netra 240 server supported components. |
Copyright © 2004, Sun Microsystems, Inc. All rights reserved.