| C H A P T E R 7 |
|
Powering On and Configuring the Server |
This chapter describes how to power on and configure the server to suit your application. It contains these sections:
To power on the server, you can use either the On/Standby button located behind the front bezel, or you can use the keyboard. If you power on from the keyboard, you can see system output as the server powers on.

|
Caution - Never move the system when the system power is on. Movement can cause catastrophic hard drive failure. Always power off the system before moving it. |
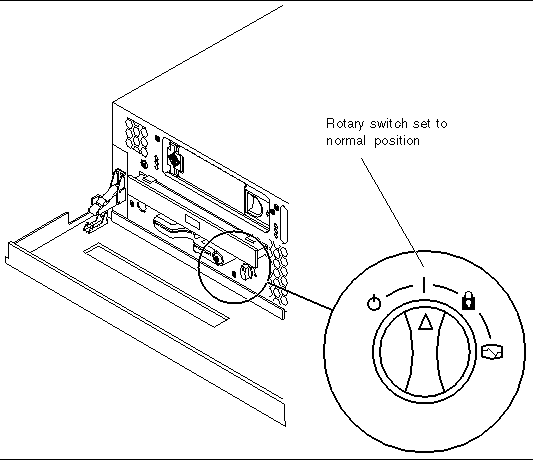
Before you begin powering on the server, make sure that the rotary switch is in the normal position. This position allows the On/Standby button to control the power state of the server. For more information on the operation of the rotary switch, refer to the Netra 240 Server Service Manual (817-2699).
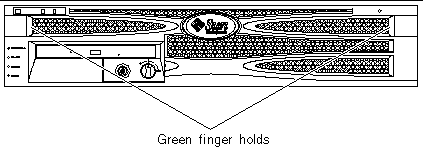
1. Grip the bezel at the two finger holds and rotate it down to its open position (FIGURE 7-1).

2. Ensure that the rotary switch is set to the normal position.
If the switch is not in the normal position (|), set it now.

1. Connect the server to the power supply.
The server automatically goes into Standby power mode when it is connected to a power source. See Chapter 5 for instructions on connecting the power cables.
2. Set up a connection to the SERIAL MGT port.
For details, see Chapter 6.
When you switch to the ALOM prompt after initial power-on, you will be logged in as the admin user and prompted to set a password. You must set this password in order to execute certain commands.
3. If you are prompted to do so, set a password for the admin user.
Once the password is set, the admin user has full permissions and can execute all ALOM command-line interface (CLI) commands.
4. Turn on power to any peripherals and external storage devices you have connected to the server.
Read the documentation supplied with the devices for specific instructions.
5. At the console sc> prompt, type the following command to power on the server:
1. Connect the server to the power supply.
The server automatically goes into Standby power mode when it is connected to a power source. See Chapter 5 for instructions on connecting the power cables.
2. Turn on power to any peripherals and external storage devices you have connected to the server.
Read the documentation supplied with the devices for specific instructions.
3. Set the rotary switch on the front bezel to the Normal (|) position.
See Setting the Rotary Switch for more information.
4. Press the On/Standby button.
5. Turn the rotary switch to the Locked position.
This prevents anyone from accidentally powering off the system.
For complete instructions on powering down the server, refer to the Netra 240 Server Service Manual (817-2699).
1. Notify users that the system will be powered down.
2. Back up the system files and data, if necessary.
3. Ensure that the rotary switch is in the Normal or Diagnostics position.
See Setting the Rotary Switch for more information.
4. Press and release the On/Standby button on the front bezel.
The system begins an orderly software system shutdown.
5. Wait for the front panel green Activity indicator to go out.
See Front Panel Indicators for a description of this indicator.
The Netra 240 server comes preinstalled with the Solaris operating system. When you power on the server for the first time, you are automatically taken through a configuration procedure. This procedure consists of a number of questions, and the answers you give determine how the server is configured.
Complete the software installation worksheet and choose the configuration that best suits your requirements from the list below. Then follow the instructions in the appropriate section to configure your server.
Use the following worksheet to gather the information that you need to configure software on the Netra 240 server. You do not need to gather all of the information that is requested on the worksheet. You only need to collect the information that applies to your system.
During the boot process, you are prompted for certain information. The information you provide determines the configuration of the server.
1. Specify the type of terminal you are using to communicate with the server.
2. Specify whether you need IPv6 enabled, and then follow the instructions on the screen.
3. Specify whether you want to enable the Kerberos Security mechanism, and then follow the instructions on the screen.
4. When prompted, give a password (if any) for users logging in as superuser.
Follow the instructions in this section if you do not have a name server configured on your network.
|
Tip - Read these instructions through before you follow them, to see what information the system prompts you for when you start it for the first time. |
During booting you are prompted for certain information. The information you provide determines the configuration of the server.
1. Specify the type of terminal you are using to communicate with the server.
2. When asked if you want the server to be networked, answer Yes.
3. Specify whether the IP address is to be configured by DHCP.
If you plan to configure the IP address manually, specify an IP address when prompted.
4. Specify which of the Ethernet ports you intend to use as the primary Ethernet connection.
5. Specify a host name for the server.
6. If prompted, specify the IP address for the system.
The system prompts you for this address if you declined to use DHCP in Step 3. It also asks you whether the server is to be part of a subnet. If you answer yes, the system prompts you to provide the netmask of the subnet.
7. Specify whether you need IPv6 enabled, and then follow the instructions on the screen.
8. Specify whether you want to enable the Kerberos Security mechanism, and then follow the instructions on the screen.
9. Specify the name service you want the server to use.
10. Specify the name of the domain of which the server will be a part.
11. Specify whether you want the system to search the network for a name server or whether you want it to use a particular name server.
12. If you chose to use a particular name server, specify the host name and IP address of the name server.
13. At the name server prompt, create entries in the network administration files for the system you are setting up.
14. At the system you are setting up, follow the prompts to provide time and date information.
15. When prompted, give a password (if any) for users logging in as superuser.
1. Specify the type of terminal you are using to communicate with the server.
2. When prompted to indicate whether you want the server to be networked, specify No.
3. Specify a host name for the server.
4. Confirm the information you have given.
5. Specify the date and time information.
6. When prompted, give a password (if any) for users logging in as superuser.
If you want to start the power on process again, as if from a previously unused server, you must clear the configuration of the server.
1. At the Solaris prompt, type:
2. When prompted to confirm that you want to create a "blank" server, type y.
3. When the OpenBoot prompt appears, type:
4. Follow the instructions in one of the following sections:
For a brief introduction, see Sun Advanced Lights Out Manager. For detailed ALOM instructions and configuration information, refer to the Sun Advanced Lights Out Manager User Guide For the Netra 240 Server (817-3174). For late-breaking information about the ALOM software, refer to the Netra 240 Server Release Notes (817-3142).
The ALOM software is preinstalled on the server and is ready to run as soon as power is supplied to the server. However, you need to perform some basic configuration steps to customize the ALOM software to suit your application.
1. At the command prompt, type the default keystroke sequence (#.) to display the ALOM prompt:
|
Note - When you switch to the ALOM prompt after initial power-on, you are logged in as the admin user and prompted to set a password. You must set this password in order to execute certain commands. |
2. If you are prompted to do so, set a password for the admin user.
Once the password is set, the user has full permissions and can execute all ALOM command-line interface (CLI) commands.
More than one ALOM user can be connected to the server console stream at a time, but only one user is permitted to type input characters to the console.
If another user is logged on and has write capability, you will see the message below after issuing the console command:
Copyright © 2004, Sun Microsystems, Inc. All rights reserved.