| C H A P T E R 2 |
|
Preparing to Service the System |
This chapter contains the following sections:
|
Note - Illustrations might contain optional components that are not available on all standard configurations of the Netra 240 server. |
You must open the bezel to access the On/Standby button and the rotary switch. The On/Standby button controls only the power state of the server. It does not isolate the server from its electrical power source. Turning the power off does not disable the ALOM. For information on controlling server power using software, refer to the Sun Advanced Lights Out Manager Software User's Guide for the Netra 240 Server (817-3174).
The On/Standby button is a momentary switch and has two operation modes:
The On/Standby button does not power off the server. It toggles the server between on and standby (FIGURE 2-2). The results of these actions are summarized in TABLE 2-1.
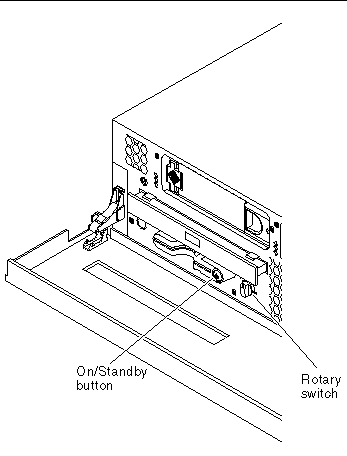
The server immediately goes into Standby mode as soon as it is connected to a power source. As long as it remains connected to the power source, the server stays in either the Standby or On power state. An explanation of the power states is provided in TABLE 2-1.
|
Note - The only way to remove power totally from the server is to disconnect the power cable. |
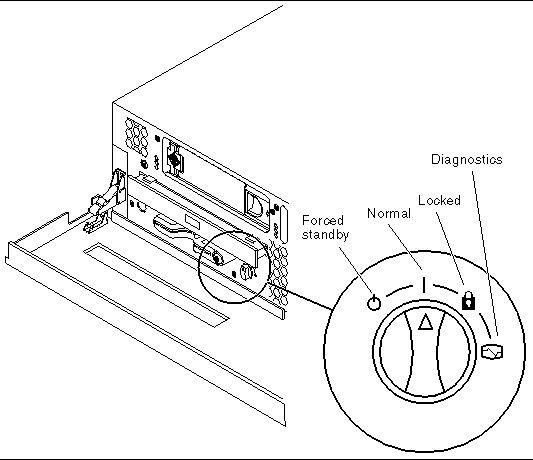
Open the front bezel for access to the rotary switch (FIGURE 2-2). An explanation of the rotary positions and server behaviors is provided in TABLE 2-2. The switch positions are shown in FIGURE 2-3. TABLE 2-3 provides the system control rotary switch functions and positions.
|
Write-protect OpenBoot PROM/POST Flash PROM Disable suspension to OpenBoot PROM/kadb[1] |
|
The level of deployment security and the level of diagnostic testing for the rotary switch is summarized in TABLE 2-3.
|
Normal[2] |
Diagnostics[3] |
|||
|---|---|---|---|---|
Do not use this power-on procedure if you have just added any new internal option or external storage device, or if you have removed a storage device without replacing it. To power on the system under those circumstances, you must initiate a reconfiguration boot. For those instructions, see Initiating a Reconfiguration Boot .

|
Caution - Never move the system when the system power is on. Movement can cause catastrophic disk drive failure. Always power off the system before moving it. |
1. Establish a connection to the system console.
If you are powering on the system for the first time, connect a terminal to the serial management port. For more information on establishing a connection, refer to the Netra 240 Server Installation Guide (817-2698).
2. Connect the server to a power source.
Once connected, the server automatically goes into Standby power mode.
3. Turn on power to any peripherals and external storage devices you have connected to the server.
Read the documentation supplied with the device for specific instructions.
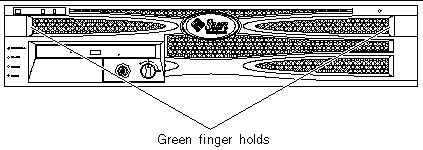
4. Grip the bezel at the two finger holds and rotate it down to its open position (FIGURE 2-4).
|
Note - You must open the front bezel to access the rotary switch. |
5. Set the rotary switch to the Normal or Diagnostics position (TABLE 2-2 and FIGURE 2-3).
6. Press the On/Standby button.
Verbose POST output is immediately displayed to the system console if diagnostics are enabled at power-on. The system console is directed to the serial and network management ports.
The system can take anywhere from 30 seconds to 5 minutes before text messages appear on the system monitor (if one is attached) or the system prompt appears on an attached terminal. The time depends on the system configuration (number of CPUs, memory modules, PCI cards, and console configuration) and the level of power-on self-test (POST) and OpenBoot Diagnostics tests being performed. The System Activity LED lights when the server is running under control of the Solaris platform.
7. Turn the rotary switch to the Locked position (FIGURE 2-3).
This prevents anyone from accidentally powering off the system.
To issue software commands, you need to set up an alphanumeric terminal connection, a local graphics monitor connection, an ALOM connection, or a TIP connection to the Netra 240 server.
Do not use this power-on procedure if you have just added any new internal option or external storage device, or if you have removed a storage device without replacing it. To power on the system under those circumstances, you must initiate a reconfiguration boot. For those instructions, see Initiating a Reconfiguration Boot .

|
Caution - Never move the system when the system power is on. Movement can cause catastrophic hard drive failure. Always power off the system before moving it. |
2. Type the following command:
1. Notify users that the system will be powered down.
2. Back up system files and data.
3. Grip the bezel at the two finger holds and rotate it down to its open position (FIGURE 2-4).
4. Ensure that the rotary switch is in the Normal or Diagnostics position (FIGURE 2-3).
5. Press and release the On/Standby button on the bezel (FIGURE 2-2).
The system begins an orderly software system shutdown.
6. Wait for the front panel green Activity LED to go out.
Refer to FIGURE 1-5 for the location of the Activity LED.
7. Disconnect both power input cables.
This is the only way to remove power from the server. Electrical power is present when the server is in Standby mode.

|
Caution - As long as the power input cables are connected, potentially hazardous energy is present inside the server. |
To issue software commands, set up an alphanumeric terminal connection, a local graphics monitor connection, ALOM connection, or a TIP connection to the Netra 240 server.
You can power off the system remotely either from the ok prompt or from the ALOM sc> prompt.
1. Before getting to the ok prompt, notify users that the system will be powered off.
2. Back up the system files and data, if necessary.
See Initiating a Reconfiguration Boot.
4. At the ok prompt, issue the following command:
2. Determine whether Solaris software is running by executing the showplatform ALOM command.
If Solaris software is running, then go to Step 3, otherwise go to Step 4.
3. If Solaris software is running, notify users that the system will be powered off and back up the system files and data, if necessary.
4. Issue the following command:
For more information on powering off from the ALOM system controller prompt including an immediate forced shutdown, refer to the Sun Advanced Lights Out Manager Software User's Guide for the Netra 240 Server (817-3174). Information on ALOM is also available in the Netra 240 Server System Administration Guide (817-2700).
After installing any new internal option or external storage device, you must perform a reconfiguration boot so that the operating system is able to recognize the newly installed device(s). In addition, if you remove any device and do not install a replacement device prior to rebooting the system, you must perform a reconfiguration boot in order for the operating system to recognize the configuration change. This requirement also applies to any component that is connected to the system I2C bus to ensure proper environmental monitoring.
This requirement does not apply to any component that is:
To issue software commands, you need to set up an alphanumeric terminal connection, a local graphics monitor connection, ALOM connection, or a TIP connection to the Netra 240 server.

|
Caution - Before you power on the system, make sure that the system doors and all panels are properly installed. |
This procedure assumes that you are accessing the system console using the serial management or network management port. For more information, refer to the Netra 240 Server Installation Guide (817-2698).
1. Turn on power to any external peripherals and storage devices.
Read the documentation supplied with the device for specific instructions.
2. Turn on power to the alphanumeric terminal or local graphics monitor, or log in to the ALOM.
3. Turn the rotary switch to the Diagnostics position.
Use the Diagnostics position to run power-on self-test (POST) and OpenBoot Diagnostics tests to verify that the system functions correctly with the new part(s) you just installed. See Controlling Server Power for information about rotary switch settings.
4. Press the On/Standby button to power on the system.
5. If you are logged in to the sc> prompt, switch to the ok prompt. Type:
6. When the system banner is displayed on the system console, immediately abort the boot process to access the system ok prompt.
The system banner contains the Ethernet address and host ID. To abort the boot process, use one of the following methods:
7. If you have not done so already, disable the OpenBoot automatic boot operation:
You must set the auto-boot? variable to false and issue the reset-all command to ensure that the system correctly initiates upon reboot. If you do not issue these commands, the system might fail to initialize, because the boot process was aborted in Step 6.
8. (Optional) Re-enable the OpenBoot automatic boot operation:
Set the auto-boot? variable back to true so that the system boots automatically after a system reset.
9. At the ok prompt, type the following command:
The boot -r command rebuilds the device tree for the system, incorporating any newly installed options so that the operating system recognizes them.
|
Note - The system banner takes anywhere from 30 seconds to 5 minutes to appear. The time depends on the system configuration (number of CPUs, memory modules, PCI cards) and the level of POST and OpenBoot Diagnostics tests being performed. For more information about OpenBoot configuration variables, see Appendix C. |
10. Turn the rotary switch to the Locked position.
This prevents anyone from accidentally powering off the system.
The system server status LED indicators provide power-on status information. For information about the system LEDs, see Front Panel Indicators.
If the system encounters a problem during startup, and the rotary switch is in the Normal position, restart the system in diagnostics mode to determine the source of the problem. Turn the rotary switch to the Diagnostics position and power cycle the system. See Powering Off the Server.
For information about system diagnostics tools, see the Netra 240 Server System Administration Guide (817-2700).
The cover detaches to provide access to the internal components of the server. You must remove the cover to perform the procedures in Chapter 4 and Chapter 5 of this document.

|
Caution - Disconnect both power input cables before carrying out this procedure. As long as the power input cables are connected, potentially hazardous energy is present inside the server. |

|
Caution - After servicing, replace and fasten the cover before plugging in the power input cables or turning power on. |
2. Using a No. 2 Phillips screwdriver, loosen the captive screw in the back of the cover (FIGURE 2-5).
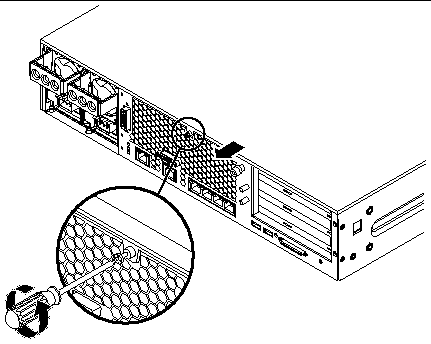
3. Grasp the cover at the sides and slide it toward the back of the server, then lift it up and away from the server (FIGURE 2-5).
4. Hang the cover on the Netra 240 server, if necessary (FIGURE 2-6).
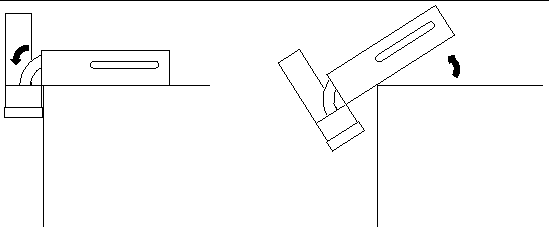
You must open the rotating service module to hang the cover on the server. Refer to Accessing Rotating Service Module Components for those instructions.
To hang the cover downward, open the front bezel by gripping the bezel at the two finger holds and rotating it down to its open position (FIGURE 2-4).
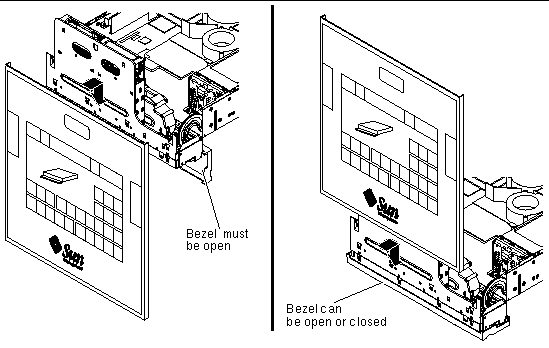
Following are the instructions for installing the cover back onto the server once you have completed the service procedures for the internal components.
1. Place the server cover back on top of the server and push it all the way forward.
Ensure that the rear corners of the cover are properly seated.
2. Tighten the captive screw in the back of the cover (FIGURE 2-5).
You must open the rotating service module to access certain server components. The procedures for servicing the rotating service module components are provided in Chapter 4.
See Removing the Server Cover.
3. Loosen the two captive screws on the rotating service module and open the module (FIGURE 2-7).
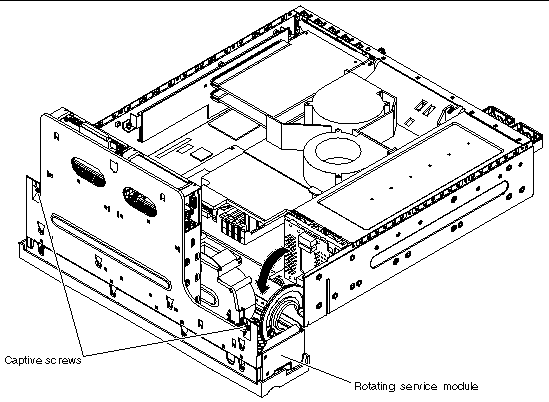
Following are the instructions for closing the rotating service module once you have completed the service procedures for the rotating service module components (see Chapter 4).
1. Close the rotating service module back into position.
2. Tighten the two captive screws to secure the rotating service module to the server (FIGURE 2-7).
3. Install the server cover back onto the server.
See Installing the Server Cover.
Whenever you work with the server's internal components, follow this procedure to prevent damage caused by static electricity.
See Removing the Server Cover.
3. Attach one end of the antistatic strap to the grounding point inside the server, and the other end to your wrist (FIGURE 2-8).
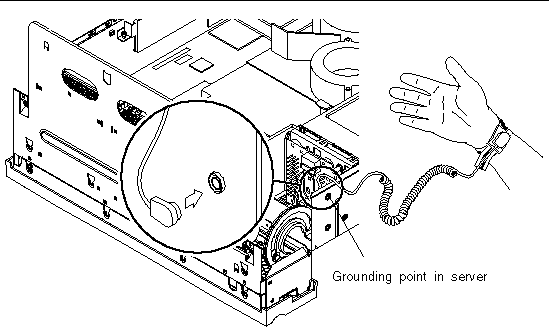
Copyright © 2004, Sun Microsystems, Inc. All rights reserved.