Sun HPC ClusterTools Software Installation Guide Software Installation Guide
|
| Sun HPC ClusterTools Software Installation Guide
|
| C H A P T E R 3 |
|
Using ctgui |
This chapter explains how to use the graphical interface tool, ctgui, to install, activate, deactivate, and remove Sun HPC ClusterTools software on cluster nodes.
If you plan to install the software in an NFS cluster configuration, keep the following in mind:
See Chapter 5 for instructions on setting up and installing software on NFS servers.
At the end of each operation, a panel will be displayed that summarizes the results of the operation on all the nodes. You can also view and save to a central location the log files from each node that participated in the operation.
1. Boot the cluster nodes and load a CD-ROM containing the Sun HPC ClusterTools software in each. For centralized installations, do this on the central host as well.
2. Log in as superuser on the system from which you will be initiating the command--the central host or directly on a cluster node if initiating the command locally.
3. If the Sun HPC ClusterTools software has not been installed yet, change directory to distribution/hpc/Product/Install_Utilities/bin, where distribution is the location of the Sun HPC ClusterTools software CD-ROM. Otherwise, go to Step 4.
4. If the software was previously installed and you intend to perform such tasks as activation, deactivation, or removal of the software, change directory to $INSTALL_LOC/SUNWhpc/HPC5.0/bin/Install_Utilities/bin, where $INSTALL_LOC is the location where the software was installed.
5. Start ctgui, which causes the first GUI panel, labeled Overview, to be displayed.
# ./ctgui |
|
Note - The ctgui is fully self-documented so you may not need to read the following procedure. However, it is provided as an optional reference. |
This procedure assumes that ctgui has been started and that you are looking at the first GUI panel.
1. Read the Overview text and click on the Next button to display the Select an Activity panel.
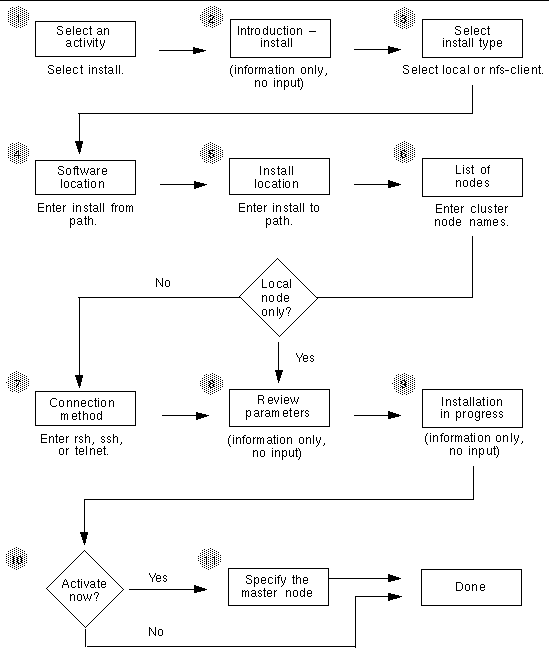
FIGURE 3-1 illustrates the sequence of ctgui panels for the Install activity, beginning with the Select an Activity panel.
2. Select Install and click on the Next button.
This begins a sequence of installation-related GUI panels, some of which request information about the installation to be performed.
3. Select the installation type - either local or nfs-client - and click on the Next button.
If you select local, the full set of Sun HPC ClusterTools software packages will be installed. If you select nfs-client, only the root packages will be installed.
4. Specify the location of the software to be installed. To install from the default location, simply click on the Next button.
5. Specify the location where you want the software to reside. To use the default location, /opt, click on the Next button.
6. Specify the cluster nodes on which the installation is to take place, using one of the following methods:
When you are satisfied with the list of target nodes, click the Next button.
7. If you specified only the local node in Step 6, skip this step. Otherwise, specify one of the following connection methods:
8. Review the values you have specified for the installation.
If you want to change any values, use the Back button to step through the previous panels until you are at the panel where you specified the value and make the desired change. Then use the Next button to return by steps to this panel.
When you are satisfied with the parameter values, click the Finish button to start the installation.
9. An Installation in Progress... panel will be displayed while the software is being installed.
Several forms of status information are provided on this panel:
You can also view the installation logs for each of the nodes.
When you are satisfied with the installation status, click the Next button, which causes the Is It Time to Activate panel to be displayed.
10. Click the Activate Now button to make the software ready for immediate use or click the Activate Later button to postpone the activation step to another time.
11. If you choose Activate Now, you will be asked to name the master node for the cluster.
This is one node in the cluster where the Sun CRE master daemons will run.
This completes the installation process on the cluster nodes. The next possibilities are:
If you are installing in an NFS cluster configuration and you have not yet set up and installed on the NFS server, go to Chapter 5 for instructions.
The procedure described below assumes that ctgui has been started and that you are looking at the first GUI panel.
|
Note - If Sun HPC ClusterTools 4 software is resident on the cluster nodes, it must be inactive before you perform the following procedure. |
If you are using the sunhpc_rhosts authentication method (the default), all the nodes to be activated must be listed in /etc/sunhpc_rhosts on the master node. To ensure that this file is created and automatically maintained by the installation tools, be certain to initiate the activation operation from the master node. If a node is not included in this file on the master node, it will not be activated.
When you want to activate Sun HPC ClusterTools software in an NFS configuration, you must ensure that the activation tool is able to locate the software mount point. You can do this in either of the following ways:
# mount server:/export/apps mount_point |
1. Read the Overview text on the first GUI panel and click on the Next button to display the Select an Activity panel.
2. Select Activate and click the Next button.
For this task, you will be asked to name a master node for the cluster and the list of nodes that are to be activated. If you are activating nodes from a central host, you will also be asked to specify the connection method.
If a master node was specified previously, enter that node's name.
4. Specify the cluster nodes that are to be activated.
5. If you specified only the local node in Step 4, skip this step. Otherwise, specify one of the following connection methods:
6. Review the values you have specified for the software activation.
If you want to change any values, use the Back button to step through the previous panels until you are at the panel where you specified the value and make the desired change. Then use the Next button to return by steps to this panel.
When you are satisfied with the activation parameter values, click the Finish button to start the activation.
7. An Activation in Progress... panel will be displayed.
The following status information is provided by this panel:
You can also view activation logs for each of the nodes.
When you are satisfied with the activation status, click the Next button, which causes Summary panel to be displayed. At this point, you can:
This procedure assumes that ctgui has been started and that you are looking at the first GUI panel.
1. Read the Overview text and click on the Next button to display the Select an Activity panel.
2. Select Deactivate and click the Next button.
For this task, you will be asked for the list of nodes that are to be deactivated. If you are deactivating from a central host, you will also be asked to specify the connection method.
3. Specify the cluster nodes that are to be deactivated.
4. If you specified only the local node in Step 3, skip this step. Otherwise, specify one of the following connection methods:
5. Review the values you have specified for the software deactivation.
If you want to change any values, use the Back button to step through the previous panels until you are at the panel where you specified the value and make the desired change. Then use the Next button to return by steps to this panel.
When you are satisfied with the deactivation parameter values, click the Finish button to start the deactivation.
6. A Deactivation in Progress... panel will be displayed.
The following status information is provided by this panel:
You can also view deactivation logs for each of the nodes.
When you are satisfied with the deactivation status, click the Next button, which causes Summary panel to be displayed. At this point, you can:
This procedure assumes that ctgui has been started and that you are looking at the first GUI panel.
1. Read the Overview text and click on the Next button to display the Select an Activity panel.
2. Select Remove and click the Next button.
For this task, you will be asked for the list of nodes that are to be removed. If you are removing nodes from a central host, you will also be asked to specify the connection method.
3. Specify the cluster nodes that are to be removed.
4. If you specified only the local node in Step 3, skip this step. Otherwise, specify one of the following connection methods:
5. Review the values you have specified for the software removal.
If you want to change any values, use the Back button to step through the previous panels until you are at the panel where you specified the value and make the desired change. Then use the Next button to return by steps to this panel.
When you are satisfied with the removal parameter values, click the Finish button to start the removal.
6. A Software Removal in Progress... panel will be displayed.
The following status information is provided by this panel:
You can also view node removal logs for each of the nodes.
When you are satisfied with the node removal status, click the Next button, which causes Summary panel to be displayed. At this point, you can:
| Sun HPC ClusterTools Software Installation Guide
| 817-0082-10 |
Copyright © 2003, Sun Microsystems, Inc. All rights reserved.
