| C H A P T E R 4 |
|
Connecting Ports |
This chapter provides procedures for cabling the Sun StorEdge 3310 SCSI array for single or dual-bus configurations and for connecting the array to power and to network devices.
The topics covered in this chapter are as follows:
Before you connect the Sun StorEdge 3310 SCSI array to the network, position the Sun StorEdge 3310 SCSI array in the rack or in the location where it will remain.

|
Caution - When you power off the array, wait five seconds before you power it back on. If you power the array off and on too quickly, a race condition might occur. |
The bezel on your array has two locks whose keys can be removed when the locks are in either the locked or open position. It is possible to reconfigure the locks so that the keys cannot be removed.

To change the locks so the keys cannot be removed, follow these steps:
1. Remove the bezel by gently pivoting the swing arms out of their ear sockets.
2. Make sure the key is in the locked position, with the pawl extending horizontally past the edge of the bezel.
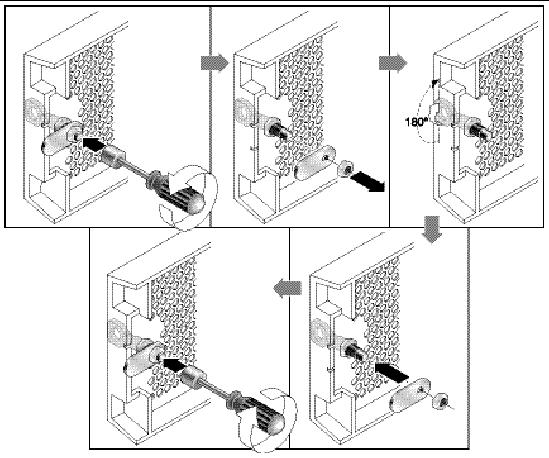
3. Hold the key in place and use a 12-mm or 3/8-inch nut driver to remove the locking nut that holds the pawl in place, as shown in the first panel of FIGURE 4-2.

|
Caution - Be sure to hold the key in place. Otherwise there is a risk of breaking the small tab on the lock that serves as a stop. |
4. Lift the pawl off the threaded part of the lock body, as shown in the second panel of FIGURE 4-2.
5. Set the pawl aside, face up, so that you can remember its orientation when you replace it.
6. Use the key to turn the lock 180 degrees, as shown in the third panel of FIGURE 4-2
7. Replace the pawl in the same orientation as before, as shown in the fourth panel of FIGURE 4-2.
8. Hold the key in place and use the nut driver to refasten the locking nut that holds the pawl in place, as shown in the fifth panel of FIGURE 4-2. Be careful not to cross-thread the nut.

|
Caution - Be sure to hold the key in place. Otherwise there is a risk of breaking the small tab on the lock that serves as a stop. |
|
Note - To convert your bezel locks back so that the keys can be removed, repeat this procedure. |
To rackmount the array in a rack or a cabinet, refer to the installation manual which is provided with the rack or refer to the Sun StorEdge 3000 Family Rack Installation Guide for 2U Arrays on the product website.
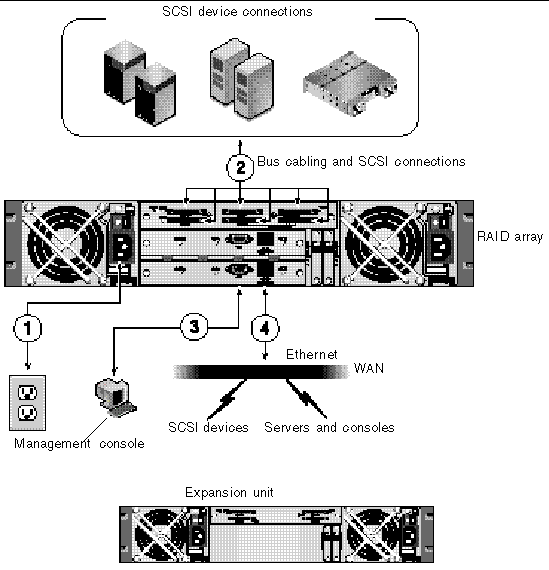
FIGURE 4-3 identifies a typical series of hardware connections used when you install an array. These procedures are designed for a redundant configuration.
When you connect the AC power cords, you should install the provided two cord locks at the same time. The provided AC cord locks are used to securely fasten the AC cable connectors.

|
Caution - For AC power: If the array is connected to AC power sources not within the designated 90-135, 180-265 VAC PFC range, damage might occur to the unit. |
|
Note - To ensure power redundancy, be sure to connect the two power supply modules to two separate circuits (for example, one commercial circuit and one UPS). |
To connect the AC power cords, perform the following procedure.
1. Obtain an appropriate AC power cable.
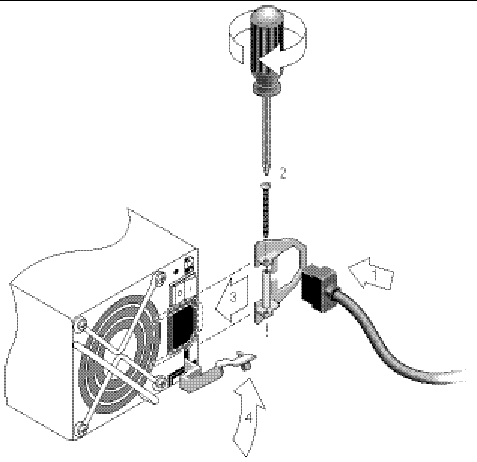
2. Use a screwdriver to remove the screw and cylindrical standoff from one of the two cord locks provided and set them aside for reassembly later.
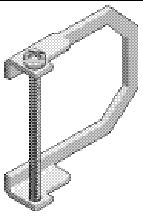
3. Slide the cord lock over the AC power connector.
4. Hold the cylindrical standoff between the two screw-holes on the flanges of the cord lock.
5. Insert the screw into the first screw-hole, through the standoff, and then into the threaded screw-hole on the other flange.
6. Tighten the screw with a screwdriver until the flanges bottom out on the cylindrical standoff.
7. Push the power cord into the power supply receptacle until it is firmly seated.
8. Push the green ejector handle forward until it is seated against the power supply.
9. Turn the thumbscrew of the green ejector handle clockwise until it is finger-tight to secure the handle and the cord lock.
10. Repeat this procedure for the second cord lock and second power cable.
Two CD power cords are packaged with each DC array. To connect the DC power cords, perform the following procedure.
1. Connect a DC power cable to the first power supply and to a power outlet.
|
Note - Use only the DC power cables provided with the array. |
2. Check the DC cable part number and wire labels carefully before connecting the cable to the source.

|
Caution - If the Sun StorEdge 3310 SCSI array is connected to DC power sources not within the designated -48V DC (-36 VDC to -72 VDC) range, damage might occur to the unit. |
|
Note - To ensure power redundancy, be sure to connect the two power supply modules to two separate circuits (for example, one commercial circuit and one UPS). |
|
Note - To extend the length of the DC power cable as needed, strip the last 1/4" of the cable, insert the stripped end into a provided Panduit tube, and crimp the tube. |
3. Tighten the cable locking screws to attach the cable securely to the power supply power outlet.
4. Connect the second power cable to the second power supply and to a second power outlet. Tighten the cable locking screws.
If one power supply fails, the second power supply automatically takes the full load.
The drive-bus configuration determines how drives and drive IDs are assigned to drive channels on the controller.
A single-bus configuration assigns all disk drive IDs in a controller to one channel (typically CH 0 for the RAID array and CH 2 for an expansion unit).
A dual-bus configuration assigns half the disk drive IDs to CH 0 and the other half to CH 2 in the RAID array, and then typically adds additional disk drive IDs to both CH 0 and CH2 when it is connected to an expansion unit.
The following figures illustrate the six standard cabling scenarios for a 12-drive array:
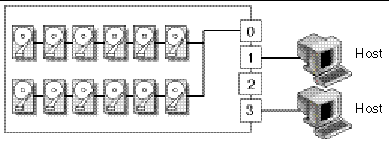
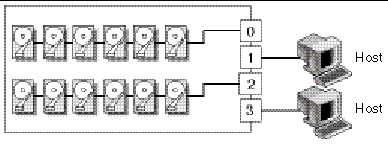
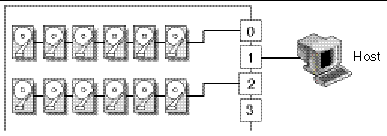
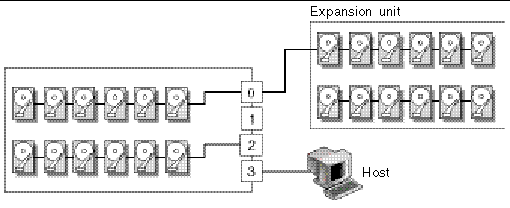
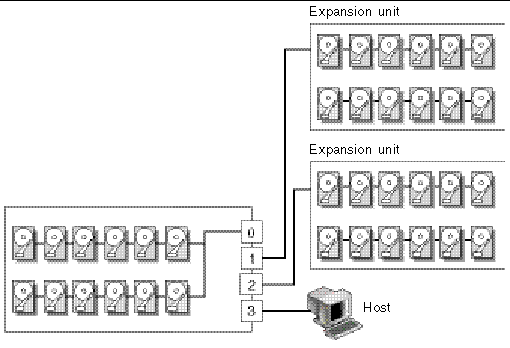
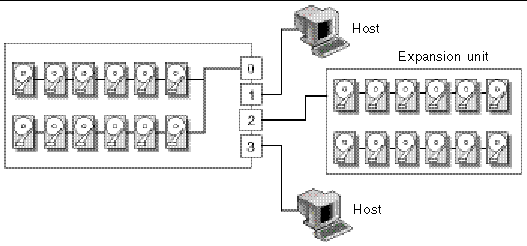
Each drive channel can have up to 16 IDs (0 to 15); ID 6 and ID 7 are reserved for internal connections.

|
Caution - A maximum of 16 drive IDs is allowed per channel. Therefore, do not connect a dual-bus Channel 0 or Channel 2 (6 IDs) to a single-bus expansion unit (12 IDs). |
On the rear panel of each RAID array on the I/O module, the SB icon is displayed next to the CH 0 port and the SCSI SNGL BUS CONF port to indicate where to connect the SCSI jumper cable for a single-bus configuration.
Similarly, the DB icon is displayed next to the CH 2 port and the dual-bus CONF port to indicate where to connect the SCSI jumper cable for a dual-bus configuration.

On the rear panel of each expansion unit, the SB icon indicates where to connect the jumper cable for a single-bus configuration.
The SCSI IDs are also displayed on the lower inside-front edge of the chassis. These IDs are automatically assigned and appear in the RAID controller status tables.

A single-bus I/O configuration assigns all disk drive IDs in a chassis (RAID or expansion unit) to one channel. This configuration is convenient administratively if you want to assign all RAID array drive IDs to Channel 0, and assign all expansion unit drive IDs to Channel 2.
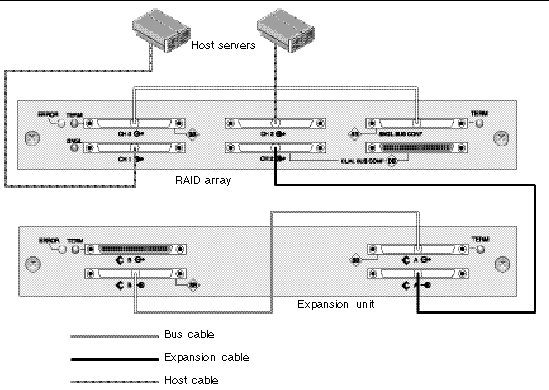
1. To configure a RAID array as a single-bus configuration, connect the SCSI jumper cable between the SCSI ports labeled "CH 0" and "SNGL BUS CONF" as shown in FIGURE 4-14. Tighten the cable jack screws with six full clockwise turns to ensure proper connection and operation.

2. To configure an expansion unit as a single-bus configuration, connect the SCSI jumper cable between SCSI ports (lower left and upper right ports), as shown in FIGURE 4-15. Tighten the cable jack screws with six full clockwise turns to ensure proper connection and operation.


|
Caution - A maximum of 16 drive IDs is allowed per channel. Therefore, with a 12-drive array, do not connect a dual-bus Channel 0 or Channel 2 (6 IDs) to a single-bus expansion unit (12 IDs). |
3. (Optional) Use a SCSI cable to connect a RAID array (Channel 2 port) to an expansion unit (lower right port). Tighten the cable jack screws with six full clockwise turns to ensure proper connection and operation.
The configuration in FIGURE 4-16 shows a RAID array with all its drive IDs assigned to Channel 0, and an expansion unit with all its drive IDs assigned to Channel 2.
Based on the configuration in FIGURE 4-16, the default drive IDs for a 12-drive single-bus configuration are shown in FIGURE 4-17 and FIGURE 4-18. (ID6 and ID7 are reserved for host HBAs.)
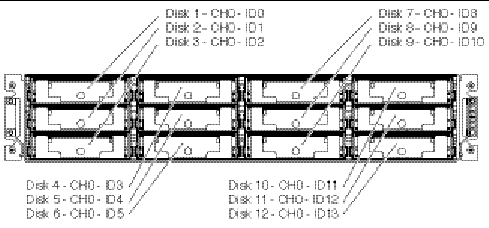
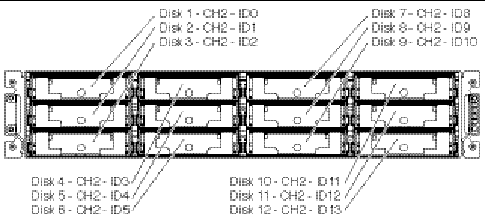
The IDs are also displayed on the lower inside-front edge of the chassis. These IDs are automatically assigned and appear in RAID controller status tables.
4. Connect your RAID array (SCSI Channel 1 and 3 ports) to one or two host servers with SCSI cables.
SCSI ports for Channels 1 and 3 are assigned as host channels by default.
A dual-bus configuration assigns half the disk drives to one channel and the other to the second channel. This configuration can be helpful when you want to use one set of drives to mirror the second set with drives configured as RAID 1 drives.
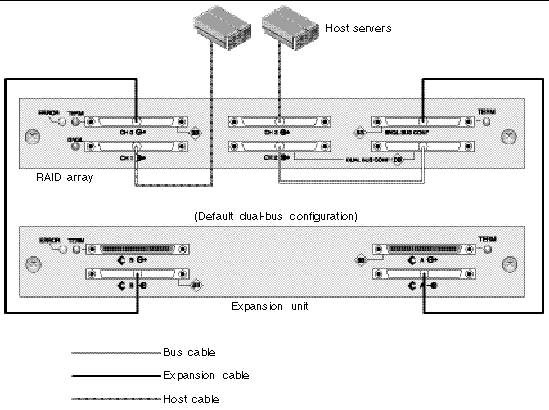
1. To create a dual-bus configuration on a RAID array, use the SCSI jumper cable to connect the CH 2 port to the dual-bus CONF port. Tighten the cable jack screws with six full clockwise turns to ensure proper connection and operation.
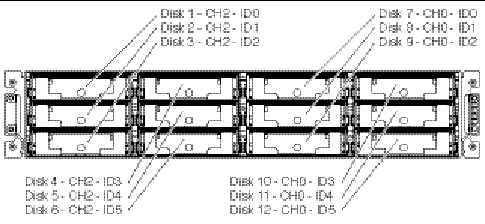
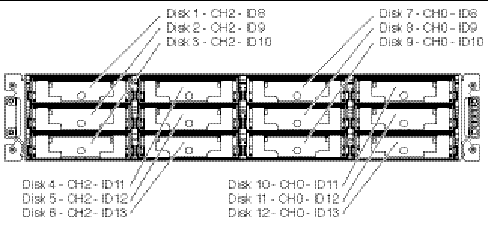
Six IDs are assigned to CH 0, and six IDs are assigned to CH 2 in a 12-drive array.

In the dual-bus JBOD configuration, no jumper cable is required.

2. (Optional) Use a SCSI cable to connect a RAID array (Channel 2 port) to an expansion unit lower input port. Tighten the cable jack screws with six full clockwise turns to ensure proper connection and operation.
In FIGURE 4-21, RAID Channels 0 and 2 are expanded into the expansion unit, in a dual-bus configuration set up on the RAID array and kept by default for the expansion unit.

|
Caution - A maximum of 16 drive IDs is allowed per channel. Therefore, with a 12-drive array, do not connect a dual-bus Channel 0 or Channel 2 (6 IDs) to a single-bus expansion unit (12 IDs). |
The dual-bus configuration shown in the preceding figure assigns half the IDs from the RAID and the expansion unit to Channel 0, and the other half to Channel 2. The "SINGLE BUS CONF" port is a Channel 2 expansion port in a dual-bus configuration.
3. Based on the configuration shown in FIGURE 4-21, the default drive IDs for a dual-bus configuration are shown in the following figures.
ID6 and ID7 are reserved and are not available for drive IDs.
The IDs are also displayed on the lower inside edge of the chassis. These IDs are automatically assigned and appear in RAID controller status tables.
4. Connect your RAID array (SCSI Channel 1 and 3 ports) to two host servers with SCSI cables.
SCSI ports for Channels 1 and 3 are assigned as host channels by default.
By default, channels 1 and 3 (the upper middle SCSI port and lower left SCSI port on the I/O module) are host channels. The array can be connected to a host in one of the two following ways:
Connect the array to one or two hosts with SCSI cables. Refer to the Sun StorEdge 3310 SCSI Array Release Notes for a list of the supported cables.
The SCSI specification states that the maximum bus length for Ultra3 SCSI is 25 meters for point-to-point connections. The Sun StorEdge 3310 RAID array uses a point-to-point implementation. Each channel connector is on a separate physical SCSI bus.
Taking into account the internal bus length of .5 meters and the internal SCSI bus length of the host, the maximum SCSI cable length to each channel connector could conceivably be around 24 meters when connected to an Ultra3 host adapter. However, the longest Ultra3 cable qualified by Sun is 10 meters in length.
When connected to single-ended host adapters, the longest support bus length per connector is 1.5 meters.
|
Note - When connecting to Ultra3 host adapters, all SCSI cables must be Ultra3-qualified. |
|
Note - If you connect two hosts to the same channel on a RAID array, you do not need to change the scsi-initiator-id of one host adapter. |
The SCSI specification states that the maximum bus length for Ultra3 SCSI is 12 meters for multidrop connections. The Sun StorEdge 3310 JBOD array uses a multidrop implementation. The ports on each channel are connected to the same physical SCSI bus.
Taking into account the internal bus length of .5 meters, and the internal SCSI bus length of the host, the maximum SCSI bus length for each channel is 12 meters when connected to an LVD host adapter.
You must ensure that the length of all cables to any connected nodes, as well as the internal bus length of .5 meters internal to the Sun StorEdge 3310 JBOD array and the internal bus length of the host, is less than 12 meters in total. Also include the jumper cable length of.3 meters if the JBOD is being used in a single-bus configuration.
The longest Ultra3 cable qualified by Sun is 10 meters in length.
When connected to single-ended host adapters, the longest supported bus length per channel is 1.5 meters.
Designed for a fully redundant configuration, a standard RAID array has Channels 0 and 2 assigned as drive channels, and Channels 1 and 3 assigned as host channels.
However, you can attach two expansion units to a RAID array if Channel 1 or Channel 3 is configured as a drive channel. For details, refer to Configuring SCSI Channels as Host or Drive (Optional).
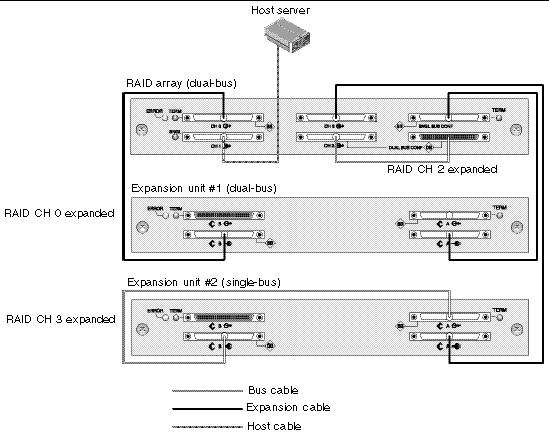
The following figures are examples of configurations that have a RAID array connected to two expansion units.

|
Caution - A maximum of 16 drive IDs is allowed per channel. Therefore, in a 12-drive array, do not connect a dual-bus Channel 0 or Channel 2 (6 IDs) to a single-bus expansion unit (12 IDs). |
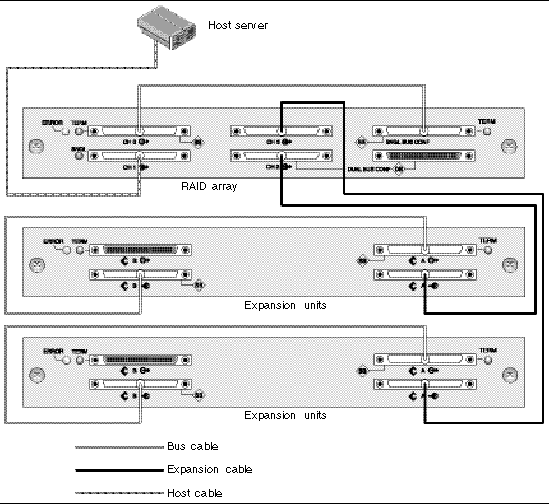
In FIGURE 4-24, the RAID array and the two expansion units have been set up for single-bus configuration; Channel 3 has been reassigned as a drive channel and connected to the second expansion unit.
In FIGURE 4-25, the RAID array and one expansion unit #1 have been configured for dual-bus configuration and expansion unit #2 is set for single-bus configuration; Channel 3 has been reassigned as a drive channel and connected to the second expansion unit. The RAID Channels 0 and 2 are connected and expanded into the dual-bus expansion unit #1, and RAID Channel 3 is connected and expanded into a single-bus expansion unit #2.
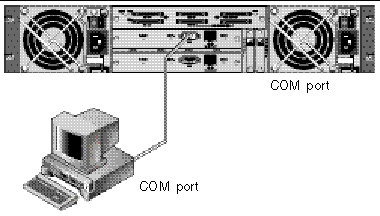
The RS-232 COM port on either controller module is used to configure and monitor the RAID array. It can be connected to a VT100 terminal or terminal emulation program, to a terminal server, or to the serial port of a Solaris host.
|
Note - You can also monitor and configure a RAID array over an IP network using the controller firmware or the Sun StorEdge Configuration Service software, once you have an IP address to the array. For details, see Setting Up Out-of-Band Management Over Ethernet and refer to the Sun StorEdge 3000 Family Configuration Service User's Guide. |
1. Use a serial cable to connect the COM port of the RAID array to a serial port on a workstation.
A DB9-to-DB25 serial cable adapter is provided to connect the serial cable to DB25 serial ports on workstations.
Make sure that a null modem cable can be attached to the host serial port. The null modem cable has serial signals swapped for connecting to a standard serial interface.
3. Set the serial port parameters on the workstation as follows:
For additional information on how to set serial port parameters on a specific server, see:
The controller Ethernet port offers interactive out-of-band management through two interfaces:
To access the array using the Ethernet port, you must set up an IP address for the controller. You can set the IP address by typing in values for the IP address itself, the subnet mask, and the IP address of the gateway manually. If your network is using a Reverse Address Resolution Protocol (RARP) server or a Dynamic Host Configuration Protocol (DHCP) server to automatically configure IP information for devices on the network, you can specify the appropriate protocol instead of typing in the information manually.
To set the IP address, subnet mask, and gateway addresses of the RAID controller, perform the following steps.
1. Access the array through the COM port on the controller module of the array.
2. From the Main Menu, choose "view and edit Configuration parameter" and press Return.
3. Choose "Communication Parameters" and press Return.
4. Choose "Internet Protocol (TCP/IP)" and press Return.
5. Choose the chip hardware address.
6. Choose "Set IP Address" and press Return.
7. Type in the desired IP address, subnet mask, and gateway address, choosing each menu option in turn.
If your network sets IP addresses using a RARP server, simply type RARP rather than an IP address and do not type in a subnet mask or gateway address. If your network sets IP addresses using a DHCP server, simply type DHCP rather than an IP address and do not type in a subnet mask or gateway address.
A confirmation prompt is displayed.
|
Note - You must reset the controller for the configuration to take effect. |
You are prompted to reset the controller.
10. Select Yes to reset the controller.
The controller takes a few minutes to format a small storage sector on each physical drive before logical drives can be successfully initialized.
The Ethernet connection enables you to configure and monitor RAID arrays and expansion units remotely by using telnet to access the firmware application on the array and by using the Sun StorEdge Configuration Service software.
There are two main reasons for placing your arrays on a private subnet:
Since it is not possible to predict the side-effects of all current and future security software products, place your Sun StorEdge 3310 SCSI arrays and Sun StorEdge 3510 FC arrays on private subnets.
1. To access the RAID Array over an Ethernet connection, first set the IP address of the RAID Array by using the RAID array's COM port and the RAID firmware. See Setting an IP Address for more information.
2. Connect the RAID array Ethernet port on each controller to the network.
|
Note - In a dual-controller RAID array, be sure to connect both Ethernet ports to the network, which will provide failover if one controller fails. |
3. To use the firmware application program from the host server, connect to the IP address of the RAID array controller with the following command:
Press Ctrl-L to refresh the screen and view the Main Menu.
|
Note - If you reset the controller during a telnet session, you are disconnected from the RAID array and need to use the telnet command to log back in to the array. |
4. To connect the Sun StorEdge Configuration Service program (on a host server) to a RAID array which has an IP address, refer to the out-of-band management instructions in the Sun StorEdge 3000 Family Software Configuration Service User's Guide.
In the following network illustration, two servers receive Sun StorEdge Configuration Service Alert messages, and a Sun StorEdge Configuration Service management console monitors and configures the RAID array as needed.
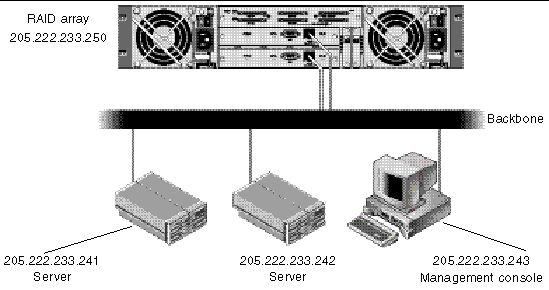
Refer to the Sun StorEdge 3000 Family Software Configuration Service User's Guide for more detailed information about using SNMP traps and MIBs to send information to other out-of-band management software.
Copyright © 2004, Sun Microsystems, Inc. All rights reserved.