| Sun Fire V20z and Sun Fire V40z Servers User Guide |
| Sun Fire V20z and Sun Fire V40z Servers User Guide |
| C H A P T E R 4 |
|
Maintaining the Sun Fire V20z Server |
This chapter describes how to add, replace and configure components in the Sun Fire V20z server after it has been set up.
For instructions on maintaining a Sun Fire V40z server, see Chapter 5.
This chapter contains the following sections:
To determine and isolate a faulty component, refer to Troubleshooting and Diagnostics.
Perform this procedure to observe safety guidelines when you are powering off the system and removing the cover for a maintenance procedure in this chapter:
1. If the system OS is running, perform a shutdown of the OS, then press and release the platform power button on the front panel.
2. Turn off all peripheral devices connected to the system.
3. Turn off the AC power switch on the rear panel of the server (see FIGURE 1-2). Leave the AC power cord attached to the power supply to maintain system ground.
4. Turn off power to any attached peripherals.
5. Label and disconnect all peripheral cables and all telecommunication lines connected to I/O connectors or ports on the back panel of the system.

|
Caution - The system's printed circuit boards and hard disk drives contain components that are extremely sensitive to static electricity. |
6. Before handling components, attach a wrist strap to a chassis ground (any unpainted metal surface).
7. Pull the cover toward the server front slightly, then press the cover latch release button with your right thumb (A) and slide the cover towards the rear of the chassis until it contacts the stop (B) (see FIGURE 4-1).
8. Lift the cover up and remove it.

When replacing the top cover on the Sun Fire V20z server after component installation, use caution to avoid damaging the cover or server components.
Remove all peripheral cables from PCI cards before installing the cover. If you install the server cover with PCI card cables installed, a lip on the edge of the server cover and the EMC foam gasket inside that lip may catch parts of the PCI card connectors and, in some cases, may deform the server cover seal or damage the connector latches.
Ensure that the power-supply cable is properly installed. The server cover may not close properly or may be difficult to close, and server performance may be affected if the power-supply cable is not properly installed.
The power-supply cable must be routed and pressed down such that it does not interfere with the cover installation. The power-supply cable must be tucked into a position such that the cable and its associated tie-wraps are not below the top surface of the power supply. Rotate the tie-wraps downward so that they do not protrude above the cable itself.
Refer to FIGURE 4-2 to locate components before performing the remove and replace procedures.
The following figure indicates the location of each of these components:
The ID assignments for the SCSI hard disk drives (HDDs) are as follows. Looking from the front of the server:
If you have a single SCSI HDD, the drive can be inserted in either slot. If you have two HDDs, the drive with the OS boot sector must be installed in the lowest-numbered slot among the populated slots.
The Solaris boot disk must be installed in SCSI slot 0.
The following sections highlight some issues that you should take into account when performing the remove-and-replace procedures in this chapter.
When the Sun Fire V20z server first shipped, the CPUs were at stepping version "C0". Since then, the CPUs have been stepped up to version "CG".
If you order an CPU X-option to add or replace a CPU in your server, do not mix CPUs of different stepping versions.
Before ordering a new or replacement CPU, verify the stepping version of your CPU(s) and then order the same stepping version.
To verify the stepping version of your CPU(s) in a local server (with KVM attached):
1. Power on or reboot your server.
A message similar to the following example appears on the screen, and the memory test begins.
PhoenixBIOS 4.0 Release 6.0
Copyright 1985-2002 Phoenix Technologies Ltd.
All Rights Reserved
Production RELEASE: System BIOS Revision = V1.30.5
SP Interface (PRS) Revision = 92
SP - BIOS Interface Active
xxxxxxxxxxxxxxxxxxxxxxxxxx
xx Sun Microsystems xx
xx Sun Fire V20z xx
xxxxxxxxxxxxxxxxxxxxxxxxxx
CPU = AMD Opteron(tm) Processor 250
2 Processors Detected, CG - CG
PCIX - Slot1: PCIX-66 Slot2: PCIX-133
4031M System RAM Passed
1024K Cache SRAM Passed
ATAPI CD-ROM: CD-224E
Mouse initialized
2. During the memory test, hit the Pause key.
3. Verify the stepping version of the CPUs in the line similar to the following:
2 Processors Detected, CG - CG
4. To continue with the reboot, hit any key.
To verify the stepping version of your CPU(s) in a remote server:
1. Enable the Serial-Over-Lan(SOL) feature on the SP.
For more information, refer to the "Serial Over LAN" section in Chapter 5 of the Sun Fire V20z and Sun Fire V40z Servers--Server Management Guide (817-5249).
2. Launch an SOL session from a SP command-line interface (CLI) to connect to the platform console remotely.
platform set console -s sp -e -S baud rate
where baud rate is the value that you have set in the BIOS settings; the default baud rate in the BIOS settings is 9600.
For example, if the baud rate in your BIOS settings is set to the default value, you would enter:
platform set console -s sp -e -S 9600
|
Note - This command changes the baud-rate value for the SP so that it matches the baud rate in the BIOS settings. It does not change the baud rate in the BIOS settings. |
5. Verify that the correct baud rate appears in the Speed column. Using the example above, the output should appear as follows:
Rear Panel Console Redirection Speed Pruning Log Trigger
SP Console Enabled 9600 No 244 KB
6. Activate the SOL session by running the following command.
7. Create another SP session from the SP prompt.
8. Re-cycle the power on the platform OS by running the following command.
|
Note - Before you re-cycle the power, ensure that the platform OS has been shut down gracefully, or that the file system has been synchronized using the sync command. |
platform set power state cycle -W -f
9. In the SP SOL session that you launched in Step 1, you now see the output of the BIOS CPU step screen.
For a sample of this output, see Step 1 in the previous procedure on "Invalid Cross-Reference Format".
10. During the server's memory self-test, terminate the remote session in order to pause the screen:
11. Verify the stepping version of the CPUs in the line similar to the following:
2 Processors Detected, CG - CG
The following CPUs have been upgraded to stepping version "CG" and qualified for the Sun Fire V20z server:
These CPUs require Sun's BIOS version 1.27.9 or later and other updated firmware components to be installed on the server.
The AMD CPU is shipped in a box that has the following AMD and Sun Microsystems part numbers printed on the side:
If the CPU box has these part numbers, you must install the updated Sun BIOS and firmware on the server for the new CPU to function properly.
Reboot your server. Once the server reboots, a text message appears; see the sample in Step 1 of the procedure Verifying the Stepping Version In a Local Server.
Ensure that, in the header of this text message, the System BIOS Revision indicates V1.27.9 or higher. If the BIOS version is lower than v1.27.9, you need to update the BIOS and firmware.
If necessary, you can download the updated Sun BIOS and firmware from the following site:
http://www.sun.com/servers/entry/v20z/downloads.html
To install BIOS and the other firmware components, follow the instructions in the ReadMe file that is found on the download page.
In the original release of the Sun Fire V20z server, there is a plastic guide on the motherboard for supporting a half-length PCI-X card. This support guide prevents you from installing a full-length PCI-X card in the PCI 1 (66 MHz) position.
In the updated release of the server, the guide has been removed. You can now install a full-length PCI-X card in this slot.
If you have an original release (chassis PN 380-0979) of the Sun Fire V20z server, you may receive as a Super CRU the updated release (chassis PN 380-1168) of the server.
If you want to install the Solaris 9 Operating System (OS) on an updated release of the Sun Fire V20z server, you must download a Solaris OS Install-Time Update (ITU) from the Web site. This ITU is required during OS installation.
The Solaris OS ITU is available from the product Web site:
http://www.sun.com/servers/entry/v20z/downloads.html
The following components are customer-replaceable units (CRUs):
|
Note - If a CRU needs replacement, you can request a replacement part from Sun. All parts replaced under warranty must be returned to Sun within 30 days of receipt of the replacement part. |
Follow these steps to remove and replace the I/O board:
1. Power off the system and remove the cover as described in Powering Off the Server and Removing the Cover.
2. Remove the two screws securing the I/O board to the motherboard (see FIGURE 4-3).

3. Lift the I/O board straight up to free it from the connector on the motherboard.
Installation is the reverse of this procedure.
|
Note - When reinstalling the I/O board, ensure that the connector on the I/O board is seated in the corresponding connector on the motherboard. |
4. Check the routing of all cables for obstructions and then reinstall the cover.
The following procedure describes how to add or replace a PCI card.

|
Caution - Do not use +5 V PCI cards or you may cause damage to the motherboard. Use only +3 V PCI cards in your Sun Fire V20z. |
1. Power off the system and remove the cover as described in Powering Off the Server and Removing the Cover.
2. Loosen the screw holding the card latch.
3. Raise the latch as far as possible and then pivot it towards the rear of the chassis.
4. Withdraw the PCI card slot cover (see FIGURE 4-4).

5. Remove the card riser assembly from the PCI card connector on the motherboard.
6. Install the PCI card in the riser assembly (see FIGURE 4-5).
7. Reinstall the riser and card in the connector on the motherboard.

8. Pivot the card latch up and then slide it down until it captures the PCI card bracket. Tighten the screw to secure the latch (refer to FIGURE 4-4).
9. Check the routing of all cables for obstructions and then reinstall the cover.
The following procedure describes how to remove and replace a SCSI hard disk drive (HDD) and carrier.
|
Note - SCSI HDDs are hot-pluggable in integrated-mirroring (IM) configurations. See Integrated Mirroring for more information.
|
1. If you are not using an integrated-mirroring configuration, you must power off the server before removing a HDD; it is not necessary to remove the cover. Power off the system as described in Powering Off the Server and Removing the Cover.
If you are using an IM configuration, start with Step 2.
2. Squeeze the release latch and carefully swing the arm to the left as far as it will go (see FIGURE 4-6).

3. Grasp the carrier bezel with both hands and carefully pull the carrier out of the drive bay.
1. Squeeze the release latch and carefully swing the arm to the left as far as it will go.
2. Grasping the body of the drive in both hands, carefully guide the connector end of the carrier into the drive bay, sliding the carrier into the bay until the arm engages and partially closes itself.
3. Push the arm forward and latch it to lock the carrier in place.
The following procedure describes how to replace the SCSI backplane.
1. Power off the system and remove the cover as described in Powering Off the Server and Removing the Cover.
2. Remove all hard disk drive (HDD) carriers:
a. Squeeze the release latch and swing the arm to the left as far as it will go.
b. Grasp the carrier bezel with both hands and carefully pull the carrier out of the
drive bay (see FIGURE 4-7).

3. Remove screw that holds the center air baffle and remove the baffle from the server (see FIGURE 4-8).

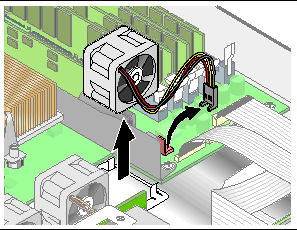
4. Remove the second processor fan from the right (see FIGURE 4-9):
a. Unplug the fan's power connector from the motherboard.
b. Pull the fan straight up to remove it from the fan tray.
|
Note - Note exactly which motherboard connector to which the fan was connected. If you plug a fan back into an incorrect connector, the SP cannot correctly identify a fan failure. |

5. Remove the CPU VRM for CPU 1 (left-hand CPU) by pulling it straight up, out of its sockets (see FIGURE 4-10).

6. Disconnect the 5-pin power cable, the small, flat cable and the 68-pin ribbon signal cable from the SCSI backplane (see FIGURE 4-11).

|
Caution - Use care with the small flat cables. They are extremely fragile. |

7. Unfasten the two screws that secure the backplane to the chassis.
8. Lift the SCSI backplane up and out of the chassis (see FIGURE 4-12).


|
Caution - Ensure that the fan wires are not pinched when reinstalling the backplane. |
9. Check the routing of all cables for obstructions and then reinstall the cover.
The following procedure describes how to replace the CD-ROM/DVD/Diskette drive assembly.
1. Power off the system and remove the cover as described in Powering Off the Server and Removing the Cover.
2. Unfasten the CD-ROM/DVD and diskette drive ribbon cables from the motherboard (see FIGURE 4-13).

|
Caution - Use care with the small flat cables. They are extremely fragile. |

3. Unfasten the single screw securing the CD-ROM/DVD/Diskette drive assembly to the chassis (see FIGURE 4-14).
4. Slide the assembly towards the rear of the chassis approximately 0.5" (12mm).


|
Caution - Move the assembly by grasping it by its sides. Do not to push on the
|
5. Lift the rear of the assembly slightly and withdraw it from the chassis.
Installation is the reverse of this procedure.
6. Check the routing of all cables for obstructions and then reinstall the cover.
The following procedure describes how to replace the operator-panel board and liquid crystal display (LCD). The operator-panel board is located beneath the CD-ROM/DVD/diskette drive assembly.
1. Power off the system and remove the cover as described in Powering Off the Server and Removing the Cover.
2. Remove the CD-ROM/DVD/diskette drive assembly (see CD-ROM/DVD/Diskette Drive Assembly).
3. Remove the two screws securing the LCD to the front panel (see FIGURE 4-15).

4. Unfasten the ribbon cable connecting the operator-panel board to the motherboard (see FIGURE 4-16).

|
Caution - Use care with the small, flat cables. They are extremely fragile. |

5. Remove the two screws and washers mounting the operator-panel board to the chassis (see FIGURE 4-16).
6. Carefully slide the operator-panel board towards the rear of the chassis as far as possible, to avoid damaging the switches. Raise the rear edge of the board first, and then lift the operator-panel board and LCD out of the chassis.
Installation is the reverse of this procedure.
7. Check the routing of all cables for obstructions and then reinstall the cover.
The following procedure describes how to replace the power supply.
1. Power off the system and remove the cover as described in Powering Off the Server and Removing the Cover.
2. Unfasten the three screws that secure the center and side air baffles. Lift the baffles straight up to remove them (see FIGURE 4-17).

3. Disconnect the three power-supply cables from the motherboard (see FIGURE 4-18).

4. Unfasten the single screw securing the power supply to the rear of the chassis (see FIGURE 4-19).

5. Slide the power supply toward the front of the chassis and lift it out of the chassis.
Installation is the reverse of this procedure.
6. Check the routing of all cables for obstructions and then reinstall the cover.
The following procedure describes how to replace a cooling fan.
1. Power off the system and remove the cover as described in Powering Off the Server and Removing the Cover.
2. Identify the fan(s) to be replaced.
3. If you are replacing a processor cooling fan, unfasten the single screw securing the center air baffle and lift the baffle away from the chassis (see FIGURE 4-20). Otherwise, continue with Step 4.

4. Unplug the fan's power connector from the motherboard (see FIGURE 4-21).
|
Note - Note exactly which motherboard connector to which the fan was connected. If you plug a fan back into an incorrect connector, the SP cannot correctly identify a fan failure. |
5. Pull the fan straight up to remove it from the fan tray.
Installation is the reverse of this procedure.
6. Check the routing of all cables for obstructions and then reinstall the cover.
The following procedure describes how to replace a memory voltage-regulator module (VRM).
1. Power off the system and remove the cover as described in Powering Off the Server and Removing the Cover.
2. Identify the memory VRM that must be replaced.
3. Remove a memory VRM by pressing down on the ejector bars at both ends of the socket (see FIGURE 4-22).

Installation is the reverse of this procedure.
4. Check the routing of all cables for obstructions and then reinstall the cover.
The following procedure describes how to remove and replace a CPU voltage-regulator module (VRM).
1. Power off the system and remove the cover as described in Powering Off the Server and Removing the Cover.
2. Identify the CPU VRM that must be replaced.
3. Remove the CPU VRM by pulling it straight up, out of its socket (see FIGURE 4-23).
|
Note - Do not rock the VRM, pull it straight up to avoid damaging its circuit board. |

1. Press the new VRM into the empty socket until it snaps into place, ensuring that the key in the CPU VRM aligns with the key in the connector.
|
Note - When installing a VRM, ensure that pin "A1", on the VRM, is aligned with the "A1" reference designation on the motherboard. |
2. Check the routing of all cables for obstructions and then reinstall the cover.
The following procedure describes how to remove and replace memory modules.
|
Note - Use the following information and rules when you use the procedures in this section to replace or add dual inline memory modules (DIMMs) to the server. |
1. Power off the system and remove the cover as described in Powering Off the Server and Removing the Cover.
2. Locate the memory-module connector in which you will install or replace a memory module.
3. Remove a memory module by pressing down on the ejector bars at both ends of the memory module's socket (see FIGURE 4-24).

1. Ensure that the memory-module socket's ejectors are open (rotated outward) to allow the new module to be inserted.
2. Align the memory module's edge connector with the alignment key and insert the memory module into the connector.
|
Note - The manufacturer and capacity of both modules in the same memory bank (Banks 1-4) must be identical. |
3. Check the routing of all cables for obstructions and then reinstall the cover.
The system battery is a common CR2032 calculator battery.
You might need to replace the system battery if you know it is weak or if after any period of AC power loss, the BIOS loses its CMOS settings or if the time-of-day clock loses time.
|
Note - The server BIOS will be reset to factory settings when you replace the battery. |

|
Caution - Do not attempt to open or service batteries. The battery contains lithium and can explode if not properly used, handled or disposed of. |
1. Power off the system and remove the cover as described in Powering Off the Server and Removing the Cover.
2. Remove the system battery by sliding it back and prying it from the holder (see FIGURE 4-25 for the location).

1. Install the new system battery into the holder with the side labeled "+" facing up.
2. Check the routing of all cables for obstructions and then reinstall the cover.
The following procedure describes how to remove and replace the following cables:
1. Five-pin cable connecting the SCSI backplane to the motherboard.
2. 68-pin ribbon cable connecting the SCSI backplane to the motherboard.
3. Flat cable connecting the SCSI backplane to the motherboard.
4. Flat cable connecting the CD-ROM/DVD to the motherboard.
5. Flat cable connecting the Diskette Drive to the motherboard.
6. Flat cable connecting the operator-panel board to the motherboard.
1. Power off the system and remove the cover as described in Powering Off the Server and Removing the Cover.
2. Identify the cable to be replaced (see FIGURE 4-26 for the location).

Refer to FIGURE 4-27 for the methods used to release cables from the various types of connectors.

|
Caution - Use caution when removing cables because they are fragile--the small, flat, flexible cables and cable connectors are extremely sensitive. |

3. Check the routing of all cables for obstructions and then reinstall the cover.
The following procedure describes how to replace a CPU. The Sun Fire V20z server supports both single- and dual-CPU configurations.
|
Caution - Before adding or replacing a CPU, ensure that you have read the information in No Mixing of CPU Stepping Versions and BIOS And Firmware Requirements For CPUs at Stepping Version "CG". |
1. Power off the system and remove the cover as described in Powering Off the Server and Removing the Cover.
2. Unfasten the single securing screw and remove the center air baffle (see FIGURE 4-28).

3. Unfasten the two securing screws and remove the heatsink securing clip (see FIGURE 4-29).


|
Caution - The heatsink can become extremely hot. Be sure it has had sufficient time to cool before handling. |
4. Twist the heatsink slightly to the right or left to break the seal with the thermal grease.
5. Lift the heatsink away from the CPU.
6. Place the heatsink upside-down on a flat surface to prevent the thermal grease from contaminating other components.
7. Pull the socket release lever up to the fully open, perpendicular position (see FIGURE 4-30).
8. Lift the CPU out of the socket, leaving the release lever in the open position.
|
Note - Ensure that no thermal grease that might be left from the heatsink comes into contact with the CPU socket or pins. |


|
2. Ensure that the socket release lever is in the fully open, perpendicular position (see FIGURE 4-31).
3. Align the small triangle, on the corner of the CPU, with the triangle on the corner of the socket.

4. Insert the CPU into the socket.
5. When the CPU is fully seated in the socket, rotate the socket release lever down until it snaps into place, securing the CPU in the socket.
6. Use the syringe to apply approximately 0.1 ML/CC of thermal grease in a circular pattern to the top of the CPU.
7. Gently distribute the thermal grease and remove any excess so that only an extremely thin, uniform layer remains. If any voids or crevices appear that could lead to air pockets, reapply the grease until you achieve a thin but compact consistency.
8. Use an alcohol pad to remove all thermal grease from the bottom of the heatsink.
9. Inspect the heatsink for dust and lint. Clean if necessary.
10. Ensure the foam strip under the heatsink area is intact and has not been removed, loosened or damaged. This foam strip is critical to proper air flow.
11. Carefully position the heatsink on the CPU, aligning it with the mounting posts to reduce movement after it makes initial contact with the layer of thermal grease.

|
Caution - If the heatsink is moved too much during its installation, the layer of thermal grease may become uneven, leading to component damage. |
12. After the heatsink is correctly aligned, reinstall the heatsink clips so that the longer tab points toward the fans.
13. Tighten the heatsink clip securing screws.
14. Replace the center air duct.
15. Check the routing of all cables for obstructions and then reinstall the cover.
The Super-CRU is a chassis that contains the motherboard and certain components. To install a Super-CRU, you must remove all of the CRUs from the system that you are replacing. Then, reinstall all of those components in the new Super-CRU chassis.
|
Note - The only CRU that is included in the Super-CRU is the operator-panel board and LCD assembly. All other components must be transferred from the old chassis to the new chassis. |
1. Power off the system and remove the cover as described in Powering Off the Server and Removing the Cover.
2. Remove the following components and reinstall them in the new Super-CRU chassis.
Refer to the appropriate instructions in this chapter to remove and replace each component. Also refer to FIGURE 4-2 for component locations.
FIGURE 4-32 shows the locations of the indicators, switches and jumpers on the motherboard. The tables in this section give detailed information about these components.

TABLE 4-3 defines the functions of the switches and jumpers shown in FIGURE 4-32.
|
Serial port: Pins 1+2 = SP console, Pins 2+3 = Platform port A |
|
|
Clear CMOS: Pins 1+2 = clear CMOS on next boot,
|
|
TABLE 4-4 defines the actions and meaning of the SP indicators shown in FIGURE 4-32.
TABLE 4-5 defines the function and meaning of the power indicators shown in FIGURE 4-32.
The location of the Clear-CMOS jumper (J110) on the Sun Fire V20z motherboard is shown below. This jumper can be used to clear the CMOS if the server hangs during certain conditions.

| Sun Fire V20z and Sun Fire V40z Servers User Guide | 817-5248-13 |
Copyright © 2004, Sun Microsystems, Inc. All Rights Reserved.