Prism 7.0 Software User's Guide 7.0 Software User's Guide
|
| Prism 7.0 Software User's Guide
|
| C H A P T E R 5 |
|
Visualizing Data |
This chapter describes how to examine the values of variables and expressions in your program. In addition, it describes how to find out the type of a variable and change its values.
This chapter consists of the following sections:
You can visualize either variables (including arrays, structures, pointers, etc.) or expressions. In addition, you can provide a context, so that the Prism environment handles the values of data elements differently, depending on whether they meet the conditions you specify.
The Prism environment provides two general methods for visualizing data:
Printing or displaying to the history region of the Command window of the Prism graphical user interface shows the numeric or character values of the data in standard fashion.
Printing or displaying to a graphical window creates a visualizer window, which provides you with various options for representing the data.
The Prism environment provides the following methods for choosing what to print or display:
In all cases, choosing Display adds an event to the event list, since displaying data requires an action to update the values each time the program is stopped. Note that, since Display updates automatically, the only way to keep an unwanted display window from reappearing is to delete the corresponding display event.
You create print events through the Event Table and the Events menu.
(prism all) set $radix = number
where number can be 2 (binary), 8 (octal), or 16 (hexadecimal). For example, this changes the default representation to hexadecimal:
By default, the Prism environment prints and displays values as decimal numbers.
You can override the default for an individual print or display operation. See To Print or Display From the Command Window and Using the Options Menu.
The default setting also affects the display of argument values in procedures in the call stack; see To Display the Call Stack.
Note these points in visualizing data:
This section describes the methods for printing and displaying data.
|
|
1. Perform one of the following:
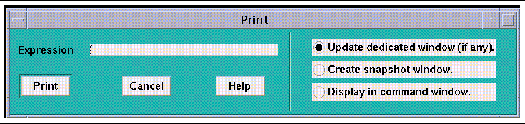
2. In the Expression box, enter the variable or expression whose value(s) you want to print.
Text selected in the source window appears as the default; you can edit this text.
The dialog boxes also allow selection of the window in which the values are to appear:
1. Select the variable or expression by dragging over it with the mouse or double-clicking on it.
To print without displaying the menu, press the Shift key while selecting the variable or expression.
2. Right-click the mouse to display a pop-up menu.
This displays a snapshot visualizer containing the value(s) of the selected variable or expression at that point in the program's execution.
This displays a visualizer that is automatically updated whenever execution stops.
|
Note - The Prism environment prints the correct variable when you choose it in this way, even if the scope pointer sets a scope that contains another variable of the same name. |
1. Select Print on the Events menu.
You can use the Events menu to define a print or display event that is to take place at a specified location in the program.
2. Fill out the fields in the Print dialog box.
The Print dialog box prompts for the variable or expression whose value(s) are to be printed, the program location at which the printing is to take place, and the name of the window in which the value(s) are to be displayed.
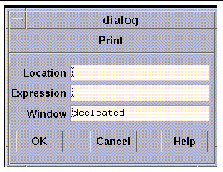
Predefined window names are dedicated, snapshot, and command. You can also specify custom names. The default window is dedicated. See To Redirect Output to a File for a discussion of these names.
The event is added to the Event Table. When the location is reached in the program, the value(s) of the expression or variable is printed.
The Display dialog box is similar, but it does not prompt for a location; the display visualizer will update every time the program stops execution.
You can use the Event Table to define a print or display event that is to take place at a specified location in the program.
 Click Print or Display in the Common Events buttons to create an event that will print or display data.
(prism all) print d2 on dedicated
The display command prints the value(s) of the variable or expression immediately and creates a display event so that the values are updated automatically whenever the program stops.
The commands have th e following syntax:
[where (expression)] command variable[, variable ...]
The optional where (expression) sets the context for printing the variable or expression.
command is either print or display, and variable is the variable or expression to be displayed or printed.
Redirection of output to a window via the on window syntax works slightly differently for display and print from the way it works for other commands; see To Redirect Output to a File for a discussion of redirection. Separate windows are created for each variable or expression that you print or display. Thus, the commands displyed in the following example create three windows, each of which is updated separately:
(prism all) display x on dedicated as colormap(prism all) display y/4 on dedicated as histogram(prism all) display [0:128:2]z on dedicated as text |
where name is the name of the register of interest. For example, this prints the contents of the program counter register:
See To Display the Contents of Registers for a list of register names supported by the Prism environment.
(prism all) where (expression) print variable
(prism all) where (expression) display variable
You can precede the print or display command with a where statement that can make elements of a variable or array inactive. Inactive elements are not printed in the Command window; Overview of Data Visualization describes how they are treated in visualizers. Making elements of a variable or array inactive is referred to as setting the context.
The expression must evaluate to true or false for every element of the variable or array being printed.
For example,this prints only the values of i that are greater than 0:
(prism all) where (i .gt. 0) print i
You can use certain Fortran intrinsics in the where statement. For example, this prints the element of a that has the largest value:
(prism all) where (a .eq. maxval(a)) print a
This is equivalent to the MAXLOC intrinsic function. See Writing Expressions in the Prism Environment for more information on writing expressions in the Prism environment.
Note that setting the context affects only the printing or displaying of the variable.
It does not affect the actual context of the program as it executes.
(prism all) print/radix variable
(prism all) display/radix variable
radix can be b (binary), d (decimal), x (hexadecimal), or o (octal).
For example, this prints the binary representation of pvar1 in the Command window:
The following example displays the hexadecimal values of pvar2 in a dedicated window:
(prism all) display/x pvar2 on dedicated
The default radix is decimal, unless you have used the set $radix command to change it; see To Change the Default Radix.
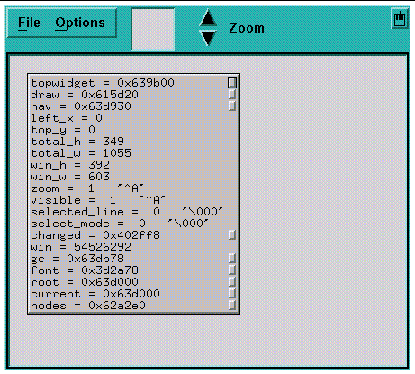
The window that contains the data being printed or displayed is called a visualizer. FIGURE 5-3 shows a visualizer for a three-dimensional array.
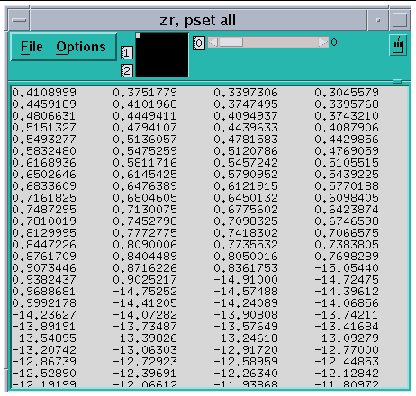
The visualizer consists of two parts: the data navigator and the display window. There are also File and Options pull-down menus.
The data navigator shows which portion of the data is being displayed and provides a quick method for moving through the data. The appearance of the data navigator depends on the number of dimensions in the data. It is described in more detail in Using the Display Window in a Visualizer.
The display window is the main part of the visualizer. It shows the data, using a representation that you can choose from the Options menu. The default is text; that is, the data are displayed as numbers or characters. FIGURE 5-3 is a Text visualizer. The display window is described in more detail in Using the Options Menu.
The File menu lets you save, update, or cancel the visualizer. The Options menu, among other things, lets you change the way values are represented. Both menus are described more fully later in this section.
The data navigator helps you move through the data being visualized. It has different appearances, depending on the number of dimensions in your data.
|
Note - If your data is a single scalar value, there is no data navigator. |
For one-dimensional arrays and parallel variables, the data navigator is the scroll bar to the right of the data. The numbers to the right of the buttons for the File and Options menus indicate the coordinates of the first element that is displayed. The elevator in the scroll bar indicates the position of the displayed data relative to the entire data set.
For two-dimensional data, the data navigator is a rectangle in the shape of the data, with the axes numbered. The white box inside the rectangle indicates the position of the displayed data relative to the entire data set. You can either drag the box or click at a spot in the rectangle. The box moves to that spot, and the data displayed in the display window changes.
For three-dimensional data, the data navigator consists of a rectangle and a slider, each of which you can operate independently. The value to the right of the slider indicates the coordinate of the third dimension. Changing the position of the bar along the slider changes which two-dimensional plane is displayed out of the
three-dimensional data.
For data with more than three dimensions, the data navigator adds a slider for each additional dimension.
You can change the way the visualizer lays out your data by changing the numbers that label the axes.
1. Click in the box surrounding the number.
It is highlighted, and an I-beam appears.
2. Type in the new number of the axis; you don't have to delete the old number.
The other axis number automatically changes. For example, if you change axis 1 to 2, axis 2 automatically changes to become axis 1.
The display window shows the data being visualized.
In addition to using the data navigator to move through the data, you can drag the data itself relative to the display window by holding down the left mouse button; this provides finer control over the display of the data.
To find out the coordinates and value of a specific data element, click it while pressing the Shift key. Its coordinates are displayed in parentheses, and its value is displayed beneath them. If you have set a context for the visualizer, you also see whether the element is active or inactive. Drag the mouse with the Shift key pressed, and you see the coordinates, value, and context of each data element over which the mouse pointer passes.
You can resize the visualizer to display more or less data either horizontally or vertically.
1. Click on File to pull down the File menu.
2. Perform one of the following:
Click on Options to pull down the Options menu. See FIGURE 5-4.
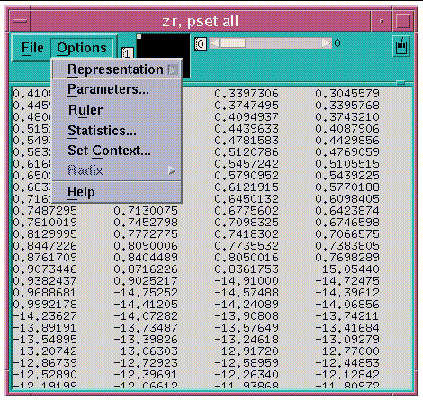
Choose Representation from the Options menu.
This displays another menu that gives the choices for how the values are represented in the display window. The choices are described below.
(prism all) set $viz = "representation"
By default, the Prism environment creates new visualizers with a Text representation. Set the Prism variable viz to control the representation that is applied when a new visualizer is created. Possible values are:
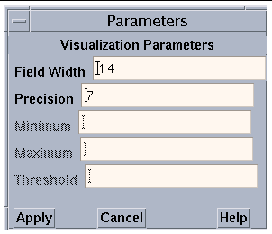
Choose Parameters from the Options menu.
This displays a dialog box in which you can change various defaults that the Prism environment uses in setting up the display window; see FIGURE 5-11. If a parameter is grayed out or missing, it does not apply to the current representation.
The parameters for all representations except the histogram representation are:
Choose Ruler from the Options menu.
This toggles the display of a ruler around the display window.
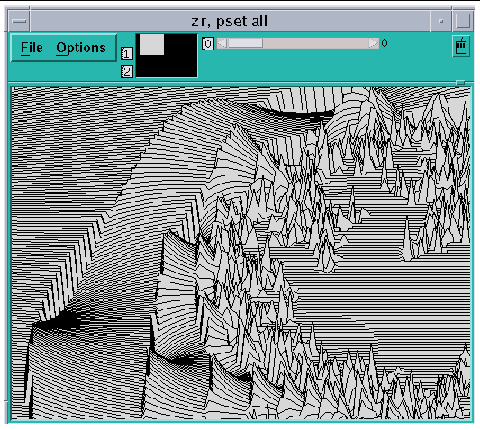
The ruler is helpful in showing which elements are being displayed. FIGURE 5-12 shows a three-dimensional threshold visualizer with the ruler displayed.
In the surface representation, the ruler cannot indicate the coordinates of elements in the vertical axis, since they change depending on the height of each element. However, you can press the Shift key and left-click to display the coordinates and value of an element.
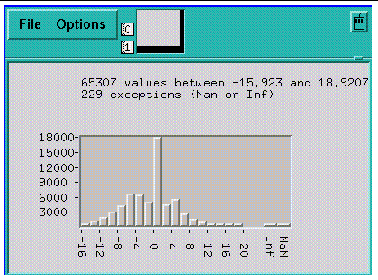
Choose Statistics from the Options menu.
This displays a window containing statistics and other information about the variable being visualized.
FIGURE 5-13 gives an example of the Statistics window.
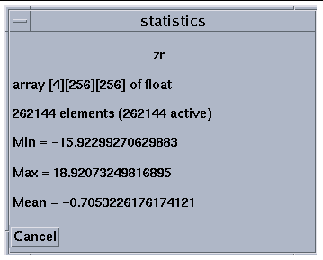
For complex numbers, the Prism environment uses the modulus.
Choose Set Context from the Options menu.
In this dialog box, you can specify which elements of the variable are to be considered active and which are to be considered inactive. Active and inactive elements are treated differently in visualizers:
FIGURE 5-14 shows the Set Context dialog box.
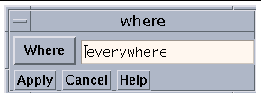
By default, all elements of the variable are active; this is the meaning of the keyword "everywhere" in the text-entry box. To change this default, you can either edit the text in the text-entry box directly or click on the Where button to display a menu. The choices in the menu are everywhere and other:
In the text-entry box, you can enter any valid expression that will evaluate to true or false for each element of the variable.
The context you specify for printing does not affect the program's context; it just affects the way the elements of the variable are displayed in the visualizer.
Click on Apply to set the context you specified. Click on Cancel or press the Esc key to close the dialog box without setting the context.
1. Choose Radix from the Options menu.
2. Choose one of the items from the submenu: Decimal, Hex, Octal, and Binary.
If you created a visualizer by issuing a display command, it automatically updates every time the program stops execution.
If you created the visualizer by issuing a print command, its display window is grayed out when the program resumes execution and the values in the window are outdated.
Choose Update from the visualizer's File menu.
Choose Close from the File menu, or press the Esc key.
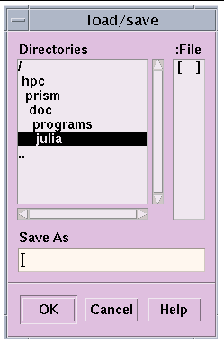
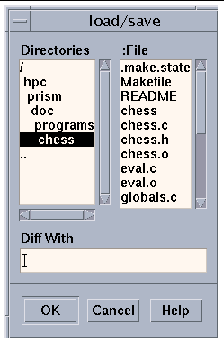
You can save the values of a variable or expression to a file. You can subsequently visualize these values and compare them with the values in another visualizer , such as the same variable later in the run or the same variable during a separate execution of the program. This provides a convenient way of spotting changes in the values of a variable.
You can save the values of a variable or expression to a file for later use.
This intrinsic brings values you have saved to a file back into the Prism environment.
(prism all) command varfile("filename")
where filename is the name of the file that contains the values you want to restore.
|
Note - The varfile intrinsic is not available for use with message-passing programs. |
You can use the varfile intrinsic anywhere you could have used the original variable or expression that you saved to a file. For example, if you saved x:
(prism all) print varfile("x.var")
Note that this enables you to save a variable's values, then print them during a later Prism session without having a program loaded or running.
You can compare a variable or expression whose values have been saved in a file with another version of the variable or expression. This comparison could take place later in the same run of the program, during a subsequent run, or even during a second, simultaneous Prism session.
You can also compare the values with those of another variable, as long as both variables have the same base type (that is, you can't compare integers with
floating-point numbers).
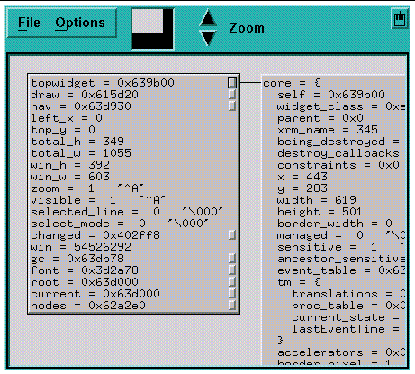
If you print a pointer or a structure (or a structure-valued expression) in a window, a structure visualizer appears.
FIGURE 5-17 shows an example of a structure visualizer.
The structure you specified appears inside a box; this is referred to as a node. The node shows the fields in the structure and their values. If the structure contains pointers, small boxes appear next to them; they are referred to as buttons. Left-click on a node to select it. Use the up and down arrow keys to move between buttons of a selected node.
You can perform various actions within a structure visualizer, as described below.
You can expand scalar pointers in a structure to generate new nodes. (You cannot expand a pointer to a parallel variable.)
|
|
For information about navigating through visualizers, see Using the Data Navigator in a Visualizer and Using the Display Window in a Visualizer.
FIGURE 5-19 shows part of a complicated structure visualizer after zooming out.
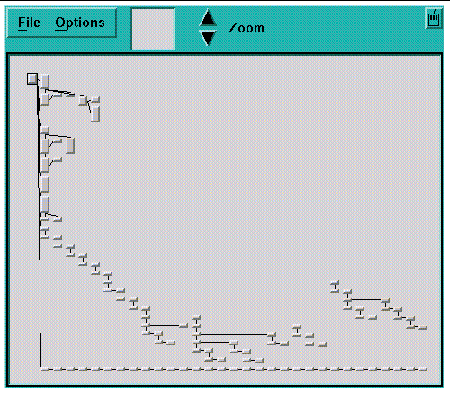
The selected node is centered in the display window whenever you zoom in or out.
To delete a node (except the root node):
Deleting a node also deletes its children (if any).
Note the following about pointers in structure visualizers:
You can provide a special function for each of your data types that makes additional information available to the Prism environment. This enables the Prism environment to more accurately display the contents of structures with that data type.
For C or C++ union types, you can identify which member of the union is valid. For a pointer within a structure, you can specify that the pointer's target is an array of elements, rather than a single element, and you can further specify the length of the array.
You must embed these specifications within a special function that is compiled and linked with your program being debugged. The function has the following form:
void prism_define_typename (typename *ptr);
where typename is the tag name of one of your structure data types. Thus, you can define one such function for each of your data types. When the Prism environment displays a variable of this type, it checks whether an augmentation function is defined in the program. If so, the Prism environment calls the function, passing a pointer to the instance of the structure being displayed. Your function can then look at the instance to choose valid union members and to size dynamic arrays.
You communicate this information back to the Prism environment with the following call, which is defined in /opt/SUNWhpc/include/prism.h:
void prism_add_array(char *member_name, int len);
This call specifies that the pointer named member_name points to an array of length len. The pointer's name, member_name, is the name of one of the members of the structure, as found in the structure's C or C++ declaration. The results are undefined if member_name is not a pointer.
The following call specifies that the member named name is of type union, and of all the members of this union, only valid_member is to be displayed.
void prism_add_union(char *name, char *valid_member);
Both name and valid_member are names as found in the C or C++ declarations of structs or unions.
|
|
Link your program with the library libprism.so in /opt/SUNWhpc/lib.
Sun HPC ClusterTools software currently supplies both static (libprism.a) and shared versions (libprism.so) of this library. Use the shared version.
|
Note - To prevent the occurrence of unresolved references in applications shipped to your customers, ensure that you remove all references to libprism.so in your production code. |
Assume that data in the declaration below is a dynamic array:
struct Vector { int len; int *data; }; |
The function you write looks like this:
#include "prism.h" void prism_define_Vector(struct Vector *v) { prism_add_array("data", v->len); } |
Assume that the member type discriminates the union value in this example:
enum Type {INT, DOUBLE}; struct Value { enum Type type; union { int i; double d; } value; }; |
The function you write would look like this:
#include "prism.h" void prism_define_Value(struct Value *val) { if (val->type == INT) prism_add_union("value", "i"); else prism_add_union("value", "d"); } |
There are no restrictions on the number or order of calls to prism_add_union and prism_add_array.
1. Update the structure visualizer by left-clicking Update in the File menu.
2. Close the structure visualizer by left-clicking Close in the File menu.
The Prism environment provides several methods for finding out the type of a variable.
1. Select Whatis from the Debug menu.
The Whatis dialog box appears; it prompts for the name of a variable.
This displays the information about the variable in the Command window.
The Prism environment treats name as a type name.
1. Select a variable by double-clicking it or by dragging over it while pressing the left mouse button.
2. Hold down the right mouse button.
3. Choose Whatis from this menu.
Information about the variable appears in the Command window.
(prism all) whatis [type] variable
If you specify a type (struct, class, enum, or union) before the name of the variable, the Prism environment treats variable as a type name. The type keywords resolve ambiguities where there are types and variables with the same name.
The Prism environment displays information about the variable in the Command window. In this example, the whatis command is used with variable primes:
whatis primes logical primes(1:999) |
(prism all) assign variable = value
This assigns new values to a variable or an array.
assigns the value 0 to the variable x. You can put anything on the left-hand side of the statement that can go on the left-hand side in the language you are using --
for example, a variable or a Fortran array section.
If the right-hand side does not have the same type as the left-hand side, the Prism environment performs the proper type coercion.
This changes the radix of a value in the Prism environment. The value can be a decimal, hexadecimal, or octal number. Precede hexadecimal numbers with 0x; precede octal numbers with 0 (zero). The base can be D (decimal), X (hexadecimal), or O (octal). The Prism environment prints the converted value in the Command window.
For example, to convert 100 (hex) to decimal, issue this command:
The Prism environment responds:
To print the names and values of all local variables in a function or procedure, specify its name. If you omit the function name, dump uses the current function. If you specify a period, dump prints the names and values of all local variables in the functions in the stack.
The Prism environment enables you to print simple arrays by section. The following examples assume the following declarations and code:
(prism all) print array-name[section-specifier]
(prism) print a[1:5:2] a[1:5:2] = (1:3) 1 3 5 |
(prism all) print pointer[section_specifier]
Specify a section when printing the pointer.
(prism all) print pa[1:5:2] pa[1:5:2] = (1:3) 1 3 5 |
(prism all) *pointer[section_specifier]
If the array element is a pointer, then the Prism environment enables you to dereference the section.
(prism all) *par[1:5:2] = (1:3) 8 6 4 |
(prism all) print ((type*)pointer)[section _specifier]
(prism all) print ((double*)ptr)[1:4:2] ((double*)ptr)[1:4:2] = (1:2) 1.100000000000000 3.100000000000000 |
Currently, the Prism environment supports only one level of dereferencing.
The Prism environment does not support:
(prism all) print **(appi[0:1])
Although the Prism environment allows one level of dereferencing for sections, the Prism environment does not support indexing. Thus, the Prism environment allows:
but the Prism environment does not allow:
(prism all) print par[1:5:2][0]
When you print or display an object in the Prism environment, the data are shown for all processes in the pset you specify. If you do not include a pset qualifier, the current pset will be the source. Choosing the Print or Display selection from the Debug menu prints or displays data for processes in the current pset.
If there is only one process in the pset, the visualizer that is displayed is no different from the visualizer you would see in the scalar mode of the Prism environment.
If the pset contains more than one process, the Prism environment adds a dimension to the visualizer. The extra dimension represents the processes in the set. For example, if the variable is scalar, the Prism environment displays a one-dimensional array that represents the value of the variable in each process. If you are printing a one-dimensional array, the Prism environment uses a two-dimensional visualizer.
For C programs, axis 0 represents the processes. For Fortran 77 programs, the highest-numbered axis represents the processes.
The Prism environment can aggregate data from multiple processes only if the expression has the same size and number of dimensions in each process; if it doesn't, the Prism environment prints an error message.
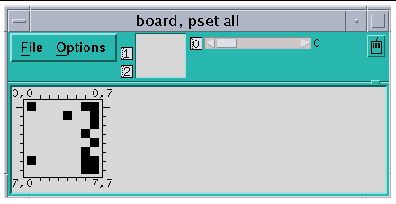
In the example shown in FIGURE 5-20, the variable board is an 8x8 array (representing a chess board); the current pset contains four processes. Therefore, the Prism environment displays a three-dimensional visualizer. Axis 0 represents the processes. The figure shows the values of board in the first process in the set. You drag the white bar in the slider portion of the data navigator to display the values in the other processes in the set. (Note that, for a two-dimensional Fortran array, where axis 3 would represent the processes, you might want to rearrange the display axes so that axis 3 is on the slider. You can do this by clicking in the box to the left of the slider and changing the number to a 3.)
Printing to the history region or in the commands-only mode of the Prism environment works the same way. Axis 0 represents the processes. Here is a portion of the history-region output for the data shown below:
The elements of axis 0 do not necessarily correspond to the numbers of the processes they represent. For example, if you were visualizing a variable in pset
(1, 3, 5, 7), element 0 of axis 0 would represent process 1, element 1 would represent process 3, and so forth.
The Prism environment provides a Cycle visualizer window you can use to display the values of a variable in the cycle pset. See The cycle Pset for more information.
(prism all) print variable on cycle
The Prism environment displays a window containing the value of variable in the current process of the current pset. If you then issue the cycle command or otherwise cycle through the members of the cycle pset, this window automatically updates to display the value of x in the next member of the set. This provides a convenient way of examining a particular variable in a series of processes.
The Prism MPI queue visualizer allows you to examine message queues created by your Sun MPI program. The visualizer shows you the status of messages generated by nonblocking send and receive routines that have not been reaped by a call to MPI_Test or MPI_Wait.
By showing you the state of the queue, detailing the messages that have not completed, the Prism environment gives you clues regarding where your program's logic can be tuned.
The Prism queue visualizer also shows you unexpected receive routines, indicating performance or correctness problems:
In addition to viewing the status of messages, you can also view the contents of the messages themselves to ensure that the correct data was transmitted.
Choose the MPI Msgs selection under the Prism Debug menu.
This selection is available only when a program linked to the Sun MPI library has been loaded into the Prism environment. See FIGURE 5-21 for an example.
Each row of messages displayed in the message queue window corresponds to a process rank, numbered from zero. The following sections describe how each part of the MPI queue visualizer window affects the display of messages.
Choose an item from the View menu.
This selects the queues to visualize. You can view three classes of MPI queues for each rank:
You can view queues only when a rank has stopped. Otherwise, the visualizer displays the label running for that rank. Prism reevaluates the queue every time the rank stops.
Click the Zoom buttons to navigate through four levels of message detail.
By default, the MPI queue visualizer opens at zoom level three. Examples of the zoom levels are illustrated in FIGURE 5-21 through FIGURE 5-24.
FIGURE 5-21 shows a single pixel per message. This zoom level is useful when examining very large MPI jobs.
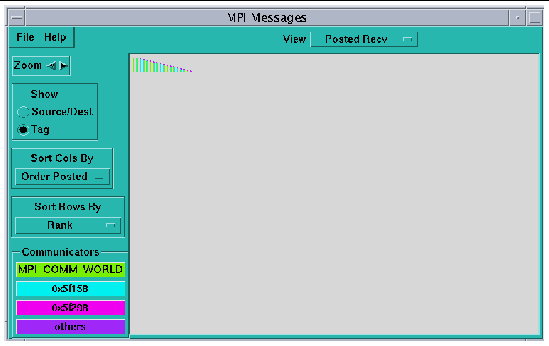
FIGURE 5-22 shows a simple box per message. The size of the box increases with the size of the message.
FIGURE 5-23 shows a single label on a message. Clicking the buttons on the Show menu toggles the labels. Label choices are Source/Destination and Tag.
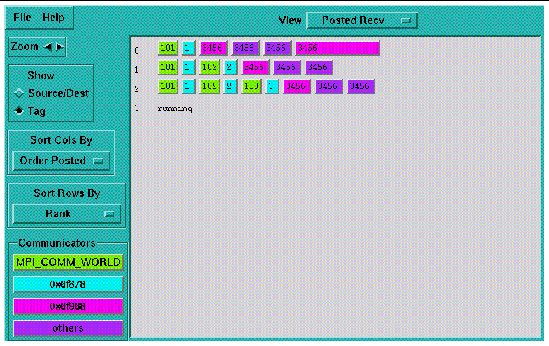
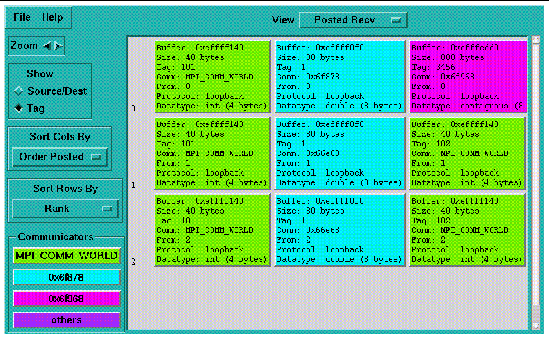
FIGURE 5-24 shows the entire message.
Click the toggle buttons under Show on the MPI queue visualizer.
This controls the value of the message labels:
Clicking the Show toggle buttons affects the display of messages at zoom level three only.
Choose selections from the Sort Rows By and Sort Cols By option menus.
These sort messages by row or by column using the criteria listed in TABLE 5-2 and TABLE 5-1.
|
Sort rows from the smallest to the largest process rank (the default). |
|
|
Sort by the sum of the sizes, in bytes, of all messages for each rank. |
The MPI queue visualizer does not scale message labels to exactly correspond to the size of the messages they represent. Collections of labels of small messages can appear disproportionately large when compared to the label of a single, very large message, even when the number of bytes in the single large message exceeds the total size of the collection of smaller messages.
This opens the Message dialog box, shown in FIGURE 5-25.
The fields in the Message dialog box are described in TABLE 5-3.
|
The MPI tag argument passed in the call to post the message. |
|
|
The name of the MPI communicator in which the message belongs, or the communicator's address if it is unnamed. Click on the Communicator View button to display the Communicator dialog box. |
|
|
The rank of the destination of the message. Prism displays this field only for posted sends. |
|
|
The rank of the sender of the message. Prism displays this field only for posted receives or unexpected receives. |
|
|
The implementation method by which the message has been sent. Possible values are: loopback, shared memory, RSM, and TCP. |
|
|
The MPI data type of the message, with the size of a single data type element in bytes. If this is a user-defined data type, click on the Data Type View button to display the Data Type dialog box. See To Display Data Types for more information about the Data Type dialog box.The View button is available only for user-defined data types. |
|
|
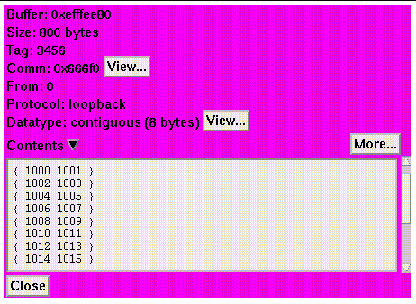
The contents of the message. Click on the triangular button to open or close the contents area. Click on More repeatedly to scroll through the message. |
When the Message dialog box displays a posted receive, it displays the value of the buffer address as null (indicating that no buffer has been allocated) and disables the Contents button.
When the Message dialog box displays an unexpected receive, it shows the delivered message with no data type. This characteristic is due to MPI design, since a posted receive declares the data type. Here too, the Contents button is disabled, and the visualizer displays the value of the buffer address as null.
The Prism environment displays MPI Communicators in the Communicators region of the MPI queue visualizer window. The visualizer does not display all the communicators that have been created in an MPI program; rather, it displays only communicators referenced by currently posted messages. Thus, if no messages are visible, the visualizer displays no communicators.
The Prism environment displays as many as three distinct communicators. Each communicator is color coded, and messages are drawn using the color of their communicator. If more than three communicators are present, then the excess are grouped together under a single color labeled Others.
Set the following X resources in the Prism application defaults file:
For information about modifying values in the Prism applications defaults file, see Changing Prism Environment Defaults.
Press any of the Communicator buttons.
This reveals the Communicator dialog box.
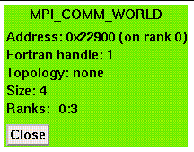
FIGURE 5-26 shows the Communicator dialog box, which includes the information described in TABLE 5-4.
Click on the Datatype View button in a Message dialog box.
FIGURE 5-27 shows the Data Type dialog box.
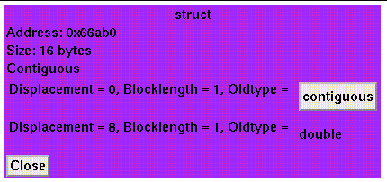
The fields in the Data Type dialog box are described in TABLE 5-5.
You can use the mpimsgs command to display (in text format) message queues created by a Sun MPI program. The Prism environment displays the messages in the output window, sorting the messages by rank. The fields of each message are displayed, including message size, tag, to (or from), comm (communicator), protocol, and data type.
Specify send to view Posted Sends, recv to view Posted Receives, or urecv to view Unexpected Receives. Specify the verbose option to display more details about the communicator and to display the contents of the message. For example,
(prism all) mpimsgs send verbose pset foo
The following example shows a typical message with the verbose option enabled,
In a multiprocess Sun MPI program, a parallel array is an array whose elements may be distributed among the processes of the program. The Prism environment can extract the global dimensionality and distribution information from these arrays and manipulate them as single entities. For the purpose of this discussion, arrays that are not distributed (arrays that belong in their entirety to a single process) are referred to as regular arrays.
Sun S3L's parallel array syntax is based on array handles, which define the properties of the parallel array.
By default, the Prism environment recognizes an array handle as a simple variable. In Fortran 77 and Fortran 90, the array handle is a variable of type integer*8. In C, the array handle is type S3L_array_t.
The following examples assume the code in CODE EXAMPLE 5-1:
Note that, before using the type command, the whatis command reports that the Sun S3L array handle, a, has been declared an integer*8.
(prism all) whatis array-handle
This shows that the array handle, a, is a variable of type integer*8:
(prism all) whatis a integer*8 a |
(prism all) type data-type array-handle
This identifies array-handle as a Sun S3L parallel array and specifies its basic data type. Basic data types are int, float, double, complex8, and complex16.
The example below executes the type command, associating the Sun S3L handle, a, with the data type, float, the same type used to declare the element type of the Sun S3L array in your program:
(prism all) type float a "a" defined as "float a" |
(prism all) print array_handle
(prism all) display array_handle
At this point, the Prism environment recognizes a as a Sun S3L array. You could now use the Prism environment's print command to display the values of a, as illustrated in the following example:
(prism all) print a a = (0:1,0) 0.000000 1.000000 (0:1,1) 0.1000000 1.100000 (0:1,2) 0.2000000 1.200000 |
In all respects, you could use a as you would use any array in the Prism environment. In the following example, you use a as an array variable:
(prism all) assign a=9 (prism all) print a a = (0:1,0) 9.000000 9.000000 (0:1,1) 9.000000 9.000000 (0:1,2) 9.000000 9.000000 |
Sun S3L arrays are distributed across multiple processes, with all processes having the same global view of the array. Since a has the same content for all processes, the Prism environment prints the values of the array only once.
However, when the Prism environment prints a regular array, it prints the values of the array separately for each process or pset. For regular arrays, the values of the array can differ in each process, since every process has its own copy.
In the following example, larr is a regular array with each process having its own copy of the array:
The Prism environment also prints expressions involving Sun S3L parallel arrays only once, unless they include a variable in the user program. The following example shows the S3L array, a, in an expression that does not include any other variables. Since the values of a are the same for all processes, its contents are printed only once.
However, if you use a Sun S3L array in an expression that includes a variable, the Prism environment replicates the array on each process and then evaluates the array separately on each process. The following example adds the variable w to a. The Prism environment prints the results for both processes.
(prism all) print layout arrayname
This returns the numbers of the nodes on which the data elements of an S3L array are located. In the following example, the print layout command is used with array a:
(prism all) print layout a layout (a) = a = (0:1,0) 0 0 (0:1,1) 0 0 (0:1,2) 1 1 |
where a is an S3L array. You can use the Fortran 90 array-section syntax described in Using Array-Section Syntax in C Arrays to specify a range of elements within an S3L array.
(prism all) print layout(arrayname) on window as representation
This creates a visualizer that is the same size and shape as S3L array arrayname. The visualizer displays the rank of the process that is holding each value.
Note that you can specify any visualizer representation--for example, text, dither, or colormap--to display the layout graphically.
| Prism 7.0 Software User's Guide
| 817-0088-10 |
Copyright © 2003, Sun Microsystems, Inc. All rights reserved.
