Implementing Off-Host Processing Solutions
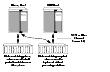
As shown in Example Implementation of Off-Host Processing,, by accessing snapshot volumes from a lightly loaded host (shown here as the OHP host), CPU- and I/O-intensive operations for online backup and decision support do not degrade the performance of the primary host that is performing the main production activity (such as running a database). Also, if you place the snapshot volumes on disks that are attached to different host controllers than the disks in the primary volumes, it is possible to avoid contending with the primary host for I/O resources.
Example Implementation of Off-Host Processing
Click the thumbnail above to view full-sized image.
The following sections describe how you can apply off-host processing to implement regular online backup of a volume in a private disk group, and to set up a replica of a production database for decision support. Two applications are outlined in the following sections:
These applications use the Persistent FastResync and disk group move, split and join features of VxVM in conjunction with volume snapshots.
 Note
A volume snapshot represents the data that exists in a volume at a given point in time. As such, VxVM does not have any knowledge of data that is cached by the overlying file system, or by applications such as databases that have files open in the file system. If the fsgen volume usage type is set on a volume that contains a VERITAS File System (VxFS), intent logging of the file system metadata ensures the internal consistency of the file system that is backed up. For other file system types, depending on the intent logging capabilities of the file system, there may potentially be inconsistencies between in-memory data and the data in the snapshot image.
Note
A volume snapshot represents the data that exists in a volume at a given point in time. As such, VxVM does not have any knowledge of data that is cached by the overlying file system, or by applications such as databases that have files open in the file system. If the fsgen volume usage type is set on a volume that contains a VERITAS File System (VxFS), intent logging of the file system metadata ensures the internal consistency of the file system that is backed up. For other file system types, depending on the intent logging capabilities of the file system, there may potentially be inconsistencies between in-memory data and the data in the snapshot image.
For databases, a suitable mechanism must additionally be used to ensure the integrity of tablespace data when the volume snapshot is taken. The facility to temporarily suspend file system I/O is provided by most modern database software. For ordinary files in a file system, which may be open to a wide variety of different applications, there may be no way to ensure the complete integrity of the file data other than by shutting down the applications and temporarily unmounting the file system. In many cases, it may only be important to ensure the integrity of file data that is not in active use at the time that you take the snapshot.
Implementing Online Backup
This section describes a procedure for implementing off-host online backup for a volume in a private disk group. The intention is to present an outline of how to set up a regular backup cycle by combining the Persistent FastResync and disk group split and join features of VxVM. It is beyond the scope of this guide to describe how to configure a database to use this procedure, or how to perform the backup itself.
To back up a volume in a private disk group, use the following procedure.
-
Use the following command on the primary host to see if the volume is associated with a version 20 data change object (DCO) and DCO volume that allow instant snapshots and Persistent FastResync to be used with the volume:
# vxprint -g volumedg -F%instant volume
This command returns on if the volume can be used for instant snapshot operations; otherwise, it returns off.
Note
If the volume was created under VxVM 4.0 or a later release, and it is not associated with a new-style DCO object and DCO volume, follow the procedure described in Preparing a Volume for DRL and Instant Snapshots.
If the volume was created before release 4.0 of VxVM, and it has any attached snapshot plexes or it is associated with any snapshot volumes, follow the procedure given in Upgrading Existing Volumes to Use Version 20 DCOs.
-
Use the following command on the primary host to check whether FastResync is enabled on the volume:
# vxprint -g volumedg -F%fastresync volume
This command returns on if FastResync is enabled; otherwise, it returns off.
If FastResync is disabled, enable it using the following command on the primary host:
# vxvol -g volumedg set fastresync=on volume
-
Add one or more snapshot plexes to the volume using this command:
# vxsnap -g volumedg addmir volume [nmirror=N]
By default, one snapshot plex is added unless you specify a number using the nmirror attribute. For a backup, you should usually only require one plex.
Alternatively, create a new volume for use as the snapshot volume as described in Creating a Volume for Use as a Full-Sized Instant Snapshot.
-
If you added one of more snapshot plexes to the volume in step 3, create a full-sized instant snapshot volume, snapvol, by running the following command on the primary host:
# vxsnap -g volumedg make source=volume/newvol=snapvol/nmirror=N
This version of the vxsnap make command uses the nmirror attribute to specify how many snapshot plexes of the original volume are to be broken off to form the snapshot volume.
If you created a new volume, snapvol, for use as the snapshot volume in step 3, use the following version of the vxsnap command to create the snapshot on this volume:
# vxsnap -g volumedg make source=volume/snapvol=snapvol
Note
By default, VxVM attempts to avoid placing snapshot mirrors on a disk that already holds any plexes of a data volume. However, this may be impossible if insufficient space is available in the disk group. In this case, VxVM uses any available space on other disks in the disk group. If the snapshot plexes are placed on disks which are used to hold the plexes of other volumes, this may cause problems when you subsequently attempt to move a snapshot volume into another disk group as described in Moving DCO Volumes Between Disk Groups. To override the default storage allocation policy, you can use storage attributes to specify explicitly which disks to use for the snapshot plexes. See Creating a Volume on Specific Disks for more information.
If a database spans more than one volume, you can specify all the volumes and their snapshot volumes using one command, as shown in this example:
# vxsnap -g dbasedg make source=vol1/newvol=snapvol1/nmirror=1 \
source=vol2/newvol=snapvol2/nmirror=1 \
source=vol3/newvol=snapvol3/nmirror=1
Note
This step sets up the snapshot volumes ready for the backup cycle, and starts tracking changes to the original volumes. When you are ready to make a backup, proceed to step 5.
-
On the primary host, suspend updates to the volume that contains the database tables. The database may have a hot backup mode that allows you to do this by temporarily suspending writes to its tables.
-
On the primary host, refresh the plexes of the snapshot volume using the following command:
# vxsnap [-g diskgroup] refresh snapvol source=volume syncing=yes
For a database, multiple snapshots can be refreshed in parallel, as shown in this example:
# vxsnap -g dbasedg refresh snapvol1 source=vol1 snapvol2 \
source=vol2 snapvol3 source=vol3 syncing=yes
-
On the primary host, if you temporarily suspended updates to the volume by a database in step 5, release all the tables from hot backup mode.
-
The snapshot volume must be completely synchronized before you can move it into another disk group. You can use the vxsnap syncwait command to wait for the synchronization to complete as shown here:
# vxsnap -g volumedg syncwait snapvol
The vxsnap syncwait command exits with an exit code of zero when the snapshot volume has been synchronized with the parent volume.
If required, you can use the following command to verify whether the V_PFLAG_INCOMPLETE flag is set on a volume:
# vxprint [-g diskgroup] -F%incomplete snapvol
This command returns the value off if synchronization of the volume, snapvol, is complete; otherwise, it returns the value on.
You can also use the vxsnap print command to check on the progress of synchronization as described in Displaying Instant Snapshot Information (vxsnap print).
-
On the primary host, use the following command to split the snapshot volume into a separate disk group, snapvoldg, from the original disk group, volumedg:
# vxdg split volumedg snapvoldg snapvol
-
On the primary host, deport the snapshot volume's disk group using the following command:
# vxdg deport snapvoldg
-
On the OHP host where the backup is to be performed, use the following command to import the snapshot volume's disk group:
# vxdg import snapvoldg
-
The snapshot volume is initially disabled following the split. Use the following commands on the OHP host to recover and restart the snapshot volume:
# vxrecover -g snapvoldg -m snapvol
# vxvol -g snapvoldg start snapvol
-
On the OHP host, back up the snapshot volume. If you need to remount the file system in the volume to back it up, first run fsck on the volume. The following are sample commands for checking and mounting a file system:
# fsck -F vxfs /dev/vx/rdsk/snapvoldg/snapvol
# mount -F vxfs /dev/vx/dsk/snapvoldg/snapvol mount_point
Back up the file system at this point, and then use the following command to unmount it.
# umount mount_point
-
On the OHP host, use the following command to deport the snapshot volume's disk group:
# vxdg deport snapvoldg
-
On the primary host, re-import the snapshot volume's disk group using the following command:
# vxdg import snapvoldg
-
On the primary host, use the following command to rejoin the snapshot volume's disk group with the original volume's disk group:
# vxdg join snapvoldg volumedg
-
The snapshot volume is initially disabled following the join. Use the following commands on the primary host to recover and restart the snapshot volume:
# vxrecover -g volumedg -m snapvol
# vxvol -g volumedg start snapvol
The contents of the snapshot volume are now ready to be refreshed.
Repeat steps 5 through 17 each time that you need to back up the volume.
Implementing Decision Support
This section describes a procedure for implementing off-host decision support for a volume in a private disk group. The intention is to present an outline of how to set up a replica database by combining the Persistent FastResync and disk group split and join features of VxVM. It is beyond the scope of this guide to describe how to configure a database to use this procedure.
To set up a replica database using the table files that are configured within a volume in a private disk group, use the following procedure.
-
Use the following command on the primary host to see if the volume is associated with a version 20 data change object (DCO) and DCO volume that allow instant snapshots and Persistent FastResync to be used with the volume:
# vxprint -g volumedg -F%instant volume
This command returns on if the volume can be used for instant snapshot operations; otherwise, it returns off.
Note
If the volume was created under VxVM 4.0 or a later release, and it is not associated with a new-style DCO object and DCO volume, follow the procedure described in Preparing a Volume for DRL and Instant Snapshots.
If the volume was created before release 4.0 of VxVM, and has any attached snapshot plexes, or is associated with any snapshot volumes, follow the procedure given in Upgrading Existing Volumes to Use Version 20 DCOs.
-
Use the following command on the primary host to check whether FastResync is enabled on a volume:
# vxprint -g volumedg -F%fastresync volume
This command returns on if FastResync is enabled; otherwise, it returns off.
If FastResync is disabled, enable it using the following command on the primary host:
# vxvol -g volumedg set fastresync=on volume
-
Prepare the OHP host to receive the snapshot volume that contains the copy of the database tables. This may involve setting up private volumes to contain any redo logs, and configuring any files that are used to initialize the database.
-
Add one or more snapshot plexes to the volume using this command:
# vxsnap -g volumedg addmir volume [nmirror=N]
By default, one snapshot plex is added unless you specify a number using the nmirror attribute. For applications where data redundancy is required for the volume that contains the replica database, specify a number greater than the default value of 1.
Alternatively, create a new volume for use as the snapshot volume as described in Creating a Volume for Use as a Full-Sized Instant Snapshot.
-
If you added one of more snapshot plexes to the volume in step 4, create a full-sized instant snapshot volume, snapvol, by running the following command on the primary host:
# vxsnap -g volumedg make source=volume/newvol=snapvol/nmirror=N
This version of the vxsnap make command uses the nmirror attribute to specify how many snapshot plexes of the original volume are to be broken off to form the snapshot volume.
If you created a new volume, snapvol, for use as the snapshot volume in step 4, use the following version of the vxsnap command to create the snapshot on this volume:
# vxsnap -g volumedg make source=volume/snapvol=snapvol
Note
By default, VxVM attempts to avoid placing snapshot mirrors on a disk that already holds any plexes of a data volume. However, this may be impossible if insufficient space is available in the disk group. In this case, VxVM uses any available space on other disks in the disk group. If the snapshot plexes are placed on disks which are used to hold the plexes of other volumes, this may cause problems when you subsequently attempt to move a snapshot volume into another disk group as described in Moving DCO Volumes Between Disk Groups. To override the default storage allocation policy, you can use storage attributes to specify explicitly which disks to use for the snapshot plexes. See Creating a Volume on Specific Disks for more information.
If a database spans more than one volume, you can specify all the volumes and their snapshot volumes using one command, as shown in this example:
# vxsnap -g dbasedg make source=vol1/newvol=snapvol1/nmirror=2 \
source=vol2/newvol=snapvol2/nmirror=2 \
source=vol3/newvol=snapvol3/nmirror=2
Note
This step sets up the snapshot volumes, and starts tracking changes to the original volumes. When you are ready to create a replica database, proceed to step 6.
-
On the primary host, suspend updates to the volume that contains the database tables. The database may have a hot backup mode that allows you to do this by temporarily suspending writes to its tables.
-
On the primary host, refresh the plexes of the snapshot volume using the following command:
# vxsnap [-g diskgroup] refresh snapvol source=volume syncing=yes
The syncing=yes attribute starts a synchronization of the snapshot in the background.
For a database, multiple snapshots can be refreshed in parallel, as shown in this example:
# vxsnap -g dbasedg refresh snapvol1 source=vol1 snapvol2 \
source=vol2 snapvol3 source=vol3 syncing=yes
-
On the primary host, if you temporarily suspended updates to the volume by a database in step 6, release all the tables from hot backup mode.
-
The snapshot volume must be completely synchronized before you can move it into another disk group. You can use the vxsnap syncwait command to wait for the synchronization to complete as shown here:
# vxsnap -g volumedg syncwait snapvol
The vxsnap syncwait command exits with an exit code of zero when the snapshot volume has been synchronized with the parent volume.
If required, you can use the following command to verify whether the V_PFLAG_INCOMPLETE flag is set on a volume:
# vxprint [-g diskgroup] -F%incomplete snapvol
This command returns the value off if synchronization of the volume, snapvol, is complete; otherwise, it returns the value on.
You can also use the vxsnap print command to check on the progress of synchronization as described in Displaying Instant Snapshot Information (vxsnap print).
-
On the primary host, use the following command to split the snapshot volume into a separate disk group, snapvoldg, from the original disk group, volumedg:
# vxdg split volumedg snapvoldg snapvol
-
On the primary host, deport the snapshot volume's disk group using the following command:
# vxdg deport snapvoldg
-
On the OHP host where the replica database is to be set up, use the following command to import the snapshot volume's disk group:
# vxdg import snapvoldg
-
The snapshot volume is initially disabled following the split. Use the following commands on the OHP host to recover and restart the snapshot volume:
# vxrecover -g snapvoldg -m snapvol
# vxvol -g snapvoldg start snapvol
-
On the OHP host, check and mount the snapshot volume. The following are sample commands for checking and mounting a file system:
# fsck -F vxfs /dev/vx/rdsk/snapvoldg/snapvol
# mount -F vxfs /dev/vx/dsk/snapvoldg/snapvol mount_point
-
On the OHP host, use the appropriate database commands to recover and start the replica database for its decision support role.
When you want to resynchronize the snapshot volume' s data with the primary database, you can refresh the snapshot plexes from the original volume as described below:
-
On the OHP host, shut down the replica database, and use the following command to unmount the snapshot volume:
# umount mount_point
-
On the OHP host, use the following command to deport the snapshot volume's disk group:
# vxdg deport snapvoldg
-
On the primary host, re-import the snapshot volume's disk group using the following command:
# vxdg import snapvoldg
-
On the primary host, use the following command to rejoin the snapshot volume's disk group with the original volume's disk group:
# vxdg join snapvoldg volumedg
-
The snapshot volume is initially disabled following the join. Use the following commands on the primary host to recover and restart the snapshot volume:
# vxrecover -g volumedg -m snapvol
# vxvol -g volumedg start snapvol
The contents of the snapshot volume are now ready to be refreshed.
You can then resume the procedure from step 6. The snapshot volume can be split from the disk group when synchronization is again complete.
|