Setting Up a Global Cluster
This section describes the steps for planning, configuring, and testing a global cluster. It describes an example of converting a single instance Oracle database configured for local high availability in a VCS cluster to a highly available, disaster-protected infrastructure using a second cluster. The solution uses VERITAS Volume Replicator to replicate changed data real-time.
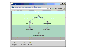
In this example, a single-instance Oracle database is configured as a VCS service group (appgroup) on a two-node cluster. The service group configuration looks like:

Click the thumbnail above to view full-sized image.
 Note
Before beginning the process, review the prerequisites listed in the section Before Configuring Global Clusters and make sure your configuration is ready for a global cluster application.
Note
Before beginning the process, review the prerequisites listed in the section Before Configuring Global Clusters and make sure your configuration is ready for a global cluster application.
The process involves the following steps:
Preparing the Application for the Global Environment
Install the application (Oracle in this example) in the second cluster. Make sure the installation is identical with the one in the first cluster.
Set up replication between the shared disk groups in both clusters. If your configuration uses VVR, the process involves grouping the shared data volumes in the first cluster into a Replicated Volume Group (RVG), and creating the VVR Secondary on hosts in the new cluster, located in your remote site.
Running the GCO Configuration Wizard
If you are upgrading from a single-cluster setup to a multi-cluster setup, run the GCO Configuration wizard to create or update the ClusterService group. The wizard verifies your configuration and validates it for a global cluster setup. You must have the GCO license installed on all nodes in the cluster. For more information, see Installing a VCS License.
 To run the GCO Configuration wizard
-
Start the GCO Configuration wizard.
# sh /opt/VRTSvcs/bin/gcoconfig
-
The wizard discovers the NIC devices on the local system and prompts you to enter the device to be used for the global cluster. Specify the name of the device and press Enter.
-
If you do not have NIC resources in your configuration, the wizard asks you whether the specified NIC will be the public NIC used by all systems. Enter y if it is the public NIC; otherwise enter n. If you entered n, the wizard prompts you to enter the names of NICs on all systems.
-
Enter the virtual IP to be used for the global cluster.
-
If you do not have IP resources in your configuration, the wizard prompts you for the netmask associated with the virtual IP. The wizard detects the netmask; you can accept the suggested value or enter another value.
-
The wizard starts running commands to create or update the ClusterService group. Various messages indicate the status of these commands. After running these commands, the wizard brings the ClusterService group online.
Configuring Replication
VCS supports several replication solutions for global clustering. Please contact your VERITAS sales representative for the solutions supported by VCS. This section describes how to set up replication using VERITAS Volume Replicator (VVR.)
Adding the RVG Resources
-
Create a new service group, say appgroup_rep.
-
Copy the DiskGroup resource from the appgroup to the new group.
-
Configure new resources of type IP and NIC in the appgroup_rep service group. The IP resource monitors the virtual IP that VVR uses for replication.
-
Configure a new resource of type RVG in the new (appgroup_rep) service group.
The RVG agent ships with the VVR software. If the RVG resource type is not defined in your configuration, import it, as instructed below.
- On the File menu, click Import Types.
- In the Import Types dialog box, click the file from which to import the resource type. By default, the RVG resource type is located at the path /etc/VRTSvcs/conf/VVRTypes.cf.
- Click Import.
-
Configure the following attributes of the RVG resource:
- RVG---The name of the RVG.
- DiskGroup---The name of the diskgroup containing the RVG.
- Primary---Whether this is the Primary.
- SRL---The SRL associated with the RVG.
- RLinks---Names of Rlinks associated with the RVG. You can retrieve Rlink names by using the vxprint -l command.
Note
The RVG resource starts, stops, and monitors the RVG in its current state and does not promote or demote VVR when you want to change the direction of replication. That task is managed by the RVGPrimary agent
-
Set dependencies as per the following information:
- RVG resource depends on the IP resource.
- RVG resource depends on the DiskGroup resource.
- IP resource depends on the NIC resource.
The service group now looks like:

Click the thumbnail above to view full-sized image.
-
Delete the DiskGroup resource from the appgroup service group.
-
In the appgroup service group, add a resource of type RVGPrimary and configure its attributes:
- RVGResourceName---The name of the RVG resource that this agent will promote.
- AutoTakeover---A flag that indicates whether the agent should perform a takeover in promoting a Secondary RVG if the original Primary is down. Default is 1, meaning a takeover will be performed.
- AutoResync---A flag that indicates whether the agent should configure the RVG to perform an automatic resynchronization after a takeover and once the original Primary is restored. Default is 0, meaning automatic resynchronization will not occur.
-
Set resource dependencies such that the Mount resources depends on the RVGPrimary resource.
The appgroup now looks like:
Click the thumbnail above to view full-sized image.
-
If your setup uses BIND DNS, add a resource of type DNS to the appgroup service group and configure its attributes:
|