| SQL*Plus® User's Guide and Reference Release 10.2 Part Number B14357-01 |
|
|
View PDF |
| SQL*Plus® User's Guide and Reference Release 10.2 Part Number B14357-01 |
|
|
View PDF |
This chapter describes the SQL*Plus command-line user interface, the Windows Graphical User Interface (GUI), and the iSQL*Plus web-based user interface. It contains the following topics:
The SQL*Plus command-line interface is standard on all operating systems.
The following image shows the SQL*Plus command-line interface running in an X terminal.
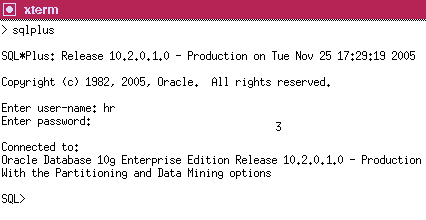
When SQL*Plus starts, it displays the date and time, the SQL*Plus version and copyright information before the SQL*Plus prompt appears. The default prompt for SQL*Plus command-line is:
SQL>
In Windows, from a Command Prompt, open the Command Prompt Properties dialog to set the font and font size used in the SQL*Plus command-line interface.
Right click in the command-line interface title bar.
Click Properties. The Window Preview box displays the current window's relative size on your monitor based on your font and font size selections. The Selected Font: box displays a sample of the current font.
Click the Font tab.
Select the font size to use from the Size box. Raster font sizes are shown as width by height in pixels. TrueType font sizes are shown as height in pixels.
Select the font to use from the Font box.
Select the Bold Fonts check box if you want to use a bold version of the font.
For more information about changing Command Prompt properties, see Windows Help or click Help in the Command Prompt Properties dialog.
To check if a font contains a particular character, for example, the Euro sign, enter the character's decimal number equivalent in the SQL*Plus command-line interface. For example, the decimal number equivalent for the Euro sign is 128, so you would enter Alt+0128 (hold Alt while pressing 0, 1, 2 and 8 in the numeric keypad) to display it. If it appears correctly, the font contains the Euro sign, otherwise you need to try another font.
You can use the Windows Character Map utility to view the characters available in a font. Character Map also shows the decimal number equivalent for extended ASCII characters. You access the Character Map utility by selecting Start, Programs, Accessories and then clicking Character Map.
The graphical user interface is a feature of SQL*Plus only available in Windows. The Windows Graphical User Interface will be obsoleted in favor of the iSQL*Plus browser-based user interface in a future release of SQL*Plus.
The graphical user interface does not support non-blocking database calls to the Oracle Database server. Therefore there is no cancel dialog while statements are executing.
The following image shows the SQL*Plus Windows Graphical User Interface (GUI) running in Windows.
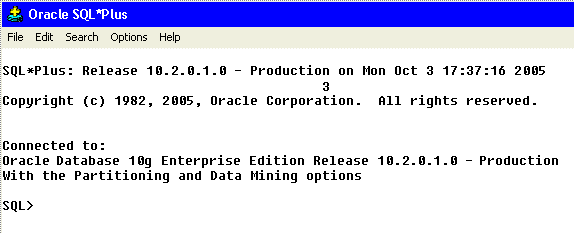
When the Windows GUI starts, it displays the same information as the command-line user interface, and has the same default prompt:
SQL>
You can use the mouse to copy text from anywhere in the Windows GUI to the SQL*Plus prompt.
Left click and drag to select the text you want to copy. While still holding down the left button, right click to copy the selected text to the SQL*Plus prompt.
You can also use Ctrl-C and Ctrl-V to cut and copy text.
The following command keys have special functions in the Windows GUI:
| Key | Function |
|---|---|
| Home | Top of screen buffer |
| End | Bottom of screen buffer |
| Page Up | Previous screen page |
| Page Down | Next screen page |
| Ctrl+Page Up | Show page on left of current screen page |
| Ctrl+Page Down | Show page on right of current screen page |
| Alt+F3 | Find |
| F3 | Find next |
| Ctrl+C | Cancels the data fetch operation following command execution. |
| Ctrl+C | Copies text - when no operations are running. |
| Ctrl+V | Paste text |
| Shift+Del | Clear the screen and the screen buffer |
There are menus in the SQL*Plus Windows GUI menu bar. In the Option column, entries in parentheses show keyboard shortcuts. The Command-line column shows equivalent command-line commands.
The File menu has the following options:
The Edit menu has the following options:
The Search menu has the following options:
The Options menu has the following options:
| Option | Description of Options Menu Option | Command-line |
|---|---|---|
| Environment | The Environment option enables you to set system variables to alter the SQL*Plus environment for your current session. This dialog has three areas: Set Options, Value, and Screen Buffer.
Note: See Setting Options and Values Using the Environment Dialog for examples of how these controls interact. |
|
| Set Options
This area has a list of variables you can select to establish aspects of the SQL*Plus environment for your current session, such as:
See the SET command for descriptions of each system variable. |
SET variable value | |
| Value
The Value area has four options: Default, Custom, On, and Off. Note: When Custom is selected, the On and Off buttons and the text field may or may not be enabled for user selection. The availability of these fields depends on the item selected in the Set Option. |
SET variable value | |
| Screen Buffer
This area has two text boxes: Buffer Width and Buffer Length. |
not applicable | |
|
||
| Notes: When you change the Screen Buffer option, SQL*Plus displays a dialog to alert you that if you shorten the size of your screen buffer, some data may not be displayed on your screen Click OK to proceed. | ||
| If you use SET MARKUP to send output to an HTML table, the number of lines specified in the Buffer Length variable specifies the number of HTML table rows Each HTML table row may contain more than one text line. |
The Help menu has the following option:
| Option | Description of Help Menu Option | Command-line |
|---|---|---|
| About SQL*Plus | Displays the SQL*Plus version number and copyright information.
You access SQL*Plus help from the SQL*Plus prompt. See Getting Command-line Help. |
not applicable |
There are two registry entries that set the font and font size used in the SQL*Plus Windows GUI. SQLPLUS_FONT sets the font face, and SQLPLUS_FONT_SIZE sets the font size in pixels.
You use the Windows Registry Editor to create these two registry entries and define values for them. Ensure that you create the correct entries in uppercase, and that the values (font names, sizes) you enter are correct.
|
Warning: Microsoft does not recommend modifying the registry. Editing the registry may affect your operating system and software installation. Only advanced users should edit the registry. Oracle takes no responsibility for problems arising from editing the Windows registry. |
You can choose any fixed-pitch TrueType font available in your Windows system such as Courier New or Lucida Console. If you choose a proportional pitch font such as Arial or Times New Roman, or if you enter an unavailable font, the registry entry is ignored and the default font and size, Fixedsys 16, are used. If you choose an unavailable font size, the default font size, 16, is used.
If you do not create the SQLPLUS_FONT registry entry, or if you do not specify a value for SQLPLUS_FONT, the default font and size, Fixedsys 16, are used.
If you want to use particular characters, such as the Euro sign, you should make sure that the fixed pitch font you choose contains those characters.
Select Run from the Start menu and then enter regedit in the Open field.
Click OK to start the Registry Editor. The Registry Editor is displayed.
Navigate to HKEY_LOCAL_MACHINE\SOFTWARE\ORACLE\HOME0.
Click New String Value in the Edit menu. A new string value, with the default name, NewValue #1 is created at the bottom of the right pane of the Registry Editor. The default name of the new string value is selected ready for you to replace with the name you want.
Enter SQLPLUS_FONT as the name of the new font face string value. If you misskey the name or inadvertently enter it in mixed or lower case, you can edit the name by selecting Rename from the Edit menu.
or
Enter SQLPLUS_FONT_SIZE as the name of the new font size string value. If you misskey the name or inadvertently enter it in mixed or lower case, you can edit the name by selecting Rename from the Edit menu.
Click Modify from the Edit menu or press Enter again to display the Edit String dialog.
Enter the font name you want to use, such as Courier New, in the Value Data: field. SQL*Plus will use the new font the next time you start the SQL*Plus Windows GUI. The font must be a True Type fixed pitch font such as Courier New or Lucida Console.
or
Enter the font size you want to use in pixels, such as 14, in the Value Data: field. SQL*Plus will use the new font size the next time you start the SQL*Plus Windows GUI. The size must be a size that exists on the client machine for the specified font.
|
Note: You should not change the font face, font size or font subset while any SQL*Plus Windows GUI is active. You should exit all SQL*Plus Windows GUI sessions, make font face, font size and font subset changes in the registry, exit the Registry Editor and then restart the SQL*Plus Windows GUI to see the changes. |
To check if a font contains a particular character such as the Euro sign, enter the character's decimal number equivalent in the SQL*Plus Windows GUI. For example, the decimal number equivalent for the Euro sign is 128, so you would enter Alt+0128 (hold Alt while pressing 0, 1, 2 and 8 on the numeric keypad) to display it. If it appears correctly, the font contains the Euro sign, otherwise you need to try another font.
You can also use the Windows Character Map accessory to view the characters available in a font. Character Map also shows the decimal number equivalent for extended ASCII characters. You access the Character Map accessory by selecting Start->Programs->Accessories->System Tools->Character Map.
iSQL*Plus is a web-based user interface to an Oracle Database.
There are a number of ways to navigate in iSQL*Plus:
Global navigation icons are displayed on each screen. Icons have two states:
A white background when that functionality is available
A blue background when active (when you have navigated to that screen)
Three navigation icons are always available after you have logged into iSQL*Plus:

Deletes your history list, ends your iSQL*Plus session, and displays the Login screen with a message confirming that you have logged out.
You connect to the Login screen from your web browser with a URL like:
http://machine_name.domain:port/isqlplus
The Login screen is displayed:

Leave this field blank to use the default Oracle database, otherwise enter a connection identifier for the database you want to connect to.
[//]host[:port][/service_name]
The SERVICE_NAME is the global database name entered during database creation. It combines a database name with a domain name. For example, the SERVICE_NAME sales.us.acme.com has a database name of sales and a domain of us.acme.com.
An INSTANCE_NAME is the name you give to the database instance during creation. It defaults to the SID you entered during database creation.
An Oracle System Identifier (SID) identifies a specific Oracle release 8.0 or earlier database instance.
You can optionally use an INSTANCE_NAME in place of the SERVICE_NAME.
Use a SID in place of SERVICE_NAME when connecting to an Oracle release 8.0 database.
Alternatively you can use an Oracle Net alias. If you use an Oracle Net alias, it must be specified on the machine running the iSQL*Plus Server, which may not be the same machine from which you run your web browser.
iSQL*Plus can be configured to restrict connections to specific databases. If restricted database access has been enabled, a dropdown list of available databases is displayed in place of the Connection Identifier text field. This enables greater security for iSQL*Plus Servers in hosted environments. This is configured using the iSQLPlusConnectIdList parameter in the configuration file. See Enabling Restricted Database Access for more information.
See the Oracle Database Net Services Administrator's Guide for more information about defining connection identifiers.
You can log in to iSQL*Plus with SYSDBA or SYSOPER privileges to perform database administration and run DBA commands through iSQL*Plus. You must authenticate with the Application Server, and have Oracle SYSDBA or SYSOPER privileges.
To connect with either SYSDBA or SYSOPER privileges, users must be created through the OC4J user manager. To add users for DBA Login, see Enabling iSQL*Plus DBA Access.
Because of possible HTTP network timeouts, it is recommended that you use command-line SQL*Plus for long running DBA operations.
To log in with SYSDBA or SYSOPER privileges, you must enter the iSQL*Plus DBA URL in the Location/Address field of your web browser. The iSQL*Plus DBA URL is in the form:
http://machine_name.domain:port/isqlplus/dba
The Enter Network Dialog dialog is displayed. The name of the dialog may differ on different operating systems.
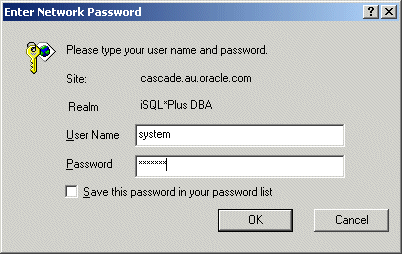
Enter a valid Application Server authentication username. This may not be the same as your Oracle Database username.
Enter a valid Application Server authentication password for the username. This may not be the same as your Oracle Database password.
After you have successfully authenticated, the iSQL*Plus DBA Login screen is displayed:
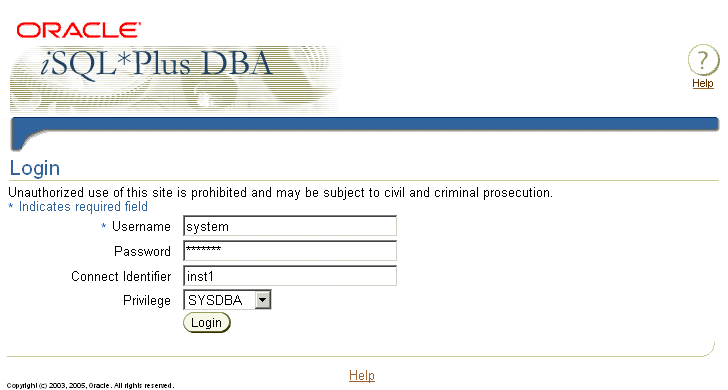
Leave this field blank to use the default Oracle database, otherwise enter a connection identifier for the database you want to connect to.
[//]host[:port][/service_name]
You can optionally use INSTANCE_NAME in place of SERVICE_NAME. When connecting to an Oracle release 8.0 or earlier database, you use a SID. Alternatively you can use an Oracle Net alias. If you use an Oracle Net alias, it must be specified on the machine running the iSQL*Plus Server, which may not be the same machine from which you run your web browser.
iSQL*Plus can be configured to restrict connections to specific databases. If restricted database access has been enabled, a dropdown list of available databases is displayed in place of the Connection Identifier text field. This enables greater security for iSQL*Plus Servers in hosted environments. This is configured using the iSQLPlusConnectIdList parameter in the configuration file. See Enabling Restricted Database Access for more information.
The Workspace consists of the Workspace, History and Load Script screens. After successfully logging in, the Workspace is displayed. From the Workspace you can:
Enter, Execute and Cancel scripts
Load and Save scripts
View, Save and Print output
Access Preferences screens
Get help and Log out
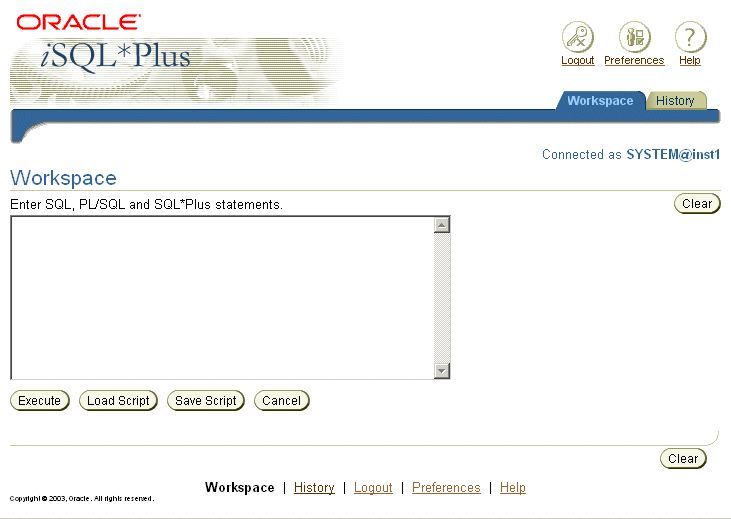
The Workspace and History screens display the user's connection information in the top right. The connection information is displayed in the form:
Connected as [username]@[connection_identifier] [AS SYSDBA| AS SYSOPER]
or
Not connected
Clears all statements in the Input area, and all displayed output. Cancels any script that may be running.
It does not clear the SQL buffer, nor does it clear any variable values altered by changing preferences or changing options of the SET command.
Executes the contents of the Input area. Depending on your preference settings, the results are displayed in the Output area, in a new web browser window, or saved to a file.
Displays the Load Script screen where you enter a path and file name, or a URL for the script you want to load into the Input area for editing or execution.
Displays the File > Save As dialog where you enter a file name for the script you want to save from the Input area as a plain text file. It may be useful to identify scripts with an extension of .SQL.
Cancels any script that is currently running, but does not clear the Input or Output areas. A message saying that the script was cancelled is displayed.
Displays the next page of report output. The Next Page button is displayed when there are more results to display than can fit on the current output page or the script contains a PAUSE command.
You can configure whether pages are displayed on a single page or multiple pages using Preferences > Interface Configuration > Output Page Setup, or by executing the SET PAUSE ON or SET PAUSE OFF command.
You can use the standard Back button of your web browser to view previous pages of iSQL*Plus output. Some web browsers do not support this use of the Back button.
If you log in with SYSDBA or SYSOPER privileges, the iSQL*Plus DBA Workspace is displayed to remind you of the privileged connection. It is otherwise identical to the iSQL*Plus Workspace described earlier.
Fill out the fields on the DBA Workspace as you would for the iSQL*Plus Workspace.
Click the History tab to display the History screen. The History screen enables you to reload scripts that you have previously executed in the same session.
A history entry is created each time you execute a script in the Workspace if it is not the same as the most recently executed script. The History screen shows the first 80 characters of the script.
When the history limit is reached, the oldest scripts are removed. When you exit a session the history is discarded, and history is not shared between sessions.
You can change the default number of entries stored in the history list in the Interface Options screen which you access from the Preferences screen.
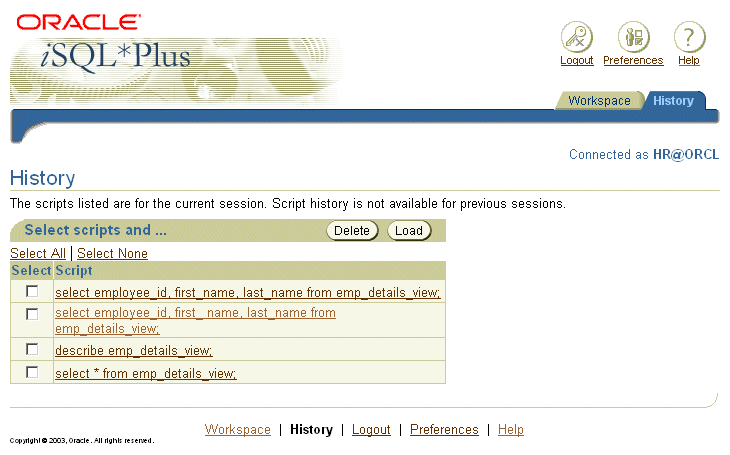
Shows the current list of scripts in the history. They are in most recently executed order, with the most recent at the top. Click the checkbox of one or more scripts that you want to load into the Input area.
Scripts are displayed verbatim, so be careful if you have included items like CONNECT commands which include passwords.
When iSQL*Plus executes a script containing substitution variables, the Input Required screen is displayed for each substitution variable. For example, enter:
BREAK ON &&SORTCOL
SELECT &SORTCOL, SALARY
FROM &MYTABLE
WHERE SALARY > 12000
ORDER BY &SORTCOL;
The Input Required screen is displayed.
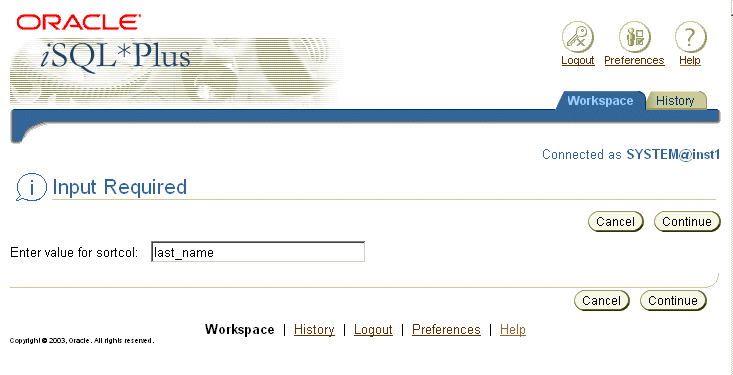
Enter a value for the sortcol variable. For example, enter LAST_NAME. Remember that if a substitution variable is currently undefined, then when it is referenced with a single ampersand, you are prompted for its value at every occurrence of the reference. If you reference the variable with a double ampersand, the value is retained for the session and you will only be prompted for it once.
When prompted, enter a value for the mytable variable. For example, enter EMP_DETAILS_VIEW.
The Preferences screen enables you to change interface settings, system settings, and your password. The Cancel and Apply buttons appear on each of the Preferences screens and have the same function on all Preferences screens. Click the Workspace or History tab to return to the Workspace or History screen.
Connection information is not displayed in the Preferences screen.
Click Interface Configuration in the side menu to open the Interface Configuration screen.
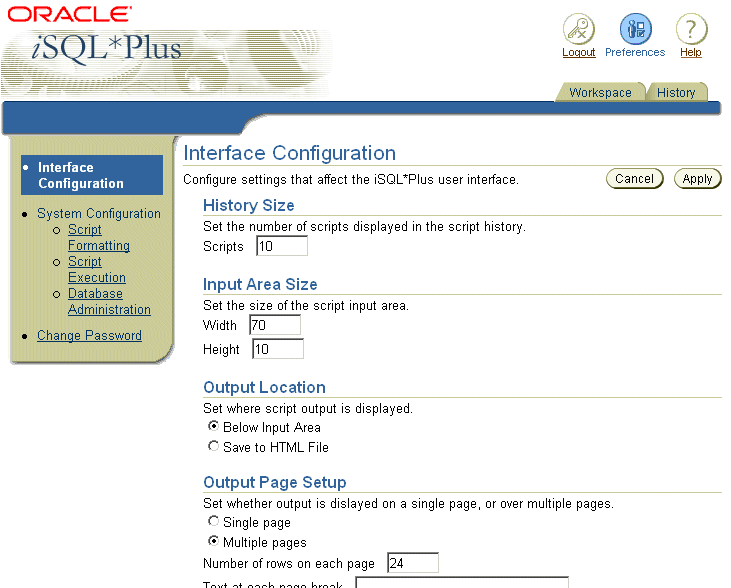
You can click one of the three entries under System Configuration in the side menu to open these further three screens:
Script Formatting
Script Execution
Database Administration
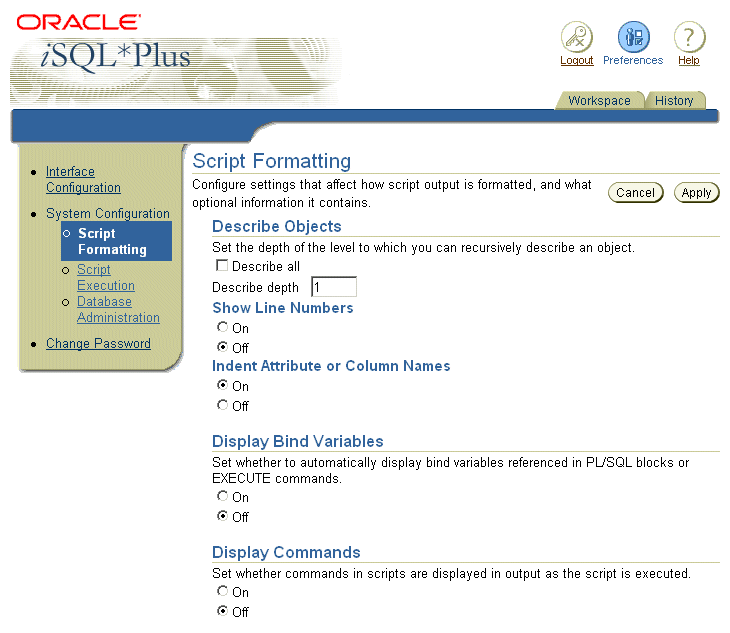
Click Script Formatting in the side menu to open the Script Formatting screen. You use the Script Formatting screen to set options that affect the way script output is displayed.
Each of these options contains either a field, set of radio buttons, or text area to change the setting, with explanatory text.
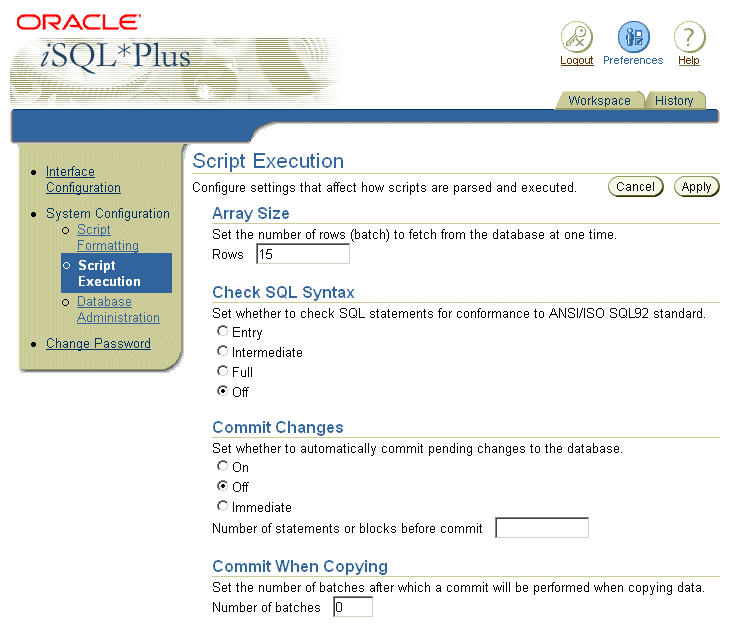
Click Script Execution in the side menu to open the Script Execution screen. You use the Script Execution screen to set options which affect the way scripts are executed.
Each of these options contains either a field, set of radio buttons, or text area to change the setting, with explanatory text.
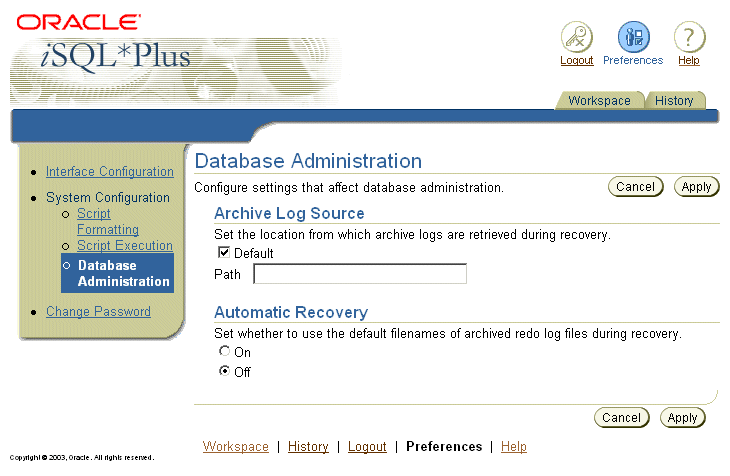
Click Database Administration in the side menu to open the Database Administration screen. You use the Database Administration screen to set options that affect database administration.
Each of these options contains either a field, set of radio buttons, or text area to change the setting, with explanatory text.
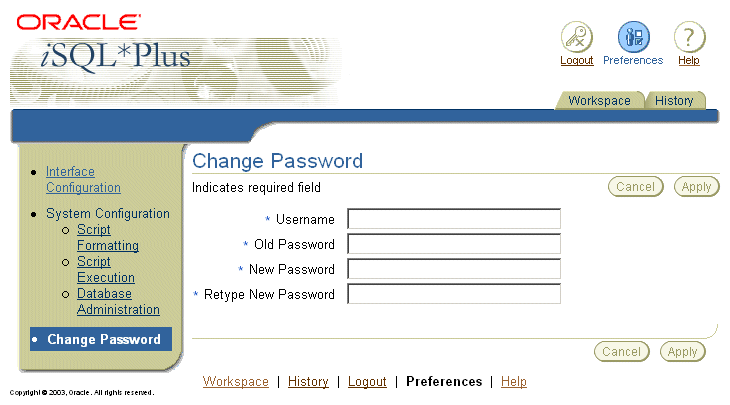
Click Change Password in the side menu to access the Change Password screen. See Changing Your Password in iSQL*Plus.
The tables below show the preferences available on each of the four Preferences screens, and the equivalent system variables that can be set using the SET command.
Table 1-1 Interface Configuration
| iSQL*Plus Preference | Equivalent SET Command |
|---|---|
|
History Size |
Not applicable |
|
Input Area Size |
Not applicable |
|
Output Location |
Not applicable |
|
Output Page Setup |
SET PAGESIZE, SET PAUSE |
Table 1-2 Script Formatting
| iSQL*Plus Preference | Equivalent SET Command |
|---|---|
|
Describe Objects |
SET DESCRIBE |
|
Display Bind Variables |
SET AUTOPRINT |
|
Display Commands |
SET ECHO |
|
Display Headings |
SET HEADING |
|
Display Record Count |
SET FEEDBACK |
|
Display Server Output |
SET SERVEROUTPUT |
|
Display Substitution Variables |
SET VERIFY |
|
*HTML HEAD Tag |
SET MARKUP HTML HEAD |
|
*HTML BODY Tag |
SET MARKUP HTML BODY |
|
*HTML TABLE Tag |
SET MARKUP HTML TABLE |
|
Line Size |
SET LINESIZE |
|
*Map Special Characters to HTML Entities |
SET MARKUP HTML ENTMAP |
|
Null Text |
SET NULL |
|
Number Format |
SET NUMFORMAT |
|
Number Width |
SET NUMWIDTH |
|
Preformatted Output |
SET MARKUP HTML PREFORMAT |
|
Column Separator |
SET COLSEP |
|
Display Record Separator |
SET RECSEP, SET RECSEPCHAR |
|
Headings on Multiple Lines |
SET HEADSEP |
|
Underline Headings |
SET UNDERLINE |
|
Start Output |
SET EMBEDDED |
|
Timing Statistics |
SET TIMIMG |
|
Wrap Lines |
SET WRAP |
* Items prefixed with an asterisk are only available when the iSQLPlusAllowUserMarkup configuration option is set to ALL. Its default value is NONE. For more information, see Enabling User Defined HTML Markup.
Table 1-3 Script Execution
| iSQL*Plus Preference | Equivalent SET Command |
|---|---|
|
Array Size |
SET ARRAYSIZE |
|
Check SQL Syntax |
SET FLAGGER |
|
Commit Changes |
SET AUTOCOMMIT |
|
Commit when Copying |
SET COPYCOMMIT |
|
Compare Datatypes when Copying |
SET COPYTYPECHECK |
|
Escape Character |
SET ESCAPE |
|
LOB Offset |
SET LOBOFFSET |
|
LOB, LONG and XML Type Size |
SET LONG |
|
Multiple SQL*Plus Commands on Single Line |
SET CMDSEP |
|
Register Scripts |
SET APPINFO |
|
SQL and PL/SQL Terminator |
SET BLOCKTERMINATOR |
|
SQL Case |
SET SQLCASE |
|
SQL Compatibility |
SET COMPATIBILITY |
|
SQL Terminator |
SET SQLTERMINATOR |
|
SQL*Plus Compatibility |
SET SQLPLUSCOMPATIBILITY |
|
Substitution Variable Prefix |
SET DEFINE |
|
Substitution Variable Reference Terminator |
SET CONCAT |
|
Trace Statements |
SET AUTOTRACE |
|
XQuery Base URI |
SET XQUERY BASEURI |
|
XQuery Ordering |
SET XQUERY ORDERING |
|
XQUERY Node Identity |
SET XQUERY NODE |
|
XQUERY Context |
SET XQUERY CONTEXT |