Sun Management Center 3.5 Supplement for Sun Fire 15K/12K Systems Management Center 3.5 Supplement for Sun Fire 15K/12K Systems
|
| Sun Management Center 3.5 Supplement for Sun Fire 15K/12K Systems
|
| C H A P T E R 2 |
|
Installation and Setup |
This chapter describes how to install, set up, start, stop, uninstall, reinstall, and reconfigure the Sun Management Center 3.5 software for the Sun Fire 15K/12K systems.
The Sun Management Center software is divided into:
Sun Fire 15K/12K support requires the Sun Management Center 3.5 base packages and the add-on Sun Fire 15K/12K packages. The Sun Management Center 3.5 Installation and Configuration Guide describes basic information about installing and setting up the Sun Management Center 3.5 base packages and starting and stopping the software. This chapter describes the processes specifically related to the Sun Fire 15K/12K systems.

|
Caution - Use the installation scripts and the setup scripts provided with the Sun Management Center 3.5 software. Do not manually add packages or manually change configuration files. |
Your Sun Management Center 3.5 installation and setup scripts or GUI panels may not display exactly the same messages in exactly the same sequence as the examples shown in this chapter. However, these examples show the basic messages you will receive in approximately the sequence you will receive them. Your actual installation and setup scripts depend on the add-on components you choose to install and other choices you make.
The Sun Fire 15K/12K system-specific packages received with the Sun Management Center 3.5 basic functionality, and the minimum size required for installation in kilobytes (KB) are listed in TABLE 2-1. Refer to the Sun Management Center 3.5 Installation and Configuration Guide for information about general Sun Management Center prerequisites, including minimum disk space requirements.
Your Sun Fire 15K/12K system must meet certain requirements before you install Sun Management Center 3.5 software. These requirements are explained in this section.
Before installing the Sun Management Center software, determine which server is to be the Sun Management Center server machine. The server must have a minimum of 256 megabytes of memory available. The server should be a system with high availability. When the Sun Management Center server is down, you will not be able to use Sun Management Center software to manage your system. Refer to the Sun Management Center 3.5 Installation and Configuration Guide for more information about server machine requirements.
TABLE 2-2 lists the software versions required for Sun Fire 15K/12K platform support.
Sun Management Center software requires network ports to communicate with various components of the system. The default port addresses for these components are listed in TABLE 2-3:
In some cases, this default port configuration conflicts with software already running on your system. Some Sun Fire 15K/12K domains might have port 161 conflicts because of the presence of legacy SMNP agents. During the Sun Management Center software setup, specify an alternate network port to avoid this conflict. Refer to the Sun Management Center 3.5 Installation and Configuration Guide for further information about solving port conflicts.
To create and access topology objects, the Sun Management Center agent layer software uses port 161 by default. If you configure an agent to use an alternate port, you must specify that port when the topology object is created or discovered. To simplify your Sun Management Center network configuration and management and enable more efficient discovery of Sun Management Center agents, select an alternate port number and use that number for all agent installations that cannot use the default port configuration.
The Sun Fire 15K/12K system controller has two Sun Management Center agents: the agent and the platform agent. The agent provides information about the system controller and the platform agent provides information about the Sun Fire 15K/12K systems. Usually there are no port conflicts with the default port configuration for the platform agent. When a platform topology object is created or discovered, the correct default port is provided and does not need to be specified.
This section summarizes the procedures for installing and setting up Sun Management Center 3.5 software on Sun Fire 15K/12K systems. FIGURE 2-1 illustrates the Sun Management Center software that needs to be installed on the Sun Fire 15K/12K system controllers and other hosts.
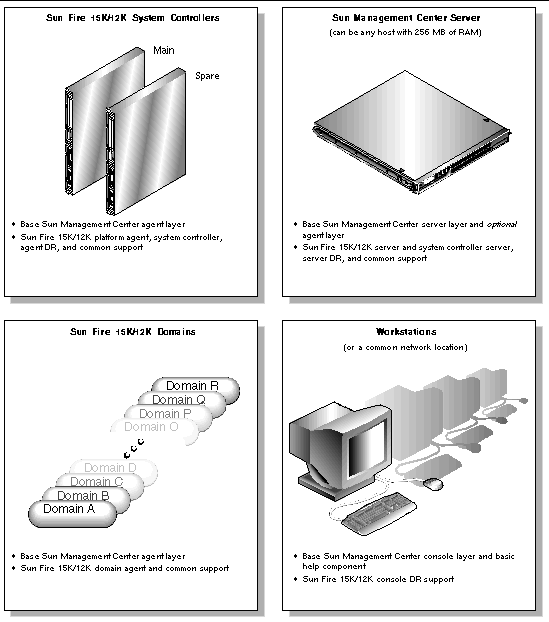
Following is a summary of the procedures for installing Sun Management Center 3.5 software on the server machine.
Following is a summary of the procedures for installing and setting up Sun Management Center 3.5 software on the system controllers and Sun Fire 15K/12K domains:
1. Install and set up the Sun Management Center 3.5 base agent layer and Sun Fire 15K/12K domain agent add-on component for each Sun Fire 15K/12K domain you want to monitor.
2. Install and set up the Sun Management Center 3.5 base agent layer and the Sun Fire 15K/12K platform agent and system controller add-on components on the main and spare system controllers.
Following is a summary of the procedures for installing Sun Management Center 3.5 software on workstations or the network:
With Sun Management Center 3.5 software, you can install, set up, uninstall, and update in several different ways. TABLE 2-4 lists the various methods with a cross-reference to the information in this chapter.
For Sun Fire 15K/12K system support, install and set up the Sun Management Center 3.5 software on the Sun Fire 15K/12K system hosts as shown in TABLE 2-5. The Sun Management Center 3.5 Installation and Configuration Guide provides information about installing and setting up the base software. It also provides instructions for starting and stopping Sun Management Center 3.5 software.
TABLE 2-6 lists the three installation CDs supplied with your system. These CDs contain all software and documentation necessary for installing and using Sun Management Center 3.5 software with the Sun Fire 15K/12K systems. The contents of the CDs are:
If any of the hosts do not have a local CD-ROM drive, you need to mount a remote CD-ROM drive before installing the software on that host. The following example shows how to mount a remote CD-ROM drive for the Sun Management Center 3.5 Sun Fire 15K/12K CD. If you cannot insert three CDs into three separate drives or install from a common network location as noted previously, then you will need to perform this procedure for each CD on each host.
1. Log in as superuser to a host that has a CD-ROM drive.
2. Insert the Sun Management Center 3.5 Sun Fire 15K/12K CD into the CD-ROM drive.
3. Type the share(1M) command on the same host as the CD-ROM drive to make the CD-ROM usable across the network.
# share -o ro,anon=0 -F nfs /cdrom/Sun_Management_Center_3_5xx |
where xx is the number of the CD.
4. Log in as superuser to the host without a CD-ROM drive, where you want to install the software.
5. Make a local directory, if it does not already exist, on which to mount the
CD-ROM.
# mkdir /cdrom/Sun_Management_Center_3_5xx |
where xx is the number of the CD.
6. Mount the /cdrom directory from the host with a CD-ROM drive on the /cdrom directory you created on the host without a CD-ROM drive.
This example assumes that the host with a CD-ROM drive is a system controller.
# mount SCn:/cdrom/Sun Management Center_3.5_Sun-Fire-15000 /cdrom/Sun_Management_Center_3_5xx |
where n is the number of the main system controller (0 or 1) and xx is the number of the CD.
|
Note - The CD-ROM directory in the preceding example (Sun Management Center_3.5_Sun-Fire-15000) applies to both Sun Fire 15K and 12K systems. |
7. Change to the Sun Management Center software installation directory.
# cd /cdrom/Sun_Management_Center_3_5xx |
where xx is the number of the CD.
|
Note - If you receive the message Stale NFS file handle, reboot and start over. |
1. If you have only one CD-ROM drive available, you need to first unmount and unshare the previous drive and then eject the CD.
2. Unmount the CD-ROM drive from the host with a CD-ROM drive.
# cd / # umount /cdrom/Sun_Management_Center_3_5xx |
where xx is the number of the CD.
3. Unshare the CD-ROM drive from the host with a CD-ROM drive.
# cd / # unshare /cdrom/Sun_Management_Center_3_5xx |
where xx is the number of the CD.
4. Remove the installation CD from the CD-ROM drive.
# cd / # eject cdrom |
If the Sun Management Center server or any agents are already running on a host where you are going to install Sun Management Center software, stop them first (see Stopping and Exiting Sun Management Center Software Using the CLI).
This section describes how to install and set up Sun Management Center 3.5 software on the Sun Management Center dedicated server machine.
|
Note - When setting up or installing the Sun Management Center software, type y for yes, n for no, or q to quit. |
1. Log in as superuser on the server machine.
2. Change the directory to the path/sbin directory, where path is the location of the Sun Management Center 3.5 (1 of 3) CD or the disk copy of the CD.
# cd path/sbin |
3. To start the installation, type:
# ./es-inst |
The system displays this message.
Please enter the target directory [/opt]: |
4. Press Return to accept the default directory of /opt or type another directory where the Sun Management Center 3.5 base software is to be installed.
|
Note - If you type your own directory, be sure you replace your directory for /opt in any path in subsequent instructions. |
The system displays this message.
Select one of the following: (1) Production Environment (PE) (2) Developer Environment (DE) Enter your choice: [1|2] |
5. Type 1 for the Production Environment.
The system displays this message.
6. Type y to install the Server Layer. Type n to not install the Agent Layer and Console Layer.
After the system finishes installing the base software, the system displays a similar message to this, depending on your system configuration.
7. The only product listed in the preceding box that is essential for monitoring the Sun Fire 15K/12K systems is Sun Fire 15K/12K Monitoring. Determine which other products to install based on licenses you have for additional features or any additional servers in your installation that you want to monitor. If you want to install Sun Fire 15K/12K add-on products now, go to Step 5 in the next procedure To Install Sun Fire 15K/12K Server Support on Server Machine.
If you choose not to install Sun Fire 15K/12K add-on products now, the system displays this message, after finishing the remainder of the installation.
Do you want to run setup now? [y|n|q] |
8. Because the system can take up to 20 minutes running server setup and you will have to set up the server again after you install the Sun Fire 15K/12K packages, it is more efficient to type n to not run setup now.
|
|
If you are installing only Sun Fire 15K/12K server support now and have not already installed base server software, perform Steps 1 through 4. If the base software has been installed already, continue with Step 5.
1. Log in as superuser on the server machine.
2. Change the directory to the /opt/SUNWsymon/sbin directory.
This example assumes that you are installing in the default area/opt. If not, replace /opt with your own path.
# cd /opt/SUNWsymon/sbin |
3. To start the installation, type:
# ./es-inst |
The system displays this message.
Please enter the source directory: |
4. Type the source directory where the Sun Fire 15K/12K server add-on packages (SUNWesscs and SUNWscscs) reside.
For example, if you are installing from the Sun Management Center CD-ROM, type:
Please enter the source directory: /cdrom/Sun_Management_Center_3_5xx/image |
where xx is the number of the CD. The system displays this message.
5. Type y to install the Sun Fire 15K/12K server add-on packages (SUNWesscs and SUNWscscs) now.
6. The Sun Fire 15K/12K server support packages are installed, and the system displays these messages.
.... .... Installation of <SUNWesscs> was successful. .... .... Installation of <SUNWscscs> was successful. Do you want to run setup now? [y|n|q] |
7. See the following procedure for setting up the Sun Management Center 3.5 software on the server machine.
After you have successfully installed the Sun Management Center 3.5 base software and Sun Fire 15K/12K add-on components on the server machine, the system displays this message.
Do you want to run setup now? [y|n|q] |

|
Caution - Be aware that you need to run setup before using the system initially, and anytime you need to make changes to the configuration file. |
The system displays this message.
2. Type y for yes to use the default seed.
The system displays this message.
3. Press Return if Sun Management Center help is installed on the console host. If Sun Management Center help is in an http-accessible location within your network, specify the URL.
Either way, the system might display the following message if you install the agent layer on the server machine, and another process is using the default port of 161.
This system displays this message.
NOTE: Prior to starting Sun Management Center agent, stop the process using port 161. |
Go to the message about starting the Sun Management Center Sun Fire 15K/12K Server setup in Step 5.
The system displays the message.
Please enter any port [ 1100 to 65535 ] : |
The system displays this message.
6. Type y to set up the Sun Fire 15K/12K server support now. Type n to not set up the Sun Fire 15K/12K server support now.
Either way, the system displays this message.
7. Type y to set up the Sun Fire 15K/12K system controller server support now. Type n to not set up the Sun Fire 15K/12K system controller server support now.
Either way, the system displays this message.
Do you want to setup Sun Fire (6800/4810/4800/3800) platform administration module [y|n|q] |
8. Type y to set up the Sun Fire (6800/4810/4800/3800) platform administration module now. Type n to not set up this module now.
Either way, the system displays this message, where nnnnnnnnnnnn.nnnn is the identifying number of the setup log.
9. Type y to start the Sun Management Center base agent, server, and Sun Fire 15K/12K server support now. Type n to not start this software now.
This section describes how to install and set up the Sun Management Center 3.5 base software and Sun Fire 15K/12K domain agents. Install and set up this software for each Sun Fire 15K/12K domain to be monitored using the Sun Management Center GUI. The procedure is the same for installing and setting up each domain. If you are reinstalling Sun Management Center software on a domain, be sure you uninstall the Sun Management Center 3.5 software on a domain, before you reinstall (see Starting Sun Management Center Software Using the Sun Management Center 3.5 Start Wizard).
|
Note - When setting up or installing the Sun Management Center software, type y for yes, n for no, or q to quit. |
1. Log in as superuser on the Sun Fire 15K/12K domain.
2. Change the directory to the PUn_path/sbin directory, where n is the number of the Platform Update, and PUn_path is the location of the Sun Management Center 3.5 Platform Update n(1 of 3) CD or the disk copy of the CD.
# cd PUn_path/sbin |
3. To start the installation, type:
# ./es-inst |
The system displays this message.
Please enter the target directory [/opt]: |
4. Press Return to accept the default directory of /opt or type another directory where the Sun Management Center 3.5 base software is to be installed.
|
Note - If you type your own directory, be sure you replace your directory for /opt in any path in subsequent instructions. |
The system displays this message.
Select one of the following: (1) Production Environment (PE) (2) Developer Environment (DE) Enter your choice: [1|2] |
5. Type 1 for the Production Environment.
The system displays this message.
6. Type y to install the Agent Layer. Type n to not install the Server Layer and Console Layer.
After the system finishes installing the base software, the system displays a similar message to this, depending on your system configuration.
7. The only product listed in the preceding box that is essential for monitoring the Sun Fire 15K/12K systems is Sun Fire 15K/12K Monitoring. Determine which other products to install based on licenses you have for additional features or any additional servers in your installation that you want to monitor. If you want to install Sun Fire 15K/12K domain agents now, go to Step 5 in the next procedure To Install Sun Fire 15K/12K Domain Agents.
If you choose not to install Sun Fire 15K/12K add-on products now, the system displays this message, after finishing the remainder of the installation.
Do you want to run setup now? [y|n|q] |
8. It is more efficient to type n to not run setup now if you need to install the Sun Fire 15K/12K packages. Otherwise, type y to run setup now.
Install the Sun Fire 15K/12K domain agent software for each domain to be monitored using the Sun Management Center software. If you are only installing Sun Fire 15K/12K domain agents and have not installed base software already, perform Steps 1 through 4. If you have installed base software already, continue with Step 5.
1. Log in as superuser on the Sun Fire 15K/12K domain.
2. Change the directory to the /opt/SUNWsymon/sbin directory.
This example assumes that you are installing in the default area /opt. If not, replace /opt with your own path.
# cd /opt/SUNWsymon/sbin |
3. To start the installation, type:
# ./es-inst |
The system displays this message.
Please enter the source directory: |
4. Type the source directory where the Sun Fire 15K/12K domain agent package (SUNWesscd) resides.
For example, if you are installing from the Sun Management Center CD-ROM, type:
Please enter the source directory: /cdrom/Sun_Management_Center_3_5xx/image |
where xx is the number of the CD. The system displays this message.
5. Type y for yes to install the Sun Fire 15K/12K domain agent package (SUNWesscd) now.
The system installs the Sun Fire 15K/12K domain agent and displays this message.
Installation of <SUNWesscd> was successful. |
After you have successfully installed the Sun Fire 15K/12K domain agent, the system displays this message.
Do you want to run setup now? [y|n|q] |

|
Caution - Be aware that you need to run setup before using the system initially, and anytime you need to make changes in the configuration file. |
The system displays this message.
2. Type y for yes to use the default seed.
The system displays this message.
Please enter the Sun Management Center Server Hostname: |
3. Type your server host name.
The system might display this message if another process is using the default port of 161.
This system displays this message.
NOTE: Prior to starting Sun Management Center agent, stop the process using port 161. |
Go to the message about starting the Sun Management Center Sun Fire 15K/12K domain setup in Step 6.
The system displays the message.
Please enter any port [ 1100 to 65535 ] : |

|
Caution - Be sure you specify the same port number for all Sun Fire 15K/12K domains. Otherwise, the Sun Fire 15K/12K composite will not work. See also Steps 4 and 5 in the procedure To Set Up Software on System Controllers. |
The system displays this message.
Do you want to setup Sun Fire (6800/4810/4800/3800) platform administration module [y|n|q] |
6. Type y to set up the Sun Fire (6800/4810/4800/3800) platform administration module now. Type n to not set up this module now.
Either way, the system displays this message.
7. Type y to set up the Sun Fire 15K/12K domain now. Type n to not set up the Sun Fire 15K/12K domain now.
Either way, the system displays this message.
Do you want to start Sun Management Center agent now [y|n|q] |
8. Type y for yes to start the Sun Management Center base agent and Sun Fire 15K/12K domain agent now. Type n to not start this software now.
This section describes how to install and set up the Sun Management Center 3.5 software on a system controller. You need to install and set up this software on both system controllers; the procedure is the same for both. If you are reinstalling software on a system controller, be sure to uninstall the Sun Management Center software on the system controller, before you reinstall (see Starting Sun Management Center Software Using the Sun Management Center 3.5 Start Wizard).
|
Note - When setting up or installing the Sun Management Center software, type y for yes, n for no, or q to quit. |
1. Log in as superuser on the system controller.
2. Change the directory to the PUn_path/sbin directory, where n is the number of the Platform Update, and PUn_path is the location of the Sun Management Center 3.5 Platform Update n(1 of 3) CD or the disk copy of the CD.
# cd PUn_path/sbin |
3. To start the installation, type:
# ./es-inst |
The system displays this message.
Please enter the target directory [/opt]: |
4. Press Return to accept the default directory of /opt or type another directory where the Sun Management Center 3.5 base software is to be installed.
|
Note - If you type your own directory, be sure to replace your directory for /opt in any path in subsequent instructions. |
The system displays this message.
Select one of the following: (1) Production Environment (PE) (2) Developer Environment (DE) Enter your choice: [1|2] |
5. Type 1 for the Production Environment.
The system displays this message.
6. Type y to install the Agent Layer. Type n to not install the Server Layer and Console Layer.
The system displays a similar message to this, depending on your system configuration.
7. The only product listed in the preceding box that is essential for monitoring the Sun Fire 15K/12K systems is Sun Fire 15K/12K Monitoring. Determine which other products to install based on licenses you have for additional features or any additional servers in your installation that you want to monitor. If you want to install Sun Fire 15K/12K add-on products now, go to Step 5 in the next procedure To Install Sun Fire 15K/12K Platform Agent on System Controllers.
If you choose not to install Sun Fire 15K/12K add-on products now, the system displays this message after finishing the remainder of the installation.
Do you want to run setup now? [y|n|q] |
8. It is more efficient to type n to not run setup now if you still need to install the Sun Fire 15K/12K Platform Agent. Otherwise, type y to run setup now.
|
|
If you are installing only the Sun Fire 15K/12K platform agent now and have not installed the base software already, perform Steps 1 through 4. If you have installed the base software already, continue with Step 5.
1. Log in as superuser on the system controller.
2. Change the directory to the /opt/SUNWsymon/sbin directory.
This example assumes that you are installing in the default area /opt. If not, replace /opt with your own path.
# cd /opt/SUNWsymon/sbin |
3. To start the installation, type:
# ./es-inst |
The system displays this message.
Please enter the source directory: |
4. Type the source directory where the Sun Fire 15K/12K platform agent add-ons (SUNWesscp and SUNWscsca) reside.
For example, if you are installing from the Sun Management Center CD-ROM, type:
Please enter the source directory: /cdrom/Sun_Management_Center_3_5xx/image |
where xx is the number of the CD. The system displays this message.
5. Type y for yes to install the Sun Fire 15K/12K platform agent add-ons (SUNWesscp and SUNWscsca) now.
The Sun Fire 15K/12K platform agent add-ons are installed, and the system displays this message.
Installation of <SUNWesscp> was successful. .... .... Installation of <SUNWscsca> was successful. |
After successfully installing the Sun Fire 15K/12K platform agent support, the system displays this message.
Do you want to run setup now? [y|n|q] |

|
Caution - Be aware that you need to run setup before using the system initially, and anytime you need to make changes in the configuration file. |
The system sets up the base agent layer on the system controller and displays this message.
2. Type y for yes to use the default seed.
The system displays this message.
Please enter the Sun Management Center Server Hostname: |
3. Type your server host name.
The system might display this message if another process is using the default port of 161.
This system displays this message.
NOTE: Prior to starting Sun Management Center agent, stop the process using port 161. |
Go to the message about starting the Sun Management Center Sun Fire 15K/12K Platform setup in Step 6.
The system displays this message.
Please enter any port [ 1100 to 65535 ] : |
The system displays this message.
Do you want to setup Sun Fire (6800/4810/4800/3800) platform administration module [y|n|q] |
6. Type y to set up the Sun Fire (6800/4810/4800/3800) platform administration module now. Type n to not set up this module now.
Either way, the system displays this message.
7. Type y for yes to set up Sun Fire 15K/12K platform agent now.
The system displays this message.
Is this Sun Fire 15K/12K platform configured with a spare SC? [y|n|q] |
8. Type y for yes if your Sun Fire 15K/12K system is configured with a spare system controller, or type n for no if there is no spare system controller.
If you choose yes, the system displays this message.
Please enter the alternate SC hostname (not main_hostname) for this platform. Alternate SC hostname: alternate_hostname |
9. If you have a spare system controller, type in the host name for the spare (or alternate) system controller.
The system displays this message.

|
Caution - Specify the same port number that you specified when setting up the domain agents on all Sun 15K/12K domains. Otherwise, the Sun Fire 15K/12K composite will not work. See also Steps 4 and 5 of the procedure To Set up Domain Agents. Type n to not change the default port or y to change the default port. If you type y, you are prompted to specify a new default port number; type in the port number. |
Either way, the system completes the platform agent setup and displays this message, where port_number is the default port number you specified.
10. Type y to set up the system controller agent now.
The system displays this message.
|
Note - The es-startup script loads the drivers automatically on the CP1500 if you type y for yes to continue. |
11. Type y to load the three drivers automatically and continue the system controller agent setup.
The system completes the system controller agent setup and displays this message.
|
Do you want to start Sun Management Center agent now? [y|n|q] |
12. Type y to start the Sun Management Center base agent, Sun Fire 15K/12K platform agent, and Sun Fire 15K/12K system controller agent now. Type n to not start this software now.
This section describes how to install and set up the Sun Management Center 3.5 base console software. There is no Sun Fire 15K/12K system-specific console software. You need to install and set up the base console software on a common network location or for each workstation where you want to monitor the Sun Fire 15K/12K system by using the Sun Management Center GUI. The procedure is the same for installing and setting up the common network location or each workstation. If you are reinstalling Sun Management Center software on a common network location or a workstation, be sure you uninstall the Sun Management Center 3.5 software on the common network location or a workstation, before you reinstall (see Starting Sun Management Center Software Using the Sun Management Center 3.5 Start Wizard).
|
Note - When setting up or installing the Sun Management Center software, type y for yes, n for no, or q to quit. |
|
|
1. Log in as superuser on the workstation or network where the Sun Management Center 3.5 console software is to be installed.
2. Change the directory to the PUn_path/sbin directory, where n is the number of the Platform Update, and PUn_path is the location of the Sun Management Center 3.5 Platform Update n(1 of 3) CD or the disk copy of the CD.
# cd PUn_path/sbin |
3. To start the installation, type:
# ./es-inst |
The system displays this message.
Please enter the target directory [/opt]: |
4. Press Return to accept the default directory of /opt or type another directory where you want Sun Management Center 3.5 console software to be installed.
|
Note - If you type your own directory, be sure you replace your directory for /opt in any path in subsequent instructions. |
The system displays this message.
Select one of the following: (1) Production Environment (PE) (2) Developer Environment (DE) Enter your choice: [1|2] |
5. Type 1 for the Production Environment.
The system displays this message.
6. Type y to install the Console Layer. Type n to not install the Server Layer and Agent Layer.
After the system finishes the installation, the system displays a similar message to this, depending on your system configuration.
7. None of the products listed in the preceding box is essential for monitoring the Sun Fire 15K/12K systems. Determine which products to install based on licenses you have for additional features or any additional servers in your installation that you want to monitor.
After the system finishes the remainder of the installation, the system displays this message.
Do you want to run setup now? [y|n|q] |
8. Because there are no Sun Fire 15K/12K system-specific console packages to install, it is more efficient to type y to run setup now.
If you type y, the system performs the console setup
This section describes how to update multiple hosts at once using Agent Update. The Agent Update process itself must be run on the Sun Management Center server machine. You also need to ensure that Sun Management Center 3.5 agents are running on all the target hosts.
To use Agent Update to fully install and set up the Sun Fire 15K/12K platform agent modules, you must create an Agent Update configuration file for the module on the target hosts, before you run the Agent Update Process on the Sun Management Center server machine.
|
|
1. Ensure the Sun Fire 15K/12K platform agent modules are installed on the target hosts.
2. Ensure that the Sun Fire 15K/12K platform agent modules are set up on the target hosts using either the es-setup script or the es-guisetup Wizard.
After this has been done, subsequent platform agent setup operations using Agent Update will work automatically, using the host-specific information provided initially.
Using the Agent Update process, create an Image File of the add-on components to be distributed to the target machines, and then add a New Job to Manage Jobs Task list to be run when you specify.
Using Agent Update you can update the following configurations:
This procedure applies only to updating from Sun Management Center 3.5 add-on software.
1. Create an Image File of the desired Sun Fire 15K/12K add-on components to be distributed to the desired agent machines using one of the base Sun Management Center scripts es-gui-imagetool or es-imagetool.
Refer to Chapter 8, "Post-Installation Tasks," in the Sun Management Center 3.5 Installation and Configuration Guide for detailed instructions about using either the Wizard or the CLI Image Tool.
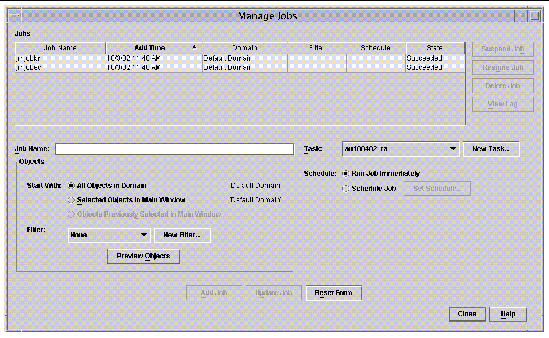
2. From your main Sun Management Center console window, select the Manage Jobs... option from the Tools menu.
The system displays the Manage Jobs panel (FIGURE 2-2), which allows you to distribute the Image File.
3. In the Manage Jobs panel, select the New Task... button.
The system displays the New Task panel (FIGURE 2-3), which allows you to specify the Agent Update Image File to distribute.
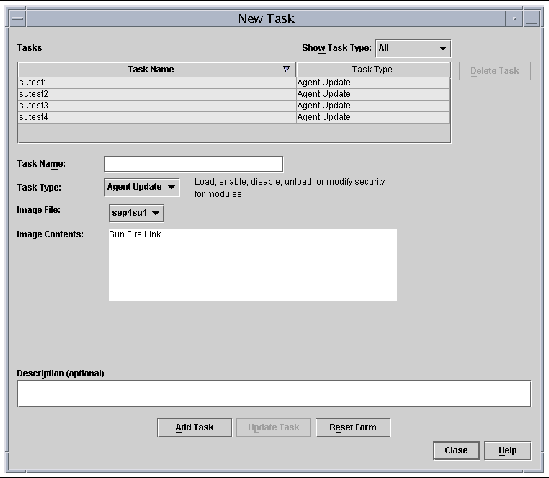
4. In the New Task panel (FIGURE 2-3), do the following:
a. Select Agent Update for the Task Type.
b. Select the Image File you created in Step 1.
5. In the Manage Jobs panel (FIGURE 2-2), do the following:
b. Select the Task you created in Step 4.
c. Do one of the following to schedule when you want the Task to run.
d. Do one of the following to select the objects (agent machines) to which you want to distribute the Image File.
e. Preview the objects (agent machines) you have selected and redo your selections if necessary.
The job starts and distributes the Image File to the objects (agent machines) you selected. When the job is running, it appears in the Job list of the Manage Jobs panel. The panel shows the status of the job when running and when complete.
|
|
This procedure applies to either:
1. Log in as root on the Sun Management Center server machine.
2. Create an agent-update image using either of the image tools.
3. Download the file /opt/SUNWsymon/base/bin/agent-update.bin to each target machine's root directory.
If you installed Sun Management Center in a different directory than /opt, download /installdir/SUNWsymon/base/bin/agent-update.bin, where installdir is the install directory you specified.
4. Log in as root on the target machine.
5. Go to the directory where you downloaded agent-update.bin.
6. Type ./agent-update.bin -s server -r http-port -p image-name, where
7. Provide the security seed and the SNMPv1 community string.
The agent-update process prompts you for the security seed and the SNMPv1 community string.
The update process applies the update to the machine without prompting for further information.
When the update process completes, check the update status by viewing the log file /var/opt/SUNWsymon/log/agent-update.log on the server host.
|
Note - You need to re-run ./es-setup -F to set up the platform agent. |
# ./es-uninst |
The system displays this message.
2. Type y to uninstall Production Environment, which uninstalls all Sun Management Center software.
The system displays this message.
This will uninstall ALL Sun Management Center Products. !!! Do you want to change selection? [y|n|q] |
The system displays your selection; go to the beginning of Step 2.
The system displays this message.
Do you want to preserve database? [y|n|q] |
4. Type y to keep any existing topology and event data; or type n to discard the data.
The system displays this message.
Proceed with uninstall? [y|n|q] |
5. Type y to proceed with the uninstall; or type n to not proceed with the uninstall.
If you type y to proceed, the system displays the list of packages to be uninstalled, the packages as they are uninstalled, the status of the uninstallation, and the location of the log file.
# ./es-uninst |
The system displays this message.
2. Type n to not uninstall the Production Environment; in other words, type n to uninstall individual modules.
The system displays this message.
3. Type y beside each module you do want to uninstall and n beside each module you do not want to uninstall.
The system displays the modules that will be uninstalled and this message.
Do you want to change selection? [y|n|q] |
The system displays your selections; go to the beginning of Step 3.
The system displays this message.
Proceed with uninstall? [y|n|q] |
5. Type y to proceed with the uninstall; or type n to not proceed with the uninstall.
If you type y to proceed, the system displays the list of packages to be uninstalled, the packages as they are uninstalled, the status of the uninstallation, and the location of the log file.
The es-start command requires different command arguments, depending on which component you are starting. Refer to the Sun Management Center 3.5 Installation and Configuration Guide for a list of the options for es-start. The -h option for es-start also lists all the options. The following procedure describes some common es-start options.
1. Log in as superuser on the machine where the components are to be started (see TABLE 2-5 for the location of the components).
2. Change the directory to the /opt/SUNWsymon/sbin directory.
This example assumes that your software in the default area /opt. If not, replace /opt with your own path.
# cd /opt/SUNWsymon/sbin |
On the system controller, start the Sun Management Center agents.
# ./es-start -al |
This command starts the base and platform agents. The platform agent provides all the Sun Fire 15K/12K system information to Sun Management Center software.
3. To start the Sun Management Center agent on a Sun Fire 15K/12K domain with only the Sun Management Center agent layer installed, type:
# ./es-start -a |
4. To start all the Sun Management Center components on the Sun Management Center server host with all layers installed, type:
# ./es-start -A |
|
Note - Upon rebooting, all Sun Management Center agents start automatically. |
5. To start the console, type:
# ./es-start -c |
|
Note - To start the console, you can also be logged in as your own user ID; you do not have to be logged in as superuser. However, to access the Platform or Domain Config Reader, you must be in the appropriate security access groups. See Security Considerations for Defining Groups. |
This section describes stopping and exiting Sun Management Center software.
The es-stop command requires different command arguments depending on which component you are stopping. Refer to the Sun Management Center 3.5 Installation and Configuration Guide for a list of the es-stop options. The -h option for es-stop also lists all the options. The following procedure describes some common es-stop options.
1. Log in as superuser on the machine where the components are to be stopped (see TABLE 2-5 for the location of the components).
2. Change the directory to the /opt/SUNWsymon/sbin directory.
This example assumes that your software is in the default area /opt. If not, replace /opt with your own path.
# cd /opt/SUNWsymon/sbin |
3. To stop the server and agent components on the server machine, type:
# ./es-stop -Sa |
4. To stop the domain agent components on the host machine for a domain, type:
# ./es-stop -a |
5. On the system controller, to stop the host agent, which monitors the SC and platform agent, type:
# ./es-stop -al |
1. From the menu bar on the main console window, select File and Exit.
2. Click the Exit button on the Exit Sun Management Center panel.
Chapter 6, "Installation and Setup", of the Sun Management Center 3.5 Installation and Configuration Guide, describes in detail how to install all the software. An overview of the process follows.
1. As superuser, run the Sun Management Center 3.5 Installation Wizard, es-guiinst, as described in Chapter 6, "Installation and Setup," of the Sun Management Center 3.5 Installation and Configuration Guide.
2. After the base software is installed, the Select Add-on Product screen provides a selectable list of add-on products that you can install. Select those add-ons that apply to Sun Fire 15K/12K systems, and click Next.
3. The Sun Management Center Setup Wizard starts automatically after all the software is installed.
This section describes how to set up the Sun Fire 15K/12K add-on software using the Sun Management Center 3.5 Setup Wizard.
|
|
1. On a system controller, type es-guisetup to start the Sun Management Center 3.5 Setup Wizard.
Once the Sun Management Center base software setup is complete, the Select Add-on Products panel appears with a list of add-on products by platform installed on your system. In this example, Sun Fire 15/12K Monitoring is the product and platform.
The following add-on products are newly installed on this system and will be set up. - Sun Fire 15K/12K Monitoring |
2. Click Next to start the Platform Setup.
The Sun Fire 15K/12K Platform Setup panel displays the following.
Checking configuration files... Status: Set the platform server: <SChostname> Checking for default platform agent port... Checking of configuration files complete. |
If the default platform port was not set previously, the Sun Fire 15K/12K Platform Setup panel displays the following.
The default port for the Sun Management Center platform agent is 166 Would you like to use the default Sun Management Center platform agent port? O Yes O No |
The Sun Fire 15K/12K Platform Setup panel displays the following.
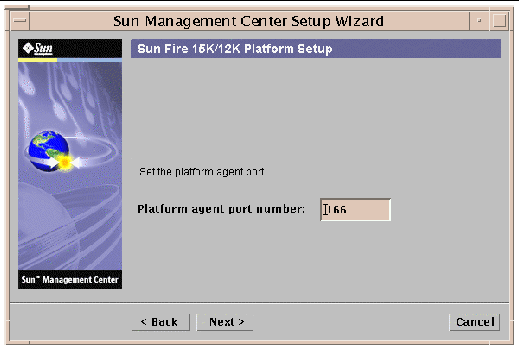
The Sun Fire 15K/12K Platform Setup panel confirms the port number that you chose.
Confirmation of the platform agent port. Platform agent port: 166 |
If you have added or changed the port number, the Sun Fire 15K/12K Platform Setup panel displays this message.
The Sun Management Center security keys must be regenerated because the platform agent port number has been changed. Would you like to regenerate the security keys now? O Yes O No |
If you click yes, the Sun Fire 15K/12K Platform Setup panel displays this message.
|
Note - Ensure you store the seed password securely. It will be needed if you perform any modifications to your Sun Management Center installation. |
i. Enter a unique password for the seed if this is a first-time installation. If not, enter the seed used in previous versions of Sun Management Center.
ii. Reenter the seed to confirm.
If you click no, the Sun Fire 15K/12K Platform Setup panel displays this message.
The Sun Management Center security keys have not been regenerated. Remember to regenerate them prior to starting Sun Management Center. |
The Sun Fire 15K/12K Platform Setup panel displays the following.
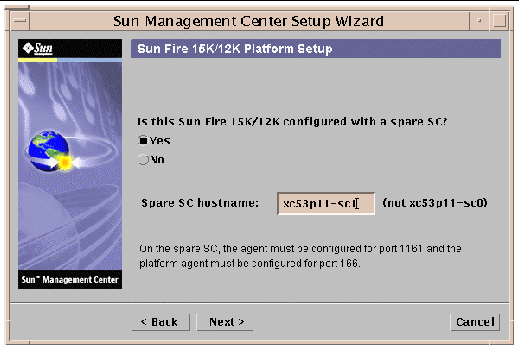
i. Click the radio button to the left of Yes.
ii. Enter the spare SC hostname.
The Sun Fire 15K/12K Platform Setup panel displays this message.
The Platform Agent will create a composite object that includes Sun Management Center agents loaded on Sun Fire 15K/12K domains. |
The Sun Fire 15K/12K Platform Setup panel displays the default Sun Fire 15K/12K domains port.
The default port to check for Sun Fire 15K/12K domains is 161. Would you like to change the port to be checked? O Yes O No Domain port number: (leave empty for none) |
i. Click the radio button to the left of Yes
ii. Enter the port number or leave blank for no ports to be checked.
The Sun Fire 15K/12K Platform Setup panel displays this message.
Updating configuration files... Status: Updated Discovery Table information via es-dt Creating Smart Update configuration file. Update of configuration files complete. |
The Sun Fire 15K/12K Platform Setup panel displays this message.
Sun Fire 15K/12K platform setup is complete. |
The Sun Fire 15K/12K System Controller Agent Setup panel displays the following.
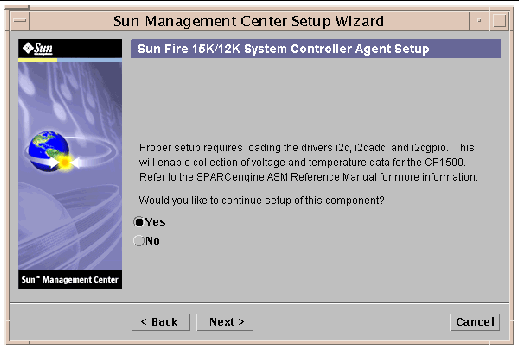
The Sun Fire 15K/12K System Controller Agent Setup panel displays this message.
Updating configuration files... Status: Created deviceinfo.conf file Loading drivers: i2c i2cadc i2cgpio Update of configuration files complete. |
The Sun Fire 15K/12K System Controller Agent Setup panel displays this message.
Sun Fire 15K/12K SC agent setup is complete. |
1. On a Sun Fire 15K/2K domain, type es-guisetup to start the Sun Management Center 3.5 Setup Wizard.
Once the Sun Management Center base software setup is complete, the Select Add-on Products panel appears with a list of add-on products by platform installed on your system. In this example, Sun Fire 15/12K Monitoring is the product and platform.
The following add-on products are newly installed on this system and will be set up. - Sun Fire 15K/12K Monitoring |
2. Click Next to start the Domain Setup.
The Sun Fire 15K/12K Domain Setup panel displays the following:
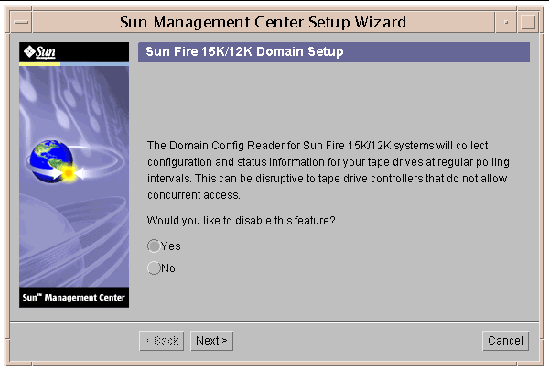
if your tape drive controllers do not allow concurrent access, you will want to disable this feature.
The Sun Fire 15K/12K Domain Setup panel displays the status of updating configuration files.
Updating configuration files... Status .... .... Update of configuration files complete. |
The Sun Fire 15K/12K Domain Setup panel displays this message.
Sun Fire 15K/12K domain setup is complete. |
|
|
1. On the Sun Management Center server machine, type es-guisetup to start the Sun Management Center 3.5 Setup Wizard.
Once the Sun Management Center base software setup is complete, the Select Add-on Products panel appears with a list of add-on products by platform installed on your system. In this example, Sun Fire 15/12K Monitoring is the product and platform.
The following add-on products are newly installed on this system and will be set up. - Sun Fire 15K/12K Monitoring |
The Sun Fire 15K/12K Server Setup panel displays this message.
Updating configuration files... |
When the update is complete, the Sun Fire 15K/12K Server Setup panel displays this message.
Sun Fire 15K/12K server setup is complete. |
The Sun Fire 15K/12K System Controller Server Setup panel displays this message.
Updating configuration files... |
When the update is complete, the Sun Fire 15K/12K System Controller Server Setup panel displays this message.
Sun Fire 15K/12K SC server setup is complete. |
You can use the Sun Management Center 3.5 Start Wizard, es-guistart, to start Sun Management Center software. Refer to Chapter 7, "Starting and Stopping Sun Management Center Software," in the Sun Management Center 3.5 Installation and Configuration Guide for detailed options and instructions.
You can use the Sun Management Center 3.5 Stop Wizard, es-guistop, to stop Sun Management Center software. Refer to Chapter 7, "Starting and Stopping Sun Management Center Software," in the Sun Management Center 3.5 Installation and Configuration Guide for detailed options and instructions.
You can use the Sun Management Center 3.5 Stop Wizard, es-guistop, to uninstall Sun Management Center software. Refer to Chapter 5, "Uninstalling Previous Versions of Sun Management Center Software," in the Sun Management Center 3.5 Installation and Configuration Guide for detailed options and instructions. See To Uninstall Individual Add-on Modules in this guide if you want to uninstall only one or two modules.
You can reconfigure the Sun Fire 15K/12K setup parameters at any time by running the setup script (es-setup) again. You must reconfigure the appropriate Sun Fire 15K/12K setup parameters if certain changes occur, including:
For information about where these components are located, see TABLE 2-5.
|
Note - You do not need to rerun setup after System Management Services (SMS) software is reinstalled; however, you do need to restart the Sun Management Center software. |
1. Log in as superuser on the machine where the components are that you want to reconfigure (see TABLE 2-5 for the location of the components).
2. Change the directory to the /opt/SUNWsymon/sbin directory.
This example assumes that you are using the default area /opt. If not, replace /opt with your own path.
# cd /opt/SUNWsymon/sbin |
3. Stop the components to be reconfigured.
The command you use to stop the component depends on which component you are reconfiguring.
# ./es-stop -Sa |
# ./es-stop -a |
# ./es-stop -al |
4. Run the setup script to set up the component layers.
# ./es-setup |
5. Follow the instructions in the setup procedures for the corresponding components with these two additional prompts.
Do you want to preserve your existing data? [y|n|q] |
a. Type y to keep any existing topology and event data; or type n to discard the data.
server-hostname appears to be configured as your Sun Management Center server. Is this correct? [y|n|q] |
a. Type y for yes if this is your Sun Management Center server, or type n for no if not. If you type n, you are prompted to type your correct server host name.
6. Restart the components that you stopped.
The Sun Management Center Web Interface is an optional, licensed Sun Management Center feature that provides most of the functionality available in the Sun Management Center Java-based Console. For a detailed description of the Sun Management Center Web Interface, refer to the Sun Management Center 3.5 User's Guide.
|
Note - Be aware that the Web Interface provides no physical or logical views of the Sun Fire 15K/12K system. See Chapter 5 in this document for more information about physical and logical views. |
This sections provides examples of messages the system displays at the end of the installation and setup scripts. You can look at these files to see if there were any problems during installation and setup, and you can use these files for diagnosing errors.
This example shows a message when an installation script completes, where nnnnnnnnnnnn.nnnnn is the identifying number of the installation log.
Log file: /var/opt/SUNWsymon/install/install.nnnnnnnnnnnn.nnnnn |
This example shows a message when a setup script completes, where nnnnnnnnnnnn.nnnn is the identifying number of the setup log.
| Sun Management Center 3.5 Supplement for Sun Fire 15K/12K Systems
| 816-7377-10 |
Copyright © 2003, Sun Microsystems, Inc. All rights reserved.

