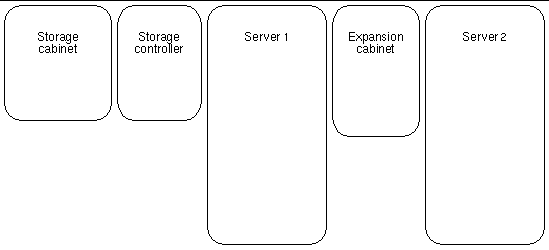
FIGURE 2-2
Expansion Cabinet Component Placement
After you have set up the hardware components, you are ready to install the cabling as described in the following section.
Cluster Platform 15K/9960 System Cabling
Most of the cabling for the Cluster Platform 15K/9960 system is preinstalled at the factory. You must complete the cabling between the Sun Fire 15K servers, the Sun StorEdge 9960 system, and the Sun StorEdge expansion cabinet.
Cluster Platform 15K/9960 Network Topology
The Cluster Platform 15K/9960 system is connected by a combination of Ethernet and fibre channel cables that create several separate networks and links to your networks. See the following figures for the layout of the networks:
Cluster Platform 15K/9960 System Cables
The following list contains the system cables you need to connect the server, storage, and expansion cabinet.
- Four, fifteen-meter, RS-232C (Mini-Din/RJ-45) serial cables
These cables provide console access to the system controllers.
- Six, fifteen-meter, RJ-45/RJ-45 Ethernet cables
These cables provide administrative network access to the system controllers.
- Four, RJ-45/RJ-45 Ethernet cables
These cables provide access to the public network and must be supplied by the customer.
- Two, RJ-45/RJ-45 Ethernet cables
These cables provide the management server and the terminal concentrator access to the external administration network.
- Six, fifteen-meter fiber optic cables
These cables provide access to the shared storage access from the cluster nodes and implement the two-link point-to-point private cluster interconnect between the cluster nodes.
- Twelve power cables for each Sun Fire 15K server
- Two power cables for the Sun StorEdge expansion cabinet
- Four power cables for the Sun StorEdge 9960 system cabinet
- Four, four-meter, SCSI boot-device cables
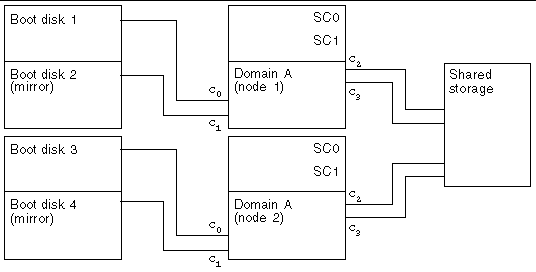
Storage Connections
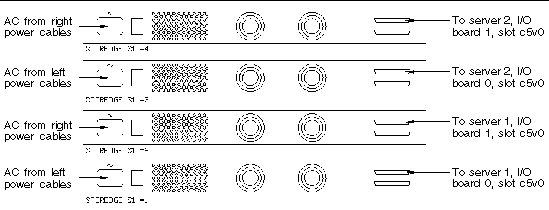
The storage connections enable the domains to have access to the shared storage and to the boot disks in the expansion cabinet. FIGURE 2-3 shows the layout of the storage connections.
FIGURE 2-3 Storage Connections
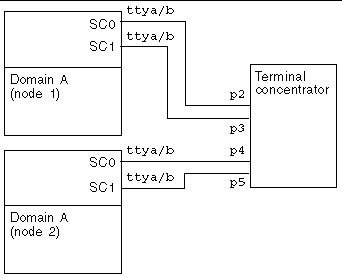
Serial Connections
The serial connections enable the terminal concentrator to have access to the system controllers. FIGURE 2-4 shows the layout of the serial connections.
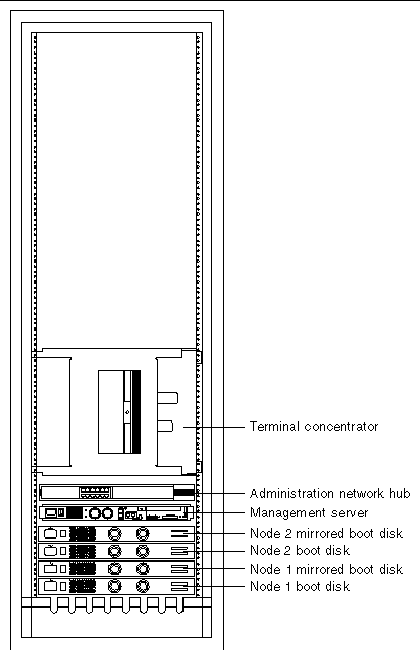
FIGURE 2-4
Serial Connections
Cabling the Cluster Platform 15K/9960 System
To cable the Cluster Platform 15K/9960 system, use the tables and illustrations in this section as a guide.
TABLE 2-1 Expansion Cabinet Cables
|
Cable
|
Source
|
Destination
|
|
Boot Disks
|
|
|
|
4-meter, SCSI
|
SCSI in-port on boot disk 1
|
Slot 0 on server 1
|
|
4-meter, SCSI
|
SCSI in-port on boot disk 2
|
Slot 1 on server 1
|
|
4-meter, SCSI
|
SCSI in-port on boot disk 3
|
Slot 0 on server 2
|
|
4-meter, SCSI
|
SCSI in-port on boot disk 4
|
Slot 1 on server 2
|
|
Administration Hub
|
|
|
|
15 meter, RJ-45/RJ-45 Ethernet
|
Port 2
|
System controller 0 on server 1
|
|
15 meter, RJ-45/RJ-45 Ethernet
|
Port 3
|
System controller 1 on server 1
|
|
15 meter, RJ-45/RJ-45 Ethernet
|
Port 4
|
Slot 0, qfe1 port on server 1
|
|
15 meter, RJ-45/RJ-45 Ethernet
|
Port 5
|
System controller 0 on server 2
|
|
15 meter, RJ-45/RJ-45 Ethernet
|
Port 6
|
System controller 1 on server 2
|
|
15 meter, RJ-45/RJ-45 Ethernet
|
Port 7
|
Slot 0, qfe1 port on server 2
|
|
Terminal Concentrator
|
|
|
|
15 meter, RJ-45/Mini-Din RS-232C
|
Port 2
|
System controller 0 on server 1
|
|
15 meter, RJ-45/Mini-Din RS-232C
|
Port 3
|
System controller 1 on server 1
|
|
15 meter, RJ-45/Mini-Din RS-232C
|
Port 4
|
System controller 0 on server 2
|
|
15 meter, RJ-45/Mini-Din RS-232C
|
Port 5
|
System controller 1 on server 2
|
TABLE 2-2 Server Cabinet Cables
|
Cable
|
Source
|
Destination
|
|
Server-to-Server
|
|
|
|
15 meter, fiber optic
|
Slot 2, Sun Gigabit Ethernet port on server 1
|
Slot 2, Sun Gigabit Ethernet port on server 2
|
|
15 meter, fiber optic
|
Slot 3, Sun Gigabit Ethernet port on server 1
|
Slot 3, Sun Gigabit Ethernet port on server 2
|
|
Server-to-Public-Network
|
|
|
|
RJ-45/RJ-45 Ethernet cable
|
Slot 0, qfe0 port on server 1
|
Customer supplied Ethernet hub
|
|
RJ-45/RJ-45 Ethernet cable
|
Slot 1, qfe0 port on server 1
|
Customer supplied Ethernet hub
|
|
RJ-45/RJ-45 Ethernet cable
|
Slot 0, qfe0 port on server 2
|
Customer supplied Ethernet hub
|
|
RJ-45/RJ-45 Ethernet cable
|
Slot 1, qfe0 port on server 2
|
Customer supplied Ethernet hub
|
TABLE 2-3 Storage Cabinet Cables
|
Cable
|
Source
|
Destination
|
|
Storage to Server
|
|
|
|
15 meter, fiber optic cable
|
Storage, board V, port A
|
Slot 2, fiber optic port on server 1
|
|
15 meter, fiber optic cable
|
Storage, board S, port A
|
Slot 3, fiber optic port on server 1
|
|
15 meter, fiber optic cable
|
Storage, board V, port C
|
Slot 2, fiber optic port on server 2
|
|
15 meter, fiber optic cable
|
Storage, board S, port C
|
Slot 3, fiber optic port on server 2
|
FIGURE 2-5 Server 1 Front Cable Connections
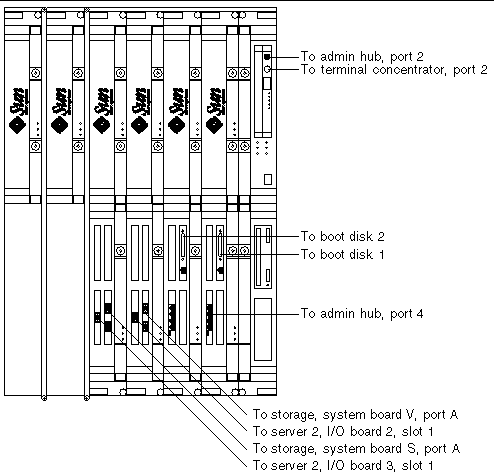
FIGURE 2-6 Server 1 Rear Cable Connections
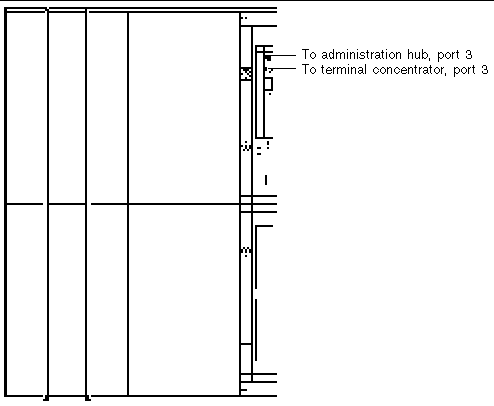
FIGURE 2-7 Server 2 Front Cable Connections
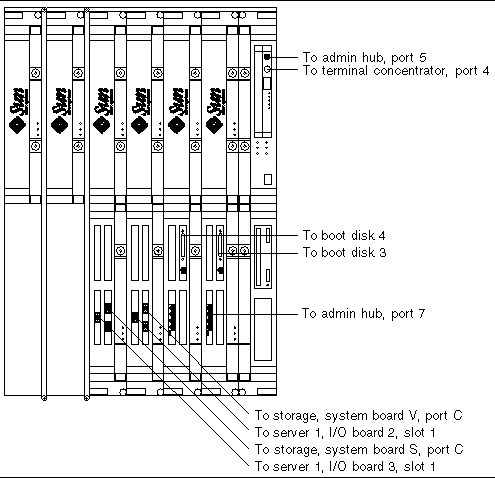
FIGURE 2-8 Server 2 Rear Cable Connections
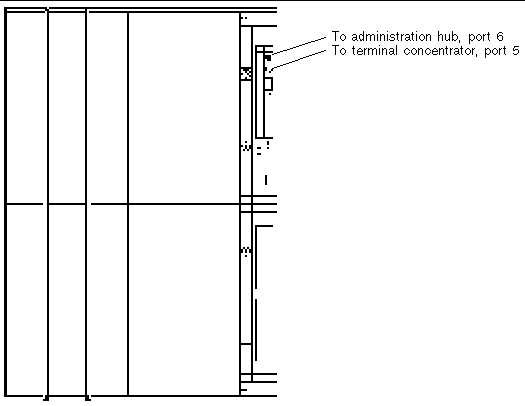
FIGURE 2-9 Storage Cabinet System Board S Connections
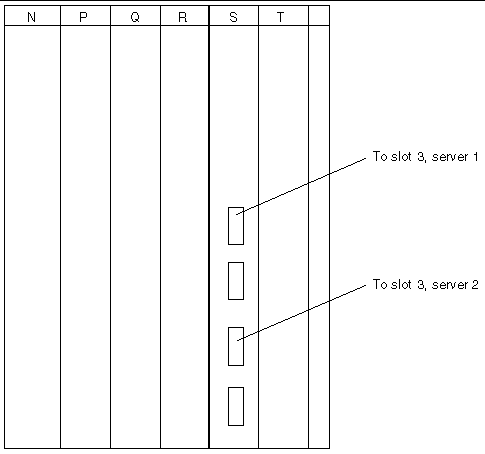
FIGURE 2-10 Storage Cabinet System Board V Connections
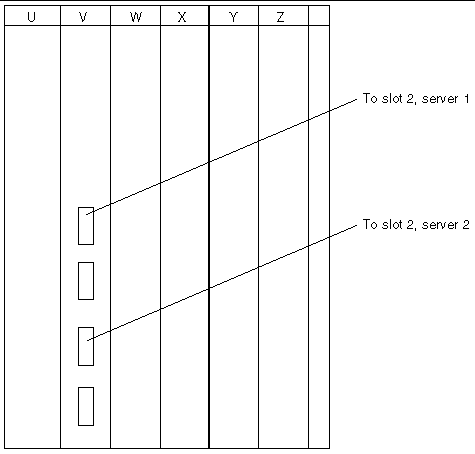
FIGURE 2-11 Terminal Concentrator Cable Connections
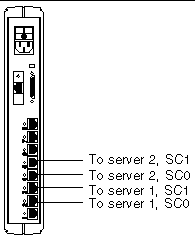
FIGURE 2-12 Administration Hub Cable Connections
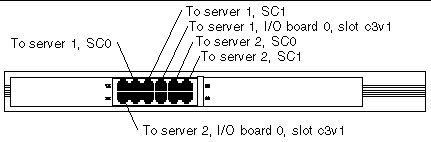
FIGURE 2-13 Boot Disks Cable Connections
| Cluster Platform 15K/9960 System Installation Guide
| 816-3538-10
|    
|
Copyright © 2002, Sun Microsystems, Inc. All rights reserved.