| C H A P T E R 3 |
|
Cluster Platform 15K/9960 System Software Configuration |
This chapter contains instructions on configuring the Cluster Platform 15K/9960 system software.
Before you configure the system, you should have already installed the hardware components and cabled the system. If you have not already done so, see Chapter 2 for instructions.
You should also have already completed the site preparation tables in the Cluster Platform 15K/9960 System Site Planning Guide. If you do have not that guide, you must obtain it to complete the tables.
Besides the site-specific information you need, you also need to know the superuser password for the management server, which is abc by default.
This section contains instructions on how to configure and customize the Cluster Platform 15K/9960 system software.

|
Caution - You must enter the correct parameters for the initial configuration, or the configuration will not initialize properly. |
|
Note - To produce a console terminal using a laptop computer, see "Invalid Cross-Reference Format". |
1. Disconnect the 9524A serial cable from port 1 on the terminal concentrator.
2. Connect the RJ-45 end of the 2151A serial cable to port 1 of the terminal concentrator and the DB-25 end to serial port B on a Sun workstation.
3. Use the tip(1M) command to establish the connection:
% /usr/bin/tip hardwire |
|
Note - The tip(1M) command connects the Sun workstation I/O with the terminal concentrator I/O during an interactive session. |
4. Power on the main circuit breakers on the StorEdge expansion cabinet.
5. Power on all of the individual components (management server, boot disks, terminal concentrator, and administration hub).
6. Power cycle the terminal concentrator (power off and then on).
Within five seconds after powering on the concentrator, press and release the TEST button.
The terminal concentrator undergoes a series of diagnostics tests. Following the diagnostics tests, the tip window on the administration workstation should display the following message:
System Reset - Entering Monitor Mode monitor:: |
7. Use the addr command to modify the network configuration of the terminal concentrator.
8. Use the addr -d command to verify the network configuration.
9. Use the sequence command to specify the interface sequence:
10. Terminate the tip(1M) session by typing ~. (tilde and period).
11. Power-cycle the terminal concentrator to enable the IP address changes and wait at least two minutes for the terminal concentrator to activate its network.
12. Verify that the Ethernet hub is connected to the local area network.
An RJ-45 cable must connect the Ethernet hub to the administration network.
a. Disconnect the RJ-45 serial cable from port 1 of the terminal concentrator and from the Sun workstation.
b. Reconnect the 9524A serial cable into port 1 of the terminal concentrator.
|
Note - At this time, the cluster configuration should be cabled as originally shipped from the factory. |
13. From the Sun workstation, use the ping(1M) command to verify that the terminal concentrator responds to the new IP address.
In the following example, 10.0.0.2 is used as the concentrator IP address.
The Sun workstation must be connected to the same subnet to which the terminal concentrator was configured.
14. Telnet to the terminal concentrator and edit the Annex file.
In the following example, 10.0.0.2 is used as the concentrator IP address. The password for the Annex file defaults to the assigned IP address.
15. Type the following information into the config.annex file.
% gateway net default gateway gateway_IP_address metric 1 hardwired Ctrl-W: save and exit Ctrl-X: exit Ctrl-F: page down Ctrl-B: page up |
16. Press Ctrl+W to save changes and exit the config.annex file.
17. Enable access to all of the ports, and reboot the terminal concentrator.
After the terminal concentrator is rebooted, all of the ports will be accessible from outside the subnet. You can use the ping(1M) command with the IP address to determine when the terminal concentrator is ready to be used.
|
Note - Make sure that all of the network interfaces for node 1 and node 2 are attached to the production network. See "Invalid Cross-Reference Format" in Chapter 2 for connection details. |
You are done configuring the terminal concentrator. You must now configure the management server.
The following steps will assist you in the configuration of the management server; at the conclusion of the steps, the management server will reboot, and you will be asked a series of questions to configure the cluster.

|
Caution - The following steps provide critical information for configuring the management server. You must ensure that you enter the proper information. |
1. From the Sun workstation, access the terminal concentrator.
In the following example, 10.0.0.2 is used as the concentrator IP address.
# telnet 10.0.0.2 Trying 10.0.0.2... Connected to 10.0.0.2. Escape character is'^]' Return Rotaries Defined: cli Enter Annex port name or number: 1 |
The following list contains the port designations:
2. Boot the management server from the OpenBoot PROM (OBP) prompt.
The sample parameters in the following examples may not fit your specific environment. You should note the introduction on each code box, and select the best choice for your environment.
5. Select the appropriate terminal emulation:
6. Select Yes to the prompt on network connectivity.
7. Select No to the prompt on DHCP services.
8. Select the primary network interface.
The management server configuration uses eri0 as the default primary network interface:
9. Enter the name of the management server.
10. Enter the IP address of the management server.
11. Select Yes to the subnet prompt.
12. Enter the netmask of the management server.
13. Select No to the prompt on IPv6 support.
Currently, only version 4 of the IP software is supported. Ensure that IPv6 support is disabled.
14. Confirm the customization information for the management server.
15. Select No at the Kerberos security prompt.
Only standard UNIX security is currently supported. Ensure that Kerberos security is not configured.
16. Select and confirm a name service.
If you choose to use a name service, you must modify the /etc/nsswitch.conf file on the management server so that files appears before any other name service.
|
Note - The two cluster nodes will be automatically configured to not support any naming services. This default configuration avoids the need to rely on external services. |
17. Select the appropriate region.
18. Select the appropriate time zone.
19. Set the appropriate date and time.
20. Confirm the date, time, and time zone information.
21. Enter a superuser (root) password.
After the system reboots, you will see the following message:
22. Type N if the management server name and IP address are correct.
If you type N, the cluster environment customization starts.
If you type Y, the configuration script invokes the sys-config(1M) command and returns the management server to the OpenBoot prompt. You must then start the configuration process again at Step 2 on page 35.
The Cluster Platform 15K/9960 system customization script displays default values within square brackets. You can press Return to accept the default value.

|
Caution - Exiting the customization process will leave the management server in an unconfigured state; therefore, the customization script will not allow you to exit during the customization process. |
|
Note - The customization script extracts the default values from the
|
You can edit the existing /jumpstart/Files/JumpStart.conf or copy a pre-defined JumpStart.conf file to the management server. Editing the JumpStart.conf file can reduce the configuration time. The following procedure assumes that you are not editing this file or using a pre-defined file.
1. Press N when prompted to edit the JumpStart.conf file.
2. Specify the settings for the external administration network:
3. Specify the settings for the public network:
4. Specify the settings for the cluster interconnect:
5. Press Y to confirm the settings for the external administration network, the public network, and the cluster interconnect.
If any of the settings are incorrect, press N and the number of the setting.
6. Enter the settings for the internal administration network:
7. Press Y to confirm the settings for the internal administration network.
If any of the settings are incorrect, press N and the number of the setting, then correct the setting.
8. Specify the volume manager for the cluster nodes.
In the following example, VERITAS VxVM 3.1.1 is installed to manage the nodes.

|
Caution - You must have the VERITAS license key before you answer N to the volume manager prompt. |
The customization script customizes the cluster and reboots the management server. You are now ready to set up the NTP server.
During the installation of the system, the configuration script scans the local networks for NTP servers. You must answer configuration questions to set up the NTP configuration.
If the script finds NTP servers, it displays a list of the IP address, as shown in the example below. You can use these servers or specify your own list of servers.
If you do not use the specified servers, you can enter a space-separated list of IP addresses of available NTP servers.
In either case, the management server attempts to synchronize with the listed servers. The scanning process does not verify if authentication and access control on the specified servers are appropriate for the management server. The scanning process also fails to detect NTP on broadcast and multicast addresses, although you can specify them manually.
If the scanning process fails to find an NTP server, the management server prompts you to choose between synchronizing to the local clock or synchronizing to a list of servers. The example below shows a user specified list being used:
The management server splash page uses the Apache Web server software included in the Solaris 8 10/01 operating environment. The Apache Web server is configured automatically during the installation process. The /etc/apache/httpd.conf file is installed and configured by the configuration process. You can customize this file to fit your data center needs. The server is configured to run as the webserver user in the webserver group.
If you need to disable the Web server, remove or rename the /etc/apache/httpd.conf file and stop the Apache Web server process, as shown below:
# mv /etc/apache/httpd.conf /etc/apache/httpd.conf.old # /etc/rc2.d/K16apache stop |
The source for the management server splash page and other Web pages on the management server is in the /suntone/html directory. You can modify the pages in this directory to customize the management server splash page.
The Sun Management Center software is installed and set up automatically as part of the Cluster Platform 15K/9960 system installation. No user interaction is required during this process. The advanced and premier Sun Management Center software options are included in the installation. These additional options require the appropriate licenses.
You must complete the following operations to use the Sun Management Center software:
The instructions in this section are intended as a quick start to the Sun Management Center software. Refer to the Sun Management Center 3.0 Software User's Guide and the Sun Management Center 3.0 Supplement for Sun Fire 15K Systems for instructions on how to customize the software further.
If you have purchased the optional Sun Management Center advanced and/or premier products, you received license keys for these products. You must register the keys by following the procedure in this section. No license is necessary for basic functionality. For more information on the Sun Management Center licensing model, contact your Sun service representative or authorized Sun service provider.
|
Note - Your particular license may not provide access to all the features documented in the Sun Management Center Software User's Guide. |
For information on purchasing a license, contact your Sun service representative or authorized Sun service provider and refer to the following web site:
If you should exceed the time period allowed for your demonstration license, a message is displayed during login to alert you that you have exceeded the limits of your license.
License expired Please purchase your license! |
If you do not have a license and attempt to access the Sun Management Center software, you may see the following message:
Missing License!! Please purchase your license!! |
During the installation of the server component, you are given the opportunity to specify a license token.
The server and agent components of Sun Management Center are started automatically during the boot process by the S82es_server and S81es_agent scripts located in the /etc/rc3.d directory. No other configuration is required.
To disable Sun Management Center server or agent, rename these scripts to s82es_server and s81es_agent respectively.
The Sun Management Center Console component is the user interface you will use for management tasks and monitoring. You should be logged into the management server to start the Console.
The Console component of Sun Management Center is an X-Windows application, but the management server has no graphical display.
If you need to log in to the management server, you must redirect the X-Windows display by setting the DISPLAY environment variable. The value should be directed to the workstation on which you are working.
Ensure that the workstation you are working from has access to the X-client applications running on the management server by using the following command on the workstation:
% xhost management_server_hostname |
In the Bourne or Korn shell, set the DISPLAY environment variable on the management server as follows:
|
$ DISPLAY=workstation_hostname_or_IP_address:0.0 $ export DISPLAY |
In the C shell, set the DISPLAY environment variable as follows:
$ setenv DISPLAY workstation_hostname_or_IP_address:0.0 |
 Use the following command to start the Sun Management Center software:
$ /opt/SUNWsymon/sbin/es-start -c & |
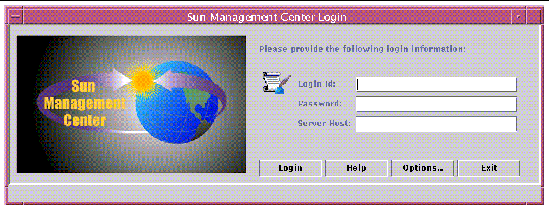
After the console starts, the Login window is displayed (FIGURE 3-1). You are prompted to enter a login ID, password, and server host.
FIGURE 3-1 Sun Management Center Software Login Window
2. Type in the root password on the management server
3. Type in the management server hostname.
|
Note - You can safely ignore the "Please acquire the license for the following: Advanced Systems Monitoring" warning. |
The first time you start the Sun Management Center software, it displays the Set Home Domain window (FIGURE 3-2).
FIGURE 3-2 Set Home Domain Window
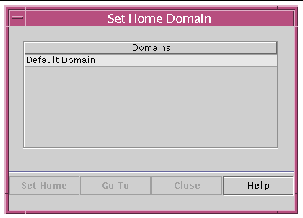
1. Highlight the default domain.
2. Click on the Set Home button.
Further information about creating and configuring administrative domains can be found in the Sun Management Center 3.0 Software User's Guide.
Initially, the Sun Management Center software console displays only one node--the management server. You must add each node by using the Create Topology Object window (FIGURE 3-3).
FIGURE 3-3 Create Topology Object Window
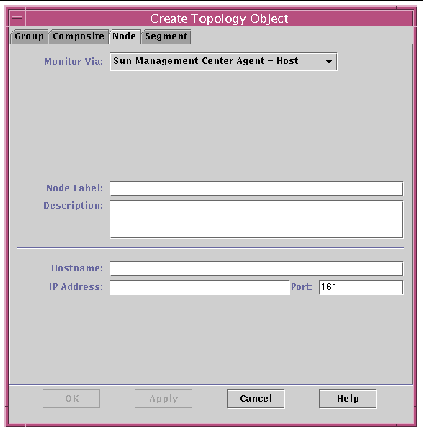
At a minimum, you must provide the node label and the hostname.
1. Select Create an Object from the Edit menu.
2. In the Node Label box, type an appropriate name.
3. In the Hostname box, type in the hostname.
You should use hostname-admin so that the software uses the administration network. This ensures that the management server is connected to a private network. You can leave the IP address blank, or you can type in the IP address in the IP Address box instead of using the hostname.
You can add nodes only through the console interface. You cannot use the Web browser that is described in the next section.
4. Repeat Step 1 through 3 for the second node.
For more information on creating objects with the Sun Management Center software, refer to the Sun Management Center 3.0 Software User's Guide.
After you have added the Cluster Platform 15K/9960 system nodes, you can use the Sun Management Center software to maintain or monitor the cluster.
You can access the Sun Management Center software by using a Web browser. The Web browser interface provides a sub-set of the Console functions. To access the Sun Management Center software, point the Web browser to the following URL:
http://management_server_hostname_or_IP_address:8002
This URL is also posted as a link on the management server splash page that can be found at the following URL:
http://management_server_hostname_or_IP_address/
By default, use root as your login ID and the superuser (root) password for the management server as the password.
|
Note - You cannot use the Web browser to create nodes or objects. |
|
Note - When executing the ccp(1M) command remotely, ensure that the DISPLAY shell environment variable is set to the local hostname. |
1. Use the following command to start the Cluster Console Panel from the management server:
# /opt/SUNWcluster/bin/ccp cluster_name & |
The ccp(1M) command displays the Cluster Control Panel, as in FIGURE 3-4.
FIGURE 3-4 Cluster Control Panel
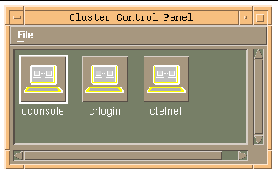
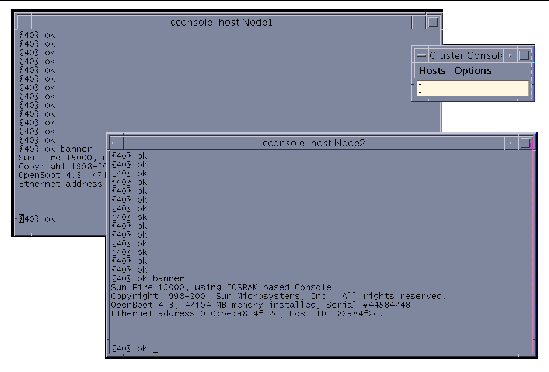
2. In the Cluster Control Panel, double-click on the cconsole icon to display a Cluster Console window for each cluster node (see FIGURE 3-5).
|
Note - Before you use an editor in a Cluster Console window, verify that the TERM shell environment value is set and exported to a value of vt220. |
3. Position the cursor in the cconsole window, and use the domain-a user ID to log into both cluster nodes.
The password is temporarily set to abc. You must change the password after the first login session.
4. Use the setkeyswitch -d command to power on domain-a on both cluster nodes
5. Use the console -d a command to display domain-a consoles for both cluster nodes.
6. Use the ~# key sequence to drop both domains to the OBP prompt.
FIGURE 3-5 Cluster Console Windows
|
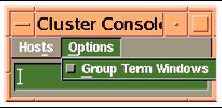
Note - The console windows for both cluster nodes are grouped (the three windows move in unison--FIGURE 3-5). To ungroup the Cluster Console window from the cluster node console windows, deselect the Group Term Windows checkbox in the Options menu (FIGURE 3-6). |
FIGURE 3-6 Cluster Console Window
7. Enter the following commands into the Cluster Console window to start the installation process:
|
boot net - You must use spaces before and after the dash (-) character in the
|
The following software is automatically installed on both cluster nodes:
All patches are applied and system files are configured to produce a basic cluster environment.
Killed Killed Warning: Failed to register application "DiskSuite Tool" with solstice launcher. |
8. Log into each cluster node as superuser.
The default superuser password is abc.
9. Change the default password to a secure password:
# passwd passwd: Changing password for root New password: password Re-enter new password: password |
10. Configure the shared storage.
Refer to the Solstice DiskSuite software documentation or the VERITAS VxVM software documentation to configure the shared storage (see Documentation). You must create the disk sets, the metadevices, and the file systems.
You are done configuring and customizing the Cluster Platform 15K/9960 system. You can now install applications in the cluster environment.
For instructions on how to install an application, refer to the documentation that accompanied the application. You will need to establish resource groups, logical hosts, and data services in the Sun Cluster 3.0 software for the application. For instructions, refer to the Sun Cluster 3.0 documentation.
The cluster nodes can access the data services from the following path:
Copyright © 2002, Sun Microsystems, Inc. All rights reserved.