|
|
< Previous | Next > |
| Product: Storage Foundation Guides | |
| Manual: Storage Foundation 4.1 FlashSnap Point-In-Time Copy Solutions Administrator's Guide | |
Preparing a Volume for Instant Snapshot OperationsTo prepare a volume for instant snapshot operations, a version 20 Data Change Object (DCO) and DCO volume must first be associated with that volume. To add a version 20 DCO object and DCO volume to an existing volume, use the following procedure:
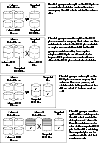
If the disks that contain volumes and their snapshots are to be moved into different disk groups, you must ensure that the disks that contain their DCO plexes can accompany them. You can use storage attributes to specify which disks to use for the DCO plexes. (If you do not want to use dirty region logging (DRL) with a volume, you can specify the same disks as those on which the volume is configured, assuming that space is available on the disks). For example, to add a DCO object and DCO volume with plexes on disk05 and disk06, and a region size of 32KB, to the volume, myvol, use the following command: # vxsnap -g mydg prepare myvol ndcomirs=2 regionsize=32k \ alloc=disk05,disk06 If required, you can use the vxassist move command to relocate DCO plexes to different disks. For example, the following command moves the plexes of the DCO volume for volume vol1 from disk03 and disk04 to disk07 and disk08: # vxassist -g mydg move vol1_dcl !disk03 !disk04 disk07 disk08 To view the details of the DCO object and DCO volume that are associated with a volume, use the vxprint command. The following is example vxprint -vh output for the volume named zoo (the TUTIL0 and PUTIL0 columns are omitted for clarity): TY NAME ASSOC KSTATE LENGTH PLOFFS STATE ... v zoo fsgen ENABLED 1024 - ACTIVE pl zoo-01 zoo ENABLED 1024 - ACTIVE sd disk01-01 zoo-01 ENABLED 1024 0 - pl foo-02 zoo ENABLED 1024 - ACTIVE sd disk02-01 zoo-02 ENABLED 1024 0 - dc zoo_dco zoo - - - - v zoo_dcl gen ENABLED 132 - ACTIVE pl zoo_dcl-01 zoo_dcl ENABLED 132 - ACTIVE sd disk03-01 zoo_dcl-01 ENABLED 132 0 - pl zoo_dcl-02 zoo_dcl ENABLED 132 - ACTIVE sd disk 04-01 zoo_dcl-02 ENABLED 132 0 - In this output, the DCO object is shown as zoo_dco, and the DCO volume as zoo_dcl with 2 plexes, zoo_dcl-01 and zoo_dcl-02. For more information, see Considerations for Placing DCO Plexes, and the vxassist(1M) and vxsnap(1M) manual pages. Considerations for Placing DCO PlexesIf you use the vxassist command or the VERITAS Enterprise Administrator (VEA) to create both a volume and its DCO, or the vxsnap prepare command to add a DCO to a volume, the DCO plexes are automatically placed on different disks from the data plexes of the parent volume. In previous releases, version 0 DCO plexes were placed on the same disks as the data plexes for convenience when performing disk group split and move operations. As the version 20 DCOs in VxVM 4.0 and later releases support dirty region logging (DRL) in addition to Persistent FastResync, it is preferable for the DCO plexes to be separated from the data plexes. This improves the I/O performance of the volume, and provides resilience for the DRL logs. If you use the vxsnap prepare command to set up a DCO, you must ensure that the disks that contain the plexes of the DCO volume accompany their parent volume during the move. Use the vxprint command on a volume to examine the configuration of its associated DCO volume. Examples of Disk Groups That Can and Cannot be Split illustrates some instances in which it is not be possible to split a disk group because of the location of the DCO plexes. For more information about relocating DCO plexes, see Preparing a Volume for Instant Snapshot Operations. Examples of Disk Groups That Can and Cannot be Split
Click the thumbnail above to view full-sized image. |
| ^ Return to Top | < Previous | Next > |
| Product: Storage Foundation Guides | |
| Manual: Storage Foundation 4.1 FlashSnap Point-In-Time Copy Solutions Administrator's Guide | |
|
VERITAS Software Corporation
www.veritas.com |