Creating an Off-Host Replica Database
As illustrated in Example System Configuration for Off-Host Decision Support, the primary database volumes to be backed up, dbase_vol and dbase_logs, are configured on disks attached to controllers c1 and c2, and the snapshots are created on disks attached to controllers c3 and c4. There is no requirement for the OHP host to have access to the disks that contain the primary database volumes.
 Note
If the database is configured on volumes in a cluster-shareable disk group, it is assumed that the primary host for the database is the master node for the cluster. If the primary host is not also the master node, all VxVM operations on shared disk groups must be performed on the master node.
Note
If the database is configured on volumes in a cluster-shareable disk group, it is assumed that the primary host for the database is the master node for the cluster. If the primary host is not also the master node, all VxVM operations on shared disk groups must be performed on the master node.
Example System Configuration for Off-Host Decision Support
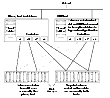
Click the thumbnail above to view full-sized image.
Note
It is assumed that you have already prepared the database volumes to be replicated as described in Setting up Volumes for Instant Snapshots.
To set up a replica database to be used for decision support on an OHP host:
-
If you have not already done so, prepare the OHP host to use the snapshot volume that contains the copy of the database tables. Set up any new database logs and configuration files that are required to initialize the database. See Preparing a Replica Oracle Database for details of this procedure for an Oracle database.
-
On the primary host, use the following command to make a full-sized snapshot, snapvol, of the tablespace volume by breaking off plexes from the original volume:
# vxsnap -g volumedg make \
source=volume/newvol=snapvol/nmirror=N
The nmirror attribute specifies the number of mirrors, N, in the snapshot volume.
If the volume does not have any available plexes, or its layout does not support plex break-off, use the procedure described in Creating a Volume for Use as a Full-Sized Instant Snapshot to prepare an empty volume for the snapshot, and then use the following command to create the snapshot:
# vxsnap -g volumedg make source=volume/snapvol=snapvol
If a database spans more than one volume, specify all the volumes and their snapshot volumes as separate tuples on the same line, for example:
# vxsnap -g dbasedg make source=vol1/newvol=svol1 \
source=vol2/newvol=svol2 source=vol3/newvol=svol3
Note
This step sets up the snapshot volumes, and starts tracking changes to the original volumes. When you are ready to create the replica database, proceed to step 3.
-
If the volumes to be backed up contain database tables in file systems, suspend updates to the volumes:
-
On the primary host, refresh the contents of the snapshot volumes from the original volume using the following command:
# vxsnap -g volumedg refresh snapvol source=vol \
[snapvol2 source=vol2]... syncing=yes
The syncing=yes attribute starts a synchronization of the snapshot in the background.
For example, to refresh the snapshots svol1, svol2 and svol3:
# vxsnap -g dbasedg refresh svol1 source=vol1 svol2 source=vol2 \
svol3 source=vol3
-
If you temporarily suspended updates to volumes in step 2, release all the tablespaces or databases from suspend, hot backup or quiesce mode:
-
Use the following command to wait for the contents of the snapshot to be fully synchronous with the contents of the original volume:
# vxsnap -g volumedg syncwait snapvol
For example, to wait for synchronization to finish for all the snapshots svol1, svol2 and svol3, you would issue three separate commands:
# vxsnap -g dbasedg syncwait svol1
# vxsnap -g dbasedg syncwait svol2
# vxsnap -g dbasedg syncwait svol3
Note
You cannot move a snapshot volume into a different disk group until synchronization of its contents is complete. You can use the vxsnap print command to check on the progress of synchronization.
-
On the primary host, use the following command to split the disks containing the snapshot volumes into a separate disk group, snapvoldg, from the original disk group, volumedg:
# vxdg split volumedg snapvoldg snapvol ...
-
On the primary host, deport the snapshot volume's disk group using the following command:
# vxdg deport snapvoldg
-
On the OHP host where the replica database is to be set up, use the following command to import the snapshot volume's disk group:
# vxdg import snapvoldg
-
The snapshot volumes are initially disabled following the split. Use the following commands on the OHP host to recover and restart the snapshot volumes:
# vxrecover -g snapvoldg -m snapvol ...
# vxvol -g snapvoldg start snapvol ...
-
On the OHP host, for each snapshot volume containing tablespaces, check the file system that it contains, and mount the volume using the following commands:
# fsck -F vxfs /dev/vx/rdsk/diskgroup/snapvol
# mount -F vxfs /dev/vx/dsk/diskgroup/snapvol mount_point
Note
On Linux, use the -t option, and on AIX, use the -V option, instead of the -F option for both commands.
For example, to check the file system in the snapshot volume snap1_dbase_vol, and mount it on /rep/dbase_vol:
# fsck -F vxfs /dev/vx/rdsk/dbasedg/snap1_dbase_vol
# mount -F vxfs /dev/vx/dsk/dbasedg/snap1_dbase_vol \
/rep/dbase_vol
Note
For a replica DB2 database, the database volume must be mounted in the same location as on the primary host.
-
Copy any required log files from the primary host to the OHP host:
-
As the database administrator, start the new database:
- If the replica DB2 database is not to be rolled forward, use the following commands to start and recover it:
db2start
db2inidb database as snapshot
If the replica DB2 database is to be rolled forward (the primary must have been placed in LOGRETAIN RECOVERY mode before the snapshot was taken), use the following commands to start it, and put it in roll-forward pending state:
db2start
db2inidb database as standby
Obtain the latest log files from the primary database, and use the following command to roll the replica database forward to the end of the logs:
db2 rollforward db database to end of logs
- For an Oracle database, use a script such as that shown in Script to Complete, Recover and Start Replica Oracle Database. (This script also creates the control file for the new database by executing the SQL script that you created using the procedure in Preparing a Replica Oracle Database.)
- For a Sybase ASE database, use a script such as that shown in Script to Start Replica Sybase ASE Database.
If you are using the warm standby method, specify the -q option to the dataserver command. Use the following isql commands to load the dump of the transaction log and put the database online:
load transaction from dump_device with standby_access
online database database_name for standby_access
If you are not using the warm standby method, use the following isql command to recover the database, roll back any uncommitted transactions to the time that the quiesce command was issued, and put the database online:
online database database_name
Resynchronizing the Data with the Primary Host
When you want to resynchronize a snapshot with the primary database, follow these steps:
-
On the OHP host, shut down the replica database, and use the following command to unmount each of the snapshot volumes:
# unmount mount_point
-
On the OHP host, use the following command to deport the snapshot volume's disk group:
# vxdg deport snapvoldg
-
On the primary host, re-import the snapshot volume's disk group using the following command:
# vxdg [-s] import snapvoldg
Note
Specify the -s option if you are reimporting the disk group to be rejoined with a shared disk group in a cluster.
-
On the primary host, use the following command to rejoin the snapshot volume's disk group with the original volume's disk group:
# vxdg join snapvoldg volumedg
-
The snapshot volumes are initially disabled following the join. Use the following commands on the primary host to recover and restart a snapshot volume:
# vxrecover -g volumedg -m snapvol
# vxvol -g volumedg start snapvol
-
Use step 3 through step 5 to refresh the contents of the snapshot from the original volume.
The snapshots are now ready to be re-used for backup or for other decision support applications.
Updating a Warm Standby Sybase ASE 12.5 Database
If you specified the for external dump clause when you quiesced the primary database, and you started the replica database by specifying the -q option to the dataserver command, you can use transaction logs to update the replica database. As the database administrator, perform the following steps each time that you want to update the replica database:
-
On the primary host, use the following isql command to dump the transaction log for the database:
dump transaction to dump_device with standby_access
Copy the transaction log dump to the appropriate database directory on the OHP host.
-
On the OHP host, use the following isql command to load the new transaction log:
load transaction from dump_device with standby_access
-
On the OHP host, use the following isql command to put the database online:
online database database_name for standby_access
Reattaching Snapshot Plexes
Note
This operation is not supported for space-optimized instant snapshots.
Using the following command, some or all plexes of an instant snapshot may be reattached to the specified original volume, or to a source volume in the snapshot hierarchy above the snapshot volume:
# vxsnap [-g diskgroup] reattach snapvol source=vol \
[nmirror=number]
By default, all the plexes are reattached, which results in the removal of the snapshot. If required, the number of plexes to be reattached may be specified as the value assigned to the nmirror attribute.
Note
The snapshot being reattached must not be open to any application. For example, any file system configured on the snapshot volume must first be unmounted.
For example the following command reattaches 1 plex from the snapshot volume, snapmyvol, to the volume, myvol:
# vxsnap -g mydg reattach snapmyvol source=myvol nmirror=1
While the reattached plexes are being resynchronized from the data in the parent volume, they remain in the SNAPTMP state. After resynchronization is complete, the plexes are placed in the SNAPDONE state.
|