| Oracle® Database 2 Day + Application Express Developer's Guide Release 3.0 Part Number B28551-01 |
|
|
View PDF |
| Oracle® Database 2 Day + Application Express Developer's Guide Release 3.0 Part Number B28551-01 |
|
|
View PDF |
In this tutorial, you create a Human Resources (HR) application for a fictitious company called AnyCo Corp. This section shows you how to build the application, modify it, and preview it at different points during the development process.
Before you begin this section:
Ensure you have installed the database objects as described in "Installing the Sample Objects". This applies to both the hosted demo environment and local instance.
This section contains the following topics:
This tutorial guides you through the development of a Human Resources (HR) application for a fictitious company called AnyCo Corp. The application enables users to view and modify employee information stored in the OEHR_DEPARTMENTS and OEHR_EMPLOYEES tables.
When building the application, you perform these steps:
Create an application that includes a Home page and a basic Departments report. See "Creating the Initial Application".
Expand the report to pull in data from other tables. See "Modifying the Departments Report".
Build an Employee form and report based on the OEHR_EMPLOYEES table. See "Adding an Employees Report and Form".
Add calculated fields to the Employees report. See "Editing the Employees Report".
Edit items on the Employees form to display as select lists (with lists of values). See "Displaying Items as Select Lists".
Add a link on the Home page. See "Adding a Link on the Home Page to the Employees Report".
Modify the Employees report to enable the user to select a department. See "Linking the Employees and Departments Reports".
Add a link on the Departments report that navigates the user to the Employees report. See "Linking a Column Value to Another Page".
Add a report as a region that displays department details. See "Adding a Conditional Department Details Report".
Add your company name so that it appears on all pages in your application. See "Adding Your Company Name".
Switch the theme for your application. See "Switching Themes to Change User Interface".
This first exercise guides you through creating your initial application. Using the Create Application Wizard, you create two pages as well as specify basic application functionality.
To create your initial application:
Log in to Application Express.
For instructions, see "Logging In to the Hosted Demo Environment" or "Logging In to Your Local Instance".
On the Workspace home page, click Application Builder.
Click the Create button.
The Create Application Wizard appears.
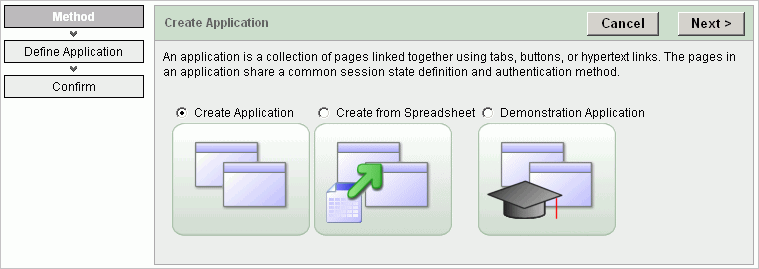
Note that each page within a wizard displays the title of the wizard (for example, Create Application). Each wizard page also displays a series of blocks on the left, representing the sequence of steps. The highlighted block indicates the step you are performing.
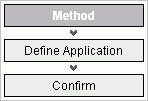
To orient you, each step in these exercises generally begins with the block label. For example, the first step in the Create Application Wizard highlights the word Method. Therefore, the next step orients you by beginning with the words For Method.
For Method, accept the default, Create Application, and click Next.
For Name:
Name - Enter AnyCo Corp.
Application - accept the default ID. The system provides a unique ID for each application you create in this workspace.
Create Application - Accept the default, From scratch.
Schema - Select the schema that contains the objects for this tutorial (for example, TWODAYPLUS).
Click Next.
Next, add a page to your application.
For Pages, specify the following in the Add Page section:
Select Page Type - Accept the default, Blank.
Tip:
Explanatory information for each option appears on the right side of the page. This page-level help appears throughout the application.Page Name - Enter Home.
Click Add Page.
The new page is listed in the top area. Also, note that the Add Page area appears so you can continue adding pages to your initial application.
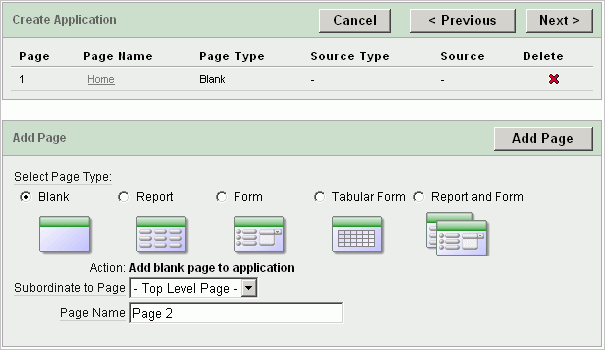
Next, add a report page on the OEHR_DEPARTMENTS table.
In the Add Page section, specify the following:
Select Page Type - Select Report.
Subordinate to Page - Select Home.
This sets up the hierarchy among the pages in your application.
Page Source - Accept the default, Table.
Table Name - Select OEHR_DEPARTMENTS.
The list shows all tables and views in the schema associated with the application.
Include Analysis Pages - Do not select.
If selected, you are prompted for information about additional summary reports and charts you can add to this page.
Click Add Page.
Notice that the pages listed in the Create Application section reflect the hierarchy of the pages in your application.
Next, change the default page name, OEHR_DEPARTMENTS, to Departments.
Click the OEHR_DEPARTMENTS link.
Under Page Definition, change the Page Name to Departments.
Click Apply Changes.
In the Create Application section, click Next.
After adding your initial pages, define some application-level settings.
For Tabs, select No Tabs and click Next.
For Shared Components, accept the default, No, and click Next.
For Attributes, accept all the defaults and click Next.
Note that Application Express is the default Authentication Scheme. The authentication scheme option enables you to control users' access to the application using Application Express authentication or another type of authentication.
For User Interface, select Theme 18 and click Next.
For Confirm, verify the information and click Create.
The two pages you created, Home and Departments, appear as icons by default.
Note:
To view the pages in a list instead of as icons, from the View list select Details and click Go. Your view setting is retained from session to session.Because these steps use the default setting, switch back to Icons view before continuing.
Notice that Application Express adds a Login page automatically to your application.
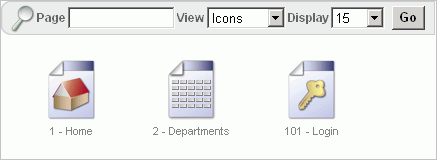
Congratulations! You created your first application using Application Express. Next, you will preview the application to see the application the way it would appear to end users.
You preview your application by running it. Running the application displays the rendered version of the application as end users would see it.
As you create new pages, you can view them by running the page individually or by running the entire application. When you run a page or application, the Application Express engine dynamically renders it into viewable HTML based on data stored in the database.
To run the application, click the Run Application icon.

To run the page, click the Run Page icon.
To preview your application:
On the Application home page, click Run Application.
On the Login page, enter your workspace username and password.
You can run the application using your Application Express login credentials because you chose Application Express Authentication when creating the application. For more information, see "Establishing User Identity Through Authentication" in Oracle Database Application Express User's Guide.
The Home page of your application appears.
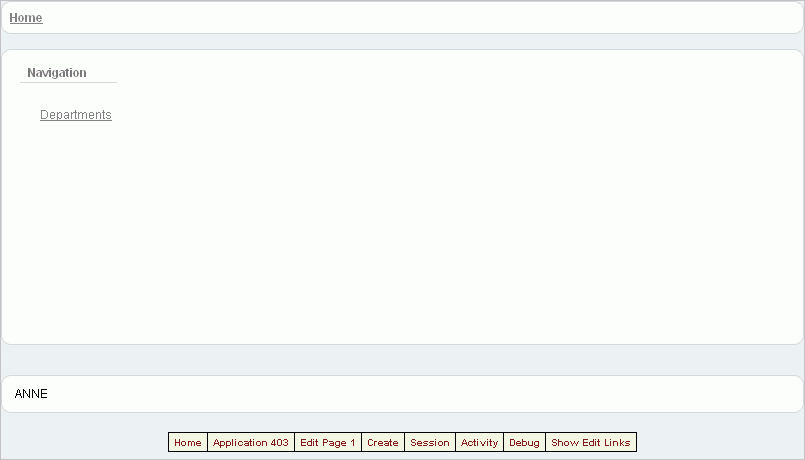
Notice that a link to the Departments page appears on the Home page because you set up that hierarchy.
Also notice the Developer toolbar at the bottom of the page. These links appear when you run an application within the development environment. The Developer toolbar offers a quick way to edit the current page; create a new page, region, or page control; view session state; or toggle in and out of Debug mode.
To continue previewing your application, click the Departments link on the Home page.
The Departments page appears.
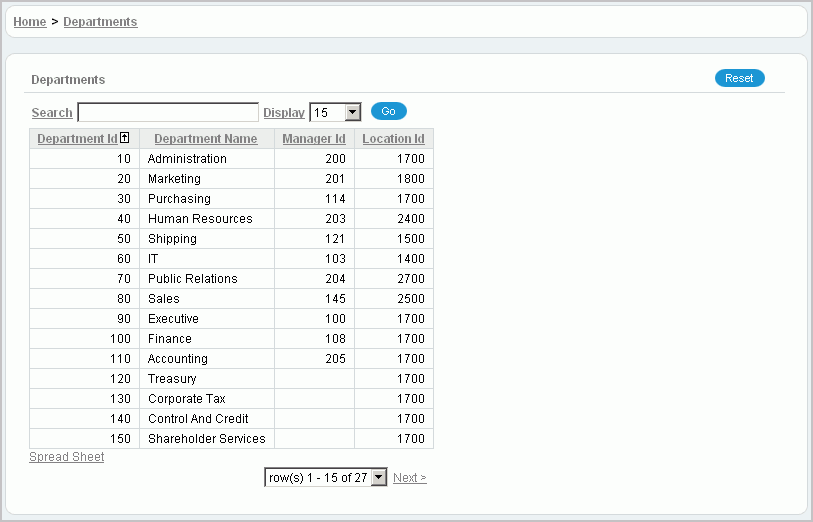
Notice that Application Express includes several features that let you perform certain tasks quickly:
Breadcrumbs - Display the hierarchy and path of the pages. Click a breadcrumb to move to a previous page.
Sort - Click a column heading to sort the data.
Search - Enter data to locate a record within the table. Search is not case sensitive.
Display - Select the number of records you want to view on the page.
Spread Sheet - Click the link to save the data to a CSV file.
Next and Previous - Click the links to move quickly from one set of records to another.
Row list - Select which set of records to view on the page.
When you run the Create Application Wizard, the wizard creates forms and reports based on the selections you make. Behind the scenes, Application Express writes a query for you to extract the appropriate data from the database.
In this exercise, you modify the query for the Departments report to include information from the OEHR_EMPLOYEES table.
To modify the Departments report:
Click the Edit Page 2 link on the Developer toolbar (at the bottom of the page).
The Page Definition for Page 2 appears. A page is the basic building block of an application. Pages contain user interface elements such as tabs, lists, buttons, items, and regions. To see the definition of each page belonging to your application, you use the Page Definition page. For more information, see "What Is Application Builder?".
Under Page Rendering, locate the Regions section.
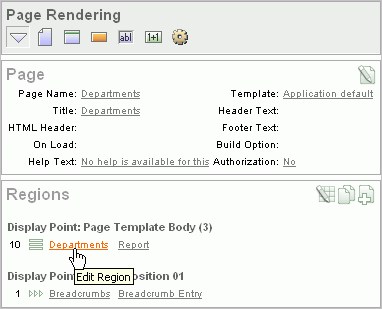
Click Departments.
Scroll down to Source, and replace the default Region Source script with the following:
SELECT d.department_id              "Department ID",
       d.department_name            "Department Name",
       count(e2.employee_id)        "Number of Employees",
       substr(e.first_name,1,1)||'. '|| e.last_name "Manager Name",
       c.country_name               "Location"
 FROM  oehr_departments d,
       oehr_employees e,
       oehr_locations l,
       oehr_countries c,
       oehr_employees e2
 WHERE d.manager_id    = e.employee_id
   AND d.location_id   = l.location_id
   AND d.department_id = e2.department_id
   AND l.country_id    = c.country_id
   AND instr(upper(d.department_name),upper(nvl(:P2_REPORT_SEARCH,d.department_name))) > 0
   GROUP BY d.department_id,
            d.department_name,
          substr(e.first_name,1,1)||'. '||e.last_name,  c.country_name
Click Apply Changes.
To see how the page looks to end users, run the page. When you run a page, the Application Express engine dynamically renders and processes the page to display viewable HTML.
To run the page:
Click the Run Page icon in the upper right corner.
The revised Departments report appears.
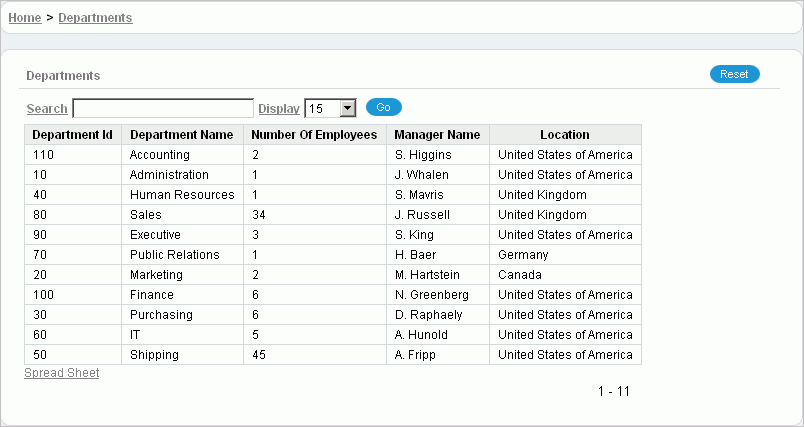
Note that the revised report has three new columns: Number of Employees, Manager Name, and Location. Also note that your data might appear in a different order. You can ignore this difference and continue with the steps.
In this exercise, you add a report to display employee information and a form to create, update, and delete employee information.
To add an employee report and form:
Click the Application link on the Developer toolbar (at the bottom of the page).
The Application home page appears.
Click Create Page.
For Page:
Select Form and click Next.
Select Form on a Table with Report.
This option creates two pages, a report and form, based on a single table or view.
Click Next.
For Identify Table or View:
For Table/View Owner, accept the default and click Next. This specifies the schema owner.
For Table/View Name, select OEHR_EMPLOYEES and click Next.
For Define Report Page, edit the following:
For Define Report Page, accept the default, Do not use tabs, and click Next.
For Define Report Page, press the Ctrl key, select the following columns, and click Next:
EMPLOYEE_ID
FIRST_NAME
LAST_NAME
HIRE_DATE
SALARY
COMMISSION_PCT
The columns you selected will appear on the Report page.
For Define Report Page, accept the defaults and click Next.
Note that the default Edit Link image resembles a small piece of paper and pencil.
Next, define the page and region information for the form.
For Define Form Page, edit the following:
Page Name - Enter Create/Edit Employee.
Region Title - Enter Create/Edit Employee.
Entry Name - Enter Create/Edit Employee.
Click Next.
In Tab Options, accept the default, Do not use tabs, and click Next.
In Primary Key, accept the defaults and click Next.
In Define the source for the primary key columns, accept the default, Existing trigger, and click Next.
Your table, OEHR_EMPLOYEES, already has a trigger that populates the primary key.
In Select Column(s), select all columns and click Next.
These columns will appear in the Create/Edit Employee form.
In Identify Process Options, accept the defaults and click Next.
These selections enable users to add, update, and create employee records.
For Confirm, verify the information and click Finish.
To preview the two pages you just created, run the current page. From the Employees report, you can then preview the form.
To preview the pages:
Click the Run Page icon.
The Employees report appears.
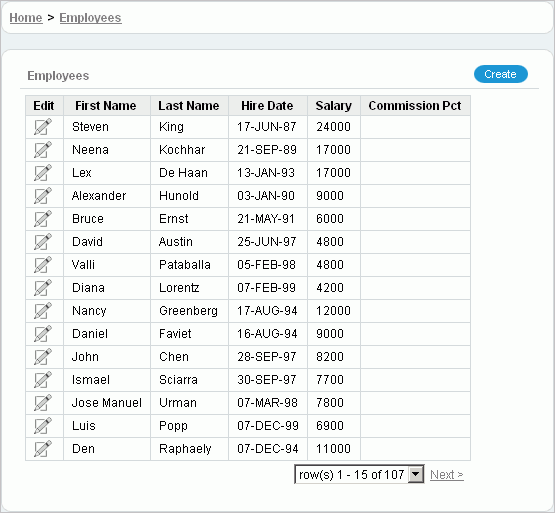
Note the following about the Employees report:
The Edit icon you selected appears in each row. You can click the Edit icon to update the employee record.
The Create button appears in the upper right corner. You can click the Create button to add an employee to the underlying table.
The Employees report includes the five columns you specified. When you selected the columns and applied the changes, Application Express created the appropriate SQL code in the background to produce this result.
Your data might appear in a different order. If so, ignore this difference and continue with these steps.
To review the form you also created, click the Edit icon in an Employee row.
The Create/Edit Employee form appears.
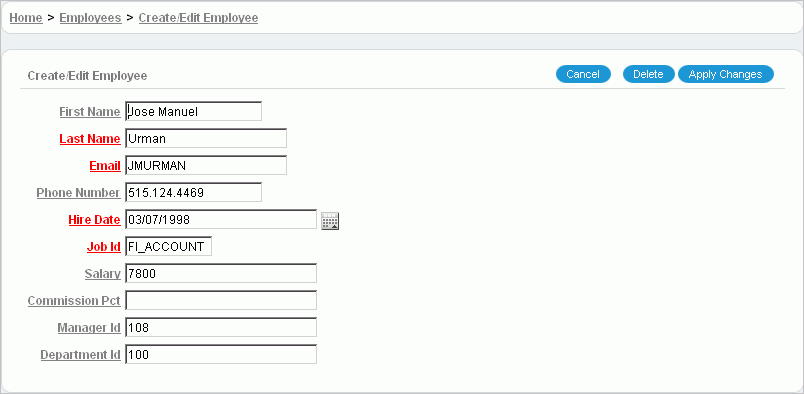
Note the following about the Create/Edit Employee form:
The form includes Cancel, Delete, and Apply Changes buttons.
The Hire Date field displays a calender, which is included because the data type of the underlying column is DATE.
In this exercise, you run a SQL script to create a function that calculates employees' salaries. Then you add a column, Remuneration, to display that calculation in the Employees report.
Topics in this section include:
First, create a function to calculate employees' salaries.
To create a function:
Click the Application link on the Developer toolbar (at the bottom of the page).
The Application home page appears.
Click the Home breadcrumb link in the title bar.
Click SQL Workshop and then SQL Commands.
SQL Commands provides a window where you can run PL/SQL against the database.
In the SQL editor, enter the following script:
CREATE OR REPLACE FUNCTION calc_remuneration(
  salary IN number, commission_pct IN number) RETURN NUMBER IS
BEGIN
  RETURN ((salary*12) + (salary * 12 * nvl(commission_pct,0)));
END;
/
Click Run.
The Results section displays this message:
Function created.
Next, add a new column to display the results of the employees' salary calculations.
To add a new column:
Navigate to the Page Definition for page 3:
On the SQL Commands page, click the Home breadcrumb link.
On the Workspace home page, click Application Builder.
Select the AnyCo Corp application.
Click 3 - Employees.
The Page Definition for page 3, Employees, appears.
Under Regions, click the Employees link (next to Report).

Scroll down to Source, and replace the existing code with the following:
SELECT "EMPLOYEE_ID",
       "FIRST_NAME",
       "LAST_NAME",
       "HIRE_DATE",
       "SALARY",
       "COMMISSION_PCT",
       calc_remuneration(salary, commission_pct) REMUNERATION
  FROM "#OWNER#"."OEHR_EMPLOYEES"
Click Apply Changes.
To preview the page, click the Run Page icon in the upper right corner. Notice the addition of the new column, Remuneration.
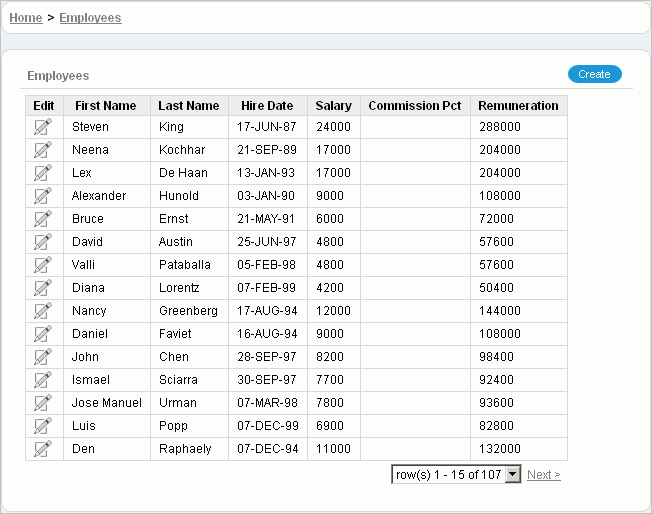
Next, change the format of the columns that contain numeric values.
To change the column format:
Click Edit Page 3 on the Developer toolbar (at the bottom of the page).
The Page Definition appears.
Under Regions, click Report.
The Report Attributes page appears.
Locate the Column Attributes section.
Next, change the column and heading alignment for the appropriate columns.
For Column Alignment, select right for SALARY, COMMISSION_PCT, and REMUNERATION.
For Heading Alignment, select center for SALARY, COMMISSION_PCT, and REMUNERATION.
Next, edit the format of the value in the column.
To edit the format of SALARY:
Under Column Attributes, click the Edit icon next to SALARY.
The Column Attributes page appears.
For Number/Date Format, select $5,234.10 from the list.
Notice that the appropriate format mask appears in the field.
Click Apply Changes.
Repeat the previous step for REMUNERATION.
Click the Run Page icon in the upper right corner to preview the page.
Notice that the numbers in the Salary and Remuneration columns now appear with the dollar sign, include commas and decimals, and are correctly aligned.
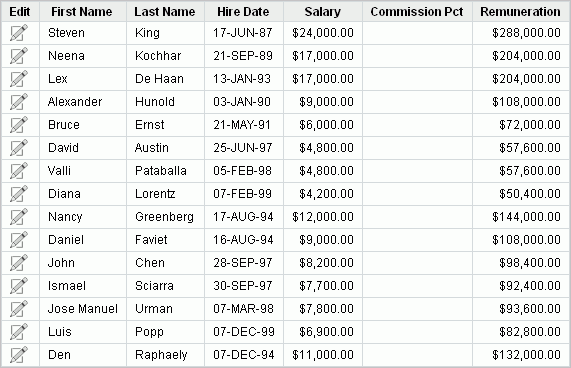
In this exercise, you edit fields (items) on the Create/Edit Employee page to display as select lists. Select lists are drop-down lists that contain lists of values that users can select to populate a field in the application. Displaying items as select lists consists of two general steps:
Create the list of values (LOVs) for each item.
Edit the item to display as a select list and reference the appropriate list of values you created.
Topics in this section include:
Next, you create lists of values for jobs, employees, and departments.
To create a list of values for jobs:
Click Application on the Developer toolbar (at the bottom of the page).
Click 4 - Create/Edit Employee.
Under Shared Components, Lists of Values, click the Create icon. The Create icon resembles a plus sign (+) that overlaps a small page.
The Create List of Values Wizard appears.
For Source, accept the default, From Scratch, and click Next.
For Name and Type:
Name - Enter JOBS.
Type - Select Dynamic.
Click Next.
For Query or Static Values, replace the existing text with this:
SELECT job_title d, job_id v
  FROM oehr_jobs
 ORDER BY d
Note that the first column selected is the one displayed to the user (d), and the second is the value stored in or retrieved from the database (v).
Click Create List of Values.
Shared Components do not appear on this Page Definition until they are explicitly added to this page. You will do that later in this tutorial.
To create a list of values for employees:
Under Lists of Values, click the Create icon.
For Source, accept the default, From Scratch, and click Next.
For Name and Type:
Name - Enter EMPLOYEES.
Type - Select Dynamic.
Click Next.
For Query or Static Values, replace the existing text with this:
SELECT first_name ||' '|| last_name d, employee_id v
  FROM oehr_employees
 ORDER BY last_name
Click Create List of Values.
To create a list of values for departments:
Under Lists of Values, click the Create icon.
For Source, accept the default, From Scratch, and click Next.
For Name and Type:
Name - Enter DEPARTMENTS.
Type - Select Dynamic.
Click Next.
For Query or Static Values, replace the existing text with this:
SELECT department_name d, department_id v
  FROM oehr_departments
 ORDER BY d
Click Create List of Values.
After you create the lists of values, you need to edit these items so that they display as select lists. By default, the items display as text fields.
You also rename the P4_JOB_ID, P4_MANAGER_ID, and P4_DEPARTMENT_ID items.
To edit the job item:
Under Page Rendering, scroll down to the Items section.
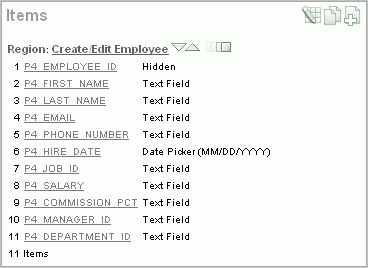
Notice that the Items section lists all the items for this page. Currently all but two items show the default type of Text field.
Click P4_JOB_ID.
The Edit Page Item page appears.
Under Name, select Select List from Display As.
Under Label, change Label to Job.
Scroll down to List of Values.
From Named LOV, select JOBS.
Click Apply Changes.
To edit the manager item:
Under Items, click P4_MANAGER_ID.
Under Name, select Select List from Display As.
Under Label, change Label to Manager.
Under List of Values:
Named LOV - Select EMPLOYEES.
Display Null - Select Yes.
Null display value - Enter the following:
- No Manager Assigned -
Note that you did not include this information for Jobs because the Job column is mandatory. For optional columns, such as Manager and Department, you need to specify that the select list display a null record. You can also provide meaningful text to display to the user when this situation occurs.
Click Apply Changes.
To edit the department item:
Under Items, select P4_DEPARTMENT_ID.
Under Name, select Select List from Display As.
Under Label, change Label to Department.
Under List of Values:
Named LOV - Select DEPARTMENTS.
Display Null - Select Yes.
Null display value - Enter the following:
- No Department Assigned -
Click Apply Changes.
Run the page.
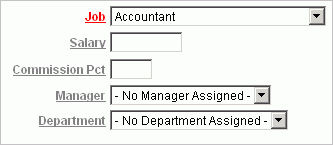
In the form, note that the Job, Manager, and Department fields now display as select lists.
In this exercise, you add a link on the Home page to take users to the Employees report. This link appears in the Navigation region on the left side of the Home page.
To add a link on the Home page to the Employees report:
Navigate to the Page Definition for the Home page, page 1:
Click Application in the Developer toolbar (at the bottom of the page).
On the Application home page, click Home.
Under Regions, click the List link (next to Navigation).
On the List Entries page, click the Create List Entry button on the right side of the page.
On the Create/Edit List Entry page, edit the following:
Sequence - Change to 20.
List Entry Label - Enter Employees.
Page - Enter 3.
Click Create.
Run the page.
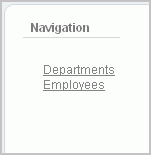
Notice that your Home page now includes a link to Employees.
Click Employees to test the link.
In this exercise, you link the Employees and Departments reports. To do this, you create a new region and new item on the Employees page to allow the user to select a department. You then modify the Employees report to only display the employees that belong to the selected department.
Topics in this section include:
First, create a region on the Employees page to hold the Department select list.
To create a region:
Navigate to the Page Definition for the Employees page, page 3.
In the Regions section, click the Create icon.
For Region:
Identify the type of region to add to this page - Accept the default, HTML, and click Next.
Select the type of HTML region container you wish to create - Accept the default, HTML, and click Next.
For Display Attributes:
Title - Enter Department.
Region Template - Select No Template.
This option adds a region without a region title.
Sequence - Change to 5 so that this region displays above Employees.
Accept the remaining defaults and click Next.
Click Create Region.
Note the Regions section now lists a Department region of type HTML.

Next, create an item in the new Department regions. The item is a select list using the Department list of values.
To create an item:
Under Items, click the Create icon.
For Item Type:
Select Item Type - Select Select List and click Next.
Select List Control Type - Select Select List with Submit and click Next.
This option refreshes the page whenever a change is made to the select list.
For Display Position and Name:
Item Name - Change to P3_DEPARTMENT_ID.
Sequence - Accept the default, 10.
Region - Select Department.
Click Next.
For List of Values:
Named LOV - Select DEPARTMENTS.
Departments appears in the select list because you created it as a shared component, which enables you to use it in other pages.
Null Text - Enter the following:
- No Department Assigned -
Null Value - Enter the following:
-1
Entering a null value makes it easier for you to write your query and to default your value to that entry. In this case, whenever a user selects - No Department Assigned -, the session state for this item is set to -1, and you can use that value in a query.
Click Next.
For Item Attributes, change the Label to Department and click Next.
For Source:
Default - Enter -1.
Accept the remaining defaults.
Click Create Item.
At this point, you have created the item, but it is not linked to the report. To link it to the report, you need to edit the Region Source and add a WHERE clause.
To link the item to the report:
Under Regions, click the Employees link (next to Report).
Scroll down to Source.
In Region Source, add the following at the end of the existing code:
WHERE nvl(DEPARTMENT_ID,'-1') = nvl(:P3_DEPARTMENT_ID,'-1')
This WHERE clause changes the query to display only those employees that belong to the selected department.
Click Apply Changes.
When a page is submitted, the branches defined for the page determine which page to display next. Because you want this page to redisplay when a user submits it, create a branch to the same page.
To create a branch:
Under Page Processing, Branches, click the Create icon.
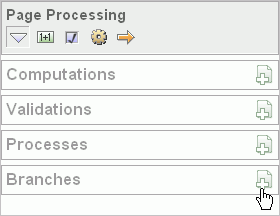
For Point and Type, accept the defaults and click Next.
For Target:
Page - Enter 3.
Select the reset pagination for this page check box.
When you select the reset pagination option, the application displays the first set of data meeting a user's new query. Otherwise, if the user was on the third page of data and then selected another department, the user would see the third page of data for the new or revised query.
Click Next.
Click Create Branch.
Run the page.
From the Department select list, select Accounting.
Note that the list displays only those employees belonging to that department.

In this exercise, you add a link on the Departments report that will navigate the user to the Employees report. It will also set the focus to the selected department.
To make this change, you edit report attributes on the Departments report.
To change the column value to a link:
Navigate to the Page Definition for the Departments page, page 2.
Under Regions, click Report.
The Region Attributes page appears.
Locate the Column Attributes section.
From Column Alignment, select right for Number of Employees.
Click the Edit icon next to Number of Employees.
Scroll down to the Column Link section.
Link Attributes - Enter the following:
alt="View Employees" title="View Employees"
Page - Enter 3.
Select the Reset Pagination check box.
Item 1, Name - Select P3-DEPARTMENT_ID.
Item 1, Value - Select #Department ID#.
The Column Link section shows all the options you selected.
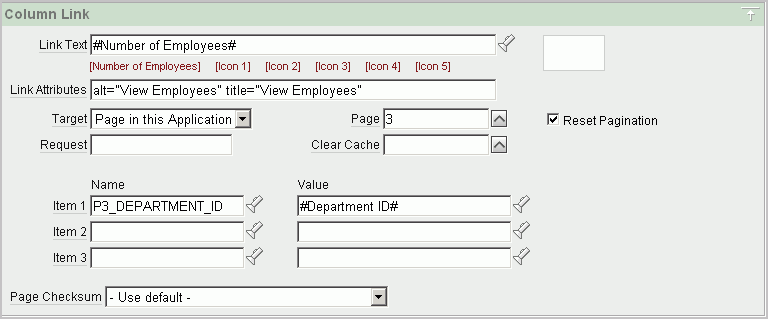
In summary, these options enable the following behavior when the end user clicks the link:
The end user is navigated to page 3, the Employees report.
On the Employees report, the selected department is in focus.
The user is returned to the first set of employee records when the user selects another department.
Click Apply Changes.
Note that in the Column Attributes section, the Number of Employees row contains a check mark in the Link column, reflecting the change you just made.
Run the page.
Note that end users can now drill down on the data in the Number of Employees column.
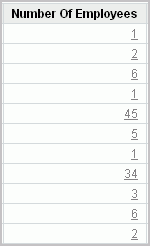
In the Number of Employees column, click a number to test the link.
Only those employees that belong to the department you selected appear in the Employees report.
In this exercise, you add a report as a region that displays department details. You also create a condition so that the report displays department information only if you select a department. If you select No Department Assigned, the Department Details report does not appear.
Topics in this section include:
First, create the report and set it to conditionally display.
To create the report and condition:
Navigate to the Page Definition for page 3, Employees.
Under Regions, click the Create icon.
For Region:
Identify the type of region to add to this page - Select Report and click Next.
Report Implementation - Accept the default, SQL Report, and click Next.
For Display Attributes:
Title - Enter Department Details.
Region Template - Select No Template.
Sequence - Enter 7.
Accept the remaining defaults and click Next.
For Source:
Enter the following query:
SELECT count(e2.employee_id) "Number of Employees:",
       substr(e.first_name,1,1)||'. '|| e.last_name "Manager Name:",
       c.country_name "Location:"
 FROM  oehr_departments d,
       oehr_employees e,
       oehr_locations l,
       oehr_countries c,
       oehr_employees e2
 WHERE d.manager_id    = e.employee_id
   AND d.location_id   = l.location_id
   AND d.department_id = e2.department_id
   AND l.country_id    = c.country_id
   AND nvl(d.department_id,'-1') = nvl(:P3_DEPARTMENT_ID,'-1')
 GROUP BY substr(e.first_name,1,1)||'. '||e.last_name,  c.country_name
Report Template - Select default: vertical report, look 1 (include null columns).
This selection displays the list vertically.
Accept the remaining defaults and click Next.
Next, you create a condition that does not display department details when the user selects the No Department Assigned option.
For Conditional Display:
Condition Type - Select Value of Item in Expression 1 != Expression 2.
Note the exclamation point (!) included after Expression 1 in the option to select.
Expression 1 - Enter:
P3_DEPARTMENT_ID
Expression 2 - Enter:
-1
Click Create Region.
Next, turn off pagination for the Department Details report, because only one record (the department details report) displays at a time. If pagination is on, the region that displays the department details includes the information row 1 - 1.
To turn off pagination:
Under Regions, click Report (next to Department Details).
Scroll down to Layout and Pagination.
For Pagination Scheme, select - No Pagination Selected.
Click Apply Changes.
Run the page.
From the Department list, select No Department Assigned.

Employee Kimberely Grant appears. This employee is not currently assigned to a department. Therefore, no department details appear. The 1 - 1 you see on this form is part of the Employees report, not part of the Department Details region you just edited.
From the Department list, select Marketing.
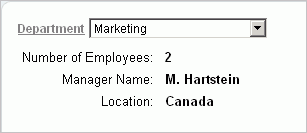
Note the details under Department.
You can add a graphical logo or text to your application so that it will display on each page. Your page template determines the display location.
In this exercise, you add your company name to your application.
To add your company name to your application:
Navigate to the Application home page. Click the Application link on the Developer toolbar (at the bottom of the page).
Click Shared Components.
Under Application, click Definition.
The Edit Application Definition page appears.
Under Logo:
Logo Type - Select Text.
Logo - Enter AnyCo Corp.
Logo Attributes - Select Black Text.
Click Apply Changes.
Run the application.
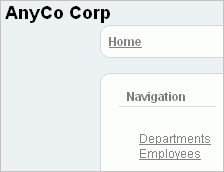
The company name now appears on each page in your application.
In this exercise, you switch the current theme to another one for your application. A theme is a collection of templates that defines the application user interface. Each theme contains templates for every type of application component and page control, including individual pages, regions, reports, lists, labels, menus, buttons, and list of values.
Application Express separates presentation (or user interface themes) from the application logic. You can design your application in one theme, change to another supplied theme, or create and use your own custom theme. By separating the application logic (such as queries, processes, and branches) from the HTML rendering, your application can take advantage of new designs and other technological advances without an application rewrite. Each theme provides a complete set of templates that accommodate every user interface pattern that may be needed in an application.
To switch the theme:
Click Application on the Developer toolbar (at the bottom of the page).
On the Application home page, click Shared Components.
Under User Interface, click Themes.
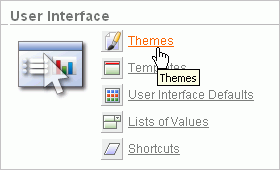
On the Themes page, click Create.
The Create Theme Wizard appears.
For Method, accept the default, From the Repository, and click Next.
For Identify Theme, select Theme 11 and click Next.
For Confirm, click Create.
Click Switch Theme.
For Identify Theme, accept the default, 11. Round Green, and click Next.
For Verify Compatibility, review the information, accept the defaults, and click Next.
The wizard verifies that corresponding templates exist in the new theme for all templates used in your current application. If a template is missing, it warns you with a message in the Status column. For this tutorial, you can ignore this message because Application Express maps missing region templates to existing ones.
For Confirm Switch, click Switch Theme.
Run the page.
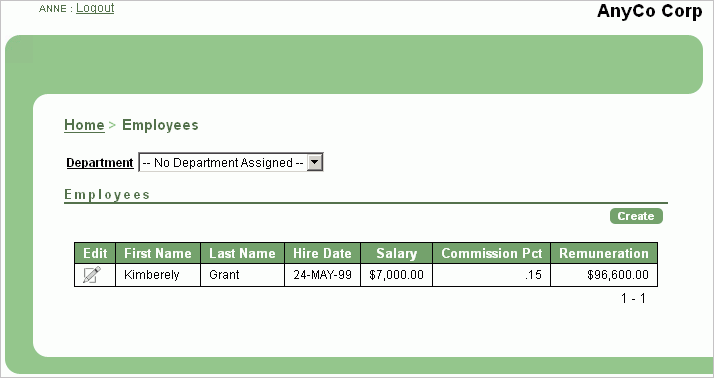
The new color scheme and display layouts are changed in all your pages.