| Oracle® Database 2 Day + Application Express Developer's Guide Release 3.0 Part Number B28551-01 |
|
|
View PDF |
| Oracle® Database 2 Day + Application Express Developer's Guide Release 3.0 Part Number B28551-01 |
|
|
View PDF |
This section guides you through the steps to access an Oracle Application Express development environment for your use. Then, you and other developers can begin building applications within Oracle Application Express.
This section contains the following topics:
Before you begin this section, do the following:
Determine which environment you want to use:
Oracle provides a hosted demonstration (demo) environment where you can try out Application Express.
Using the demo environment is the fastest way to access a development environment. You request a workspace from an Application Express Web site and provide some basic user information. Shortly after you submit your request, you receive your login credentials in an email. This option does not require installing any software.
For instructions on getting started with the demo environment, see "Accessing the Hosted Demo Environment".
Note:
Do not use the hosted demonstration environment for your production work.Set up your own local instance of Application Express. To do that, you install the product and then follow the steps in "Setting Up Your Own Local Environment".
For instructions on installing Application Express, review the installation guide for your operating environment. See "Related Documents".
To view or develop Oracle Application Express applications, use a Web browser that supports JavaScript and the HTML 4.0 and Cascading Style Sheet (CSS) 1.0 standards. The following browsers meet this requirement:
Microsoft Internet Explorer 6.0 or higher
Firefox 1.0 or higher
Enable cookies for your Web browser.
To try out Oracle Application Express without installing the product locally, go to the hosted demo environment and sign up for a workspace.
To access the hosted demo environment:
In a Web browser, go to:
Under the Login button, click Sign up for an account.
The Registration Wizard appears. Note the steps included in the wizard appear in a flowchart on the left side of the page. The highlighted block indicates the step you are performing.
On the Welcome page, review the information and click Next.
For Identify Administrator, enter valid information and click Next.
The system will generate an email with your login credentials and send it to the email address you enter.
For Workspace, enter a name for your workspace.
Workspace names must be unique. Requesting a duplicate name might delay your request. In general, enter a name that is significant to you. For example, enter your own name, your company name, or the name of the project or department to which your applications pertain.
To use the same name for your workspace and your schema (defined in the next step) use alphabetic characters when naming your workspace. Schema names are restricted to alphabetic characters.
For New or Existing Schema, select Request a new schema and click Next.
For Database Schema, do the following:
New schema to create - Enter a name containing only alphabetic characters.
Initial Space Allocation - Select at least 10 MB to accommodate the space needed for creating the objects required for this guide.
Click Next.
For Service Description, enter the requested information and click Next.
For Confirmation:
Enter the displayed numeric and alphabetic characters in the Verification Code field. Be sure to use the correct capitalization because the verification code is case-sensitive.

Review the information and click Submit Request.
You will receive an initial email that contains a link. Click the link to complete the workspace provisioning process. This step verifies that your email address is valid before approving a workspace. After that, you will receive an email with your login credentials. Use those credentials to log in to the hosted demo environment and begin using Application Express.
Using the login credentials you received in an email, log in to your dedicated workspace on the hosted demo environment.
To log in to the hosted demo environment:
In a Web browser, go to:
On the Login page, enter your login credentials.
Click Login.
The Workspace home page appears. You might be prompted to change your password. If not, you can change it manually by clicking the Change Password link on the right side of the Workspace home page. Then, enter in the information requested on the page that appears.
To continue with the tutorials, skip the rest of this section and go to "Getting Started with Oracle Application Express".
Instead of using the hosted demo environment, you can install Oracle Application Express locally. If you do a local installation, you must set up your development environment. The general steps you need to perform include:
Log in to Oracle Application Express Administration Services, as described in "Logging In to Administration Services".
Create a workspace, as described in "Creating a Workspace".
(Optional) Create additional users with developer or administrator privileges, as described in "Creating Additional User Accounts".
Note:
This tutorial explains a simplified method for setting up your development environment so that you can begin using Application Express. However, when you want to set up your development environment to accommodate your real-life development needs, review "Managing an Oracle Application Express Hosted Service" in Oracle Database Application Express User's Guide.To set up your local development environment, you first need to log in to Oracle Application Express Administration Services. This is a separate application for managing an entire Oracle Application Express instance.
To log in to the Oracle Application Express Administration Services:
In a Web browser, go to the Oracle Application Express Administration Services application. By default, Oracle Application Express Administration Services installs to one of the following locations:
If your setup uses the embedded PL/SQL gateway, go to:
http://hostname:port/apex/apex_admin
Where:
hostname is the name of the system where Oracle XML DB HTTP Server is installed.
port is the port number assigned to Oracle XML DB HTTP Server. In a default installation, this number is 8080.
apex is the database access descriptor (DAD) defined in the configuration file.
For users who have upgraded from earlier versions, or who have a custom configuration, this value may be htmldb or something else. Verify your DAD with your Oracle Application Express administrator.
See Also:
"Verifying the Oracle XML DB HTTP Server Port" in Oracle Database Application Express User's GuideIf your setup uses the Oracle HTTP Server (Apache) with mod_plsql, go to:
http://hostname:port/pls/apex/apex_admin
Where:
hostname is the name of the system where Oracle HTTP Server is installed.
port is the port number assigned to Oracle HTTP Server. In a default installation, this number is 7777. You can find information about your Oracle HTTP Server installation's port number from either of the following files:
ORACLE_BASE\ORACLE_HOME\install\portlist.ini

ORACLE_BASE\ORACLE_HTTPSERVER_HOME\Apache\Apache\conf\httpd.conf
Be aware that if you change a port number, it is not updated in the portlist.ini file. You can only rely on this file immediately after installation.
pls is the indicator to use the mod_plsql cartridge.
apex is the database access descriptor (DAD) defined in the mod_plsql configuration file.
For users who have upgraded from earlier versions, or who have a custom configuration, this value may be htmldb or something else. Verify the DAD with your Oracle Application Express administrator.
See Also:
"Managing Oracle Database Port Numbers" in Oracle Database Application Express Installation Guide andORACLE_BASE\ORACLE_HTTPSERVER_HOME\Apache\modplsql\conf\dads.readme for more information on database access descriptorsThe Login page appears.
In Username, enter the username you specified when you installed Oracle Application Express.
In Password, enter the Oracle Application Express administrator account password you specified when you installed Oracle Application Express.
Click Login.
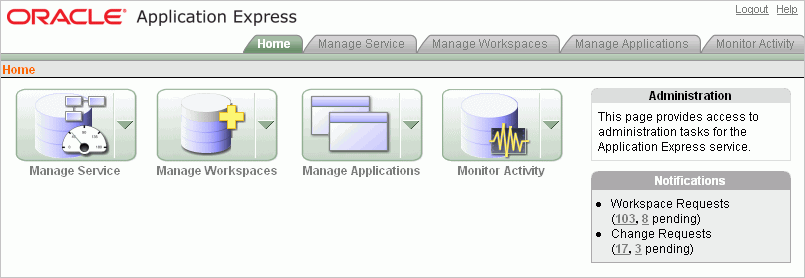
Oracle Application Express Administration Services appears.
From Administration Services, you need to create a workspace. A workspace is a shared work area within the Oracle Application Express development environment that has a unique ID and name. All users in the workspace can access all its applications and scripts. For more information about workspaces, see "About Workspaces".
To create a workspace:
Log in to Oracle Application Express Administration Services.
The Home page appears for Administration Services.

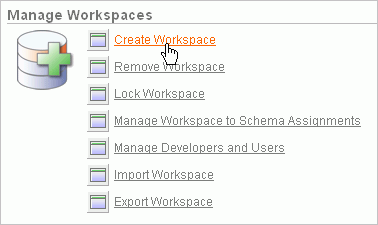
Click Manage Workspaces.
Under Manage Workspaces, click Create Workspace.

The Create Workspace Wizard appears.
For Identify Workspace, enter the following information:
Workspace Name - Enter a unique workspace name. This guide uses 2DayPlus for the workspace name.
In general, you want to enter a workspace name that is significant to you. For example, you might enter your own name, your company name, or the name of the project or department to which your application pertains.
If you want to use the same name for both your workspace and schema, enter a workspace name that contains only alphabetic characters. Schema names are restricted to alphabetic characters.
Description - Enter a workspace description.
Click Next.

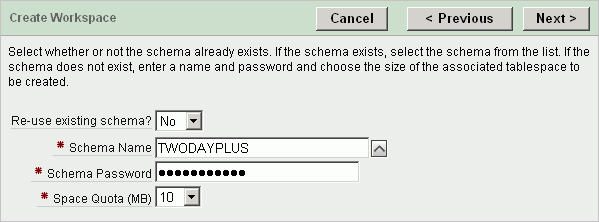
For Identify Schema, enter the following information:
Re-use existing schema - Select No if you are creating your first workspace.
A schema is a logical container for database objects. In this step, you are creating the container for database objects you will add later.
Schema Name - Enter a schema name. This guide uses TWODAYPLUS for the schema name.
You must use only alphabetic characters in your schema name.
Schema Password - Enter a case-sensitive password.
Space Quota (MB) - Select at least 10 MB to accommodate the necessary space for creating the objects required for this guide.
Click Next.

For Identify Administrator, enter the following information:
Administrator Username - Accept the default, ADMIN, or enter another user name to be used in Application Express.
You are creating an account for only one user, yourself as an administrator, at this time. To see instructions for creating additional users, see "Creating Additional User Accounts".
Administrator Password - Enter a case-sensitive password.
Enter the remaining information, including your valid email address, and click Next.
The login credentials for accessing Oracle Application Express will be sent to the email address you enter here, if you have configured the email settings for your Application Express environment.

Confirm your selections and click Create.
To log in to your local instance of Application Express, you must have this information:
URL where you can access Application Express
Workspace name you use to develop applications
Username set up for you for this workspace within Application Express
Password set up for you for this workspace within Application Express
If you set up your development environment, you have your login credentials. Otherwise, contact the person who created your user account to supply the information.
To log in to Oracle Application Express:
In a Web browser, go to the Oracle Application Express Login page. By default, Oracle Application Express installs to one of the following locations:
If your setup uses the embedded PL/SQL gateway:
http://hostname:port/apex
If your setup uses the Oracle HTTP Server (Apache) with mod_plsql:
http://hostname:port/pls/apex
For an explanation of the URLs, see "Logging In to Administration Services".
The Login page appears.
Under Login, enter your login credentials.

Click Login.
As an administrator, you inherit all the privileges associated with the developer role. If you want to start developing the application shown in this guide, skip this section and go to "Logging In to Your Local Instance".
However, you might want to create user accounts for other developers who will be sharing this workspace. Associating users with the workspace grants them access to all applications and scripts within that workspace. You can also create additional user accounts for workspace administrators.
To create user accounts:
Log in to the Workspace where you want to add users. See "Logging In to the Hosted Demo Environment" or "Logging In to Your Local Instance".
The Workspace home page appears.
From the Administration links list on the right, click Manage Application Express Users.
Under the Tasks list on the right, click either the Create Developer or Create Workspace Administrator link.
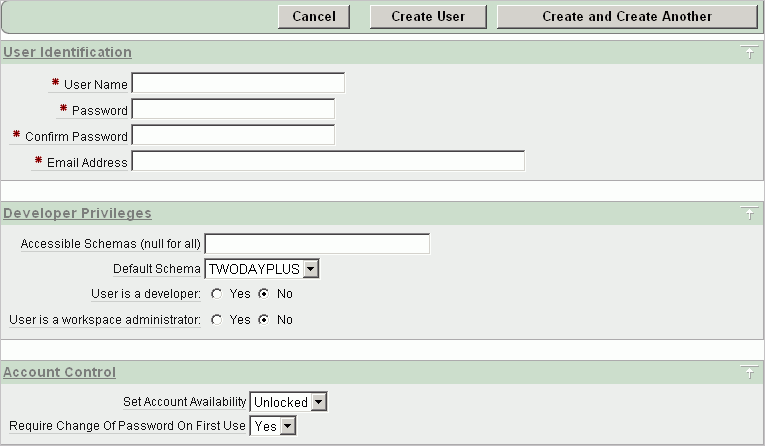
The Create User page appears.

Under Account Control:
Set Account Availability - Select Unlocked.
Require Change of Password On First Use - Select No if you do not want to force this user to change his or her password at first log in.
Under User Identification, enter the appropriate information:
User Name - Enter a user name for this end user.
Password and Confirm Password - Enter a case-sensitive password for this account.
Email Address - Enter the valid email address for this end user.
This email address must be valid so that users can receive the login credentials to log in to the application.
Under Developer Privileges:
Accessible Schemas (null for all) - Leave this blank to allow the end user to access all applications in the workspace, or enter a colon-delimited list of schemas to restrict the end user's access.
If a user does not have access to the schema that an application is built on, the user cannot access the application.
Default Schema - Accept the default, the schema you set up for this guide.
User is a developer - Accept the default.
User is a workspace administrator - Accept the default.
Under User Groups, you can select a user group.
You can use groups to restrict access to parts of an application. Groups are primarily useful when using Application Express Authentication.
Under Additional Attributes, you can enter additional user information.
Click Create User or Create and Create Another.
See also:
"Managing Application Express Users" in Oracle Database Application Express User's Guide