| C H A P T E R 5 |
|
System Administration |
This chapter describes the dzadmin configuration tool that system administrators use to configure a Sun Fire Visual Grid system.
The dzadmin program is the system administration configuration tool that system administrators use to configure a Sun Fire Visual Grid system. The dzadmin tool is a Graphical User Interface (GUI) (FIGURE 5-1).
You must run dzadmin on a Sun Fire Visual Grid system master with a slave present. The dzadmin tool dynamically queries the master and slaves for the available hardware; these details appear in the tool GUI. The Sun Fire Visual Grid system achieves communication between master and slave machines by running a network aware daemon, called dzdaemon, on each machine. dzdaemon always comes up automatically when a system is rebooted.
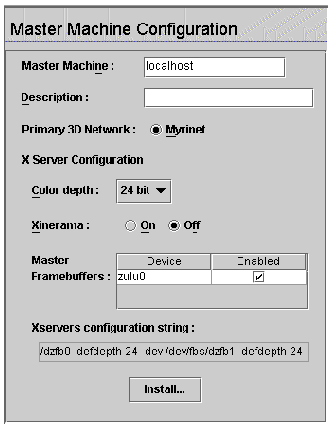
The Sun Fire Visual Grid system master is configured using the Master Machine Configuration panel of the Sun Fire Visual Grid System Administration window (FIGURE 5-1). From the dzadmin System Administration window menu system (Actions -> Add Slave), you can add slaves to the configuration. The addition of each slave adds a new slave panel to the Slave Machine Configurations panel. From this panel, you can set the characteristics of each slave (FIGURE 5-1). As each slave is added, the tool automatically queries the frame buffer information from that slave. The information appears in the Slave Machine Configurations panel. The Messages panel provides feedback about the tool's progress and reports any problems.
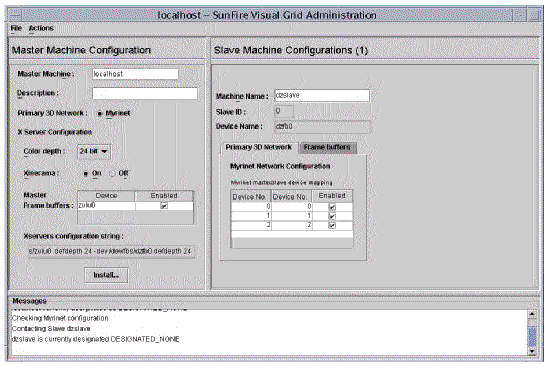
Once a configuration has been generated, you can save it as a file for later use or you can install it onto the master for immediate operation (from either Actions menu or pressing the Install button). Save a configuration by saving it as a user-named file. To load a file into the GUI, select Load from the File menu (File -> Load). A newly installed configuration becomes the default system configuration. The dzadmin tool overwrites the previous configuration file in /etc/dz/openwin/system.dzcfg. To be safe, save an existing installation to a file before installing another configuration.
The newly installed configuration takes effect after you modify the /etc/dt/config/Xservers file and restart the existing X session. The Xservers file determines which screens and what command line arguments the X server will use. Once the configuration in dzadmin has changed, it is important to modify the Xservers file before restarting the X server, or the system will not come up properly. When the Install button was pressed on the dzadmin administration tool, it appended a commented-out sample line to the bottom of the Xservers file that corresponds to the particular configuration in the tool. Comment out the existing line in the file (adding a pound sign "#" to the front of the line) and then uncomment the newly appended line (removing # in front of the line) before restarting the X server.
Alternatively, the following command, as superuser, causes the new configuration to come up immediately, and causes the X server to restart if the configuration has changed:
If the X session is being started from the command line, you must run /usr/sbin/dzstartup start in between invocations of X sessions. That is, you must run the start command again if the device configuration changes (for example, if slave machines were added or deleted, or a frame buffer was added to a slave). You also must run start if the user changes from Xinerama mode to non-Xinerama mode or vice versa.
When you select the Install option in the Actions menu, it automatically prompts the user to save the configuration to a user-named file. A new installation automatically overwrites the previously installed system.dzcfg file. To recover it, refer back to the backup file you created while installing it. To be safe, save an existing installation to a file by saving it before installing another configuration.
In an ordinary multiscreen system without Sun Fire Visual Grid software, it is possible to switch to or from Xinerama mode by modifying the Xservers file and restarting the windowing system. The X servers file is located at /etc/dt/config/Xservers. The Xservers file, if it does not already exist, is automatically created by the Sun Fire Visual Grid software package installation.
In a Sun Fire Visual Grid system, when switching back and forth between Xinerama and non-Xinerama mode, you must modify the Xservers file in the same way. And you must check or uncheck the Xinerama box in the Frame Buffers panel located within the slave panel in the dzadmin tool. This is extra step is necessary because in Xinerama mode, Sun Fire Visual Grid software sees a pair of frame buffers in a slave as a single device on the master. The single device displays twice the resolution of the individual devices.
You must set the frame buffer attributes of a system running in Xinerama mode to the same values. See Upgrading the Sun Fire Visual Grid Software for more details.
There are two menus on the Sun Fire Visual Grid software administration tool (dzadmin) menu bar: File and Actions.
FIGURE 5-2 shows the File menu.
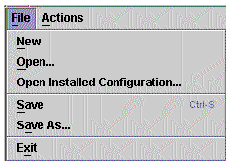
TABLE 5-1 describes the File menu items.
FIGURE 5-3 shows the Actions menu.
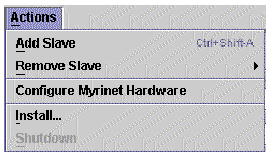
TABLE 5-2 describes the Actions menu items.
|
Automatically reconfigures the Sun Fire Visual Grid system to a new Myrinet hardware setup. |
|
The dzadmin tool does not make any dynamic changes to the system configuration until the user installs the system configuration. Therefore, you can use the tool to create new configuration profiles while the Sun Fire Visual Grid system is in use by other users.
Run dzadmin on the master by setting the DISPLAY environment variable so that you can become host (xhost) to the administration workstation. The application displays on the screen of the administration workstation.
1. Become superuser and set the administration workstation DISPLAY environment variable. Type:
Where master is the master host and admin is the name of the administration workstation.
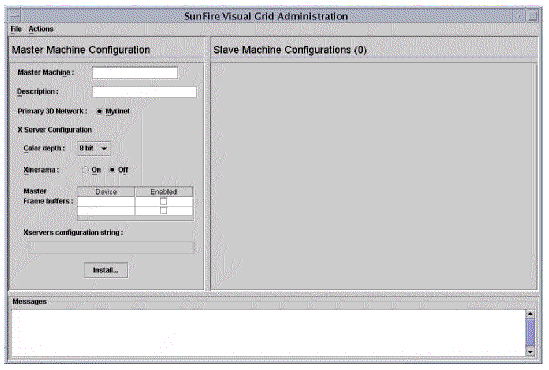
The Sun Fire Visual Grid software administration tool then appears on the administration workstation screen (FIGURE 5-4).
The administration tool consists of three panels: Master Machine Configuration, Slave Machine Configuration, and Messages.
3. Go to Using the dzadmin System Administration Tool.
1. Start the dzadmin administration tool
See Starting the dzadmin System Administration Tool.
2. Enter the master nodename in the Master Machine field.
a. Enter the master nodename, or enter localhost.
To find the master machine nodename, type:
b. Press Enter or Tab to move to the next field.

|
Caution - Do not enter the master Gigabit Ethernet nodename in the master field. This can cause a security problem for secure setups. |
After you fill in the Master Machine field (FIGURE 5-5), dzadmin queries the hardware on the master computer. If a current Sun Fire Visual Grid system.dzcfg installation file exists on this master, a dialog box appears prompting you to load it into the tool. If the file is not installed, you will enter the information in the steps of this procedure.
|
Note - The X server options in the /etc/dt/config/Xservers file must be manually edited to match the options in the dzadmin tool after the Install button has been pressed. See Step 7. |
3. Configure the X server options for the master machine.
Choose the required color depth and select Xinerama, if required. If you select Xinerama here, all the displays are combined into one large flat X screen.
4. Add the required number of slave machines one at a time.
a. From the administration tool menu bar, choose Actions -> AddSlaves.
A Slave Machine Configurations panel displays for each computer (FIGURE 5-6). A (1) indicates the first slave, a (2) indicates the second slave, and so on.
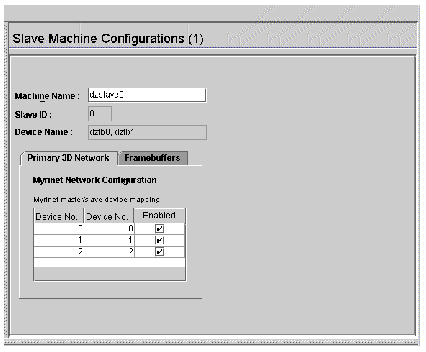
b. In each slave panel, enter the name of the slave using its Gigabit Ethernet nodename in the Machine Name field, and press Enter or Tab.
The hardware on the slaves is dynamically queried, and appears as configurable options in the dzadmin tool.
c. Adjust the Slaves Machine Configuration panel as required.
For example, you may want to select color depth, Xinerama, or particular frame buffers on the slave.
5. After you add all the slaves to the configuration, install the configuration.
Press the Install button on the Master Machine Configuration Panel (FIGURE 5-5).
6. Exit dzadmin. Choose File -> Exit from the administration tool menu bar.
7. Make necessary changes to the /etc/dt/config/Xservers file.
The Xservers file controls which frame buffers the window system and X Windows appear on. The dzadmin tool appends a string to the end of the /etc/dt/config/Xservers file when the dzadmin Install button is pushed. Uncomment the appended line string at the end of the file by removing the pound sign (#) in front of it, and comment out the old entry above it by adding a "#" in front of the line.
See Chapter 5 of the Sun Fire V880z Server and Sun XVR-4000 Graphics Accelerator Installation and User's Guide for more details on how to modify the Xservers file.
8. If a window session is currently running, log out and log back in.
The window system restarts with the configuration changes you have made.
Or, if you are not already logged in, select Reset from the Options menu from the desktop login screen, this causes the session to use the new settings.
The dzstatus program, found in /usr/sbin, queries dzdaemon on the local host and prints its status. dzdaemon is a daemon that runs in the background as part of the Sun Fire Visual Grid system. It exchanges set up and connection initiation information among computers in the system. dzstatus reports whether the local dzdaemon is designated as a master or slave in the Sun Fire Visual Grid system, and what network transport layer is being used for passing 3D graphics protocol.
This information can be useful in diagnosing configuration problems. See Appendix A for troubleshooting information.
|
Note - The format of the dzstatus output is subject to change without notice. Care should be taken in writing scripts that parse the output. |
GLX (indirect) rendering on the master is supported (for example, master:0.2), but the network connection used is TCP and not Myrinet. It is never correct to set the display for indirect rendering to the slave display (for example, slave:0.0).
Only six concurrent OpenGL applications can simultaneously use the high-speed Myrinet connection. The seventh and subsequent concurrent OpenGL applications fall back to using the slower Gigabit Ethernet connection. Applications using the slower link do not automatically migrate to the Myrinet connection if space becomes available when one of the first six applications terminates. The application must be restarted to use the faster network. This is only a performance limitation, functionality is not affected.
For the Sun Fire Visual Grid system, framelock and genlock are configured as if all the frame buffers were installed in the same host; therefore, the software setup and cabling requirements do not change. All of the fbconfig commands are issued on the master machine. The only difference is the device names, dzfbn is the device name for the Sun Fire Visual Grid frame buffers (instead of zulun).
See the Sun Fire V880z Server and Sun XVR-4000 Graphics Accelerator Installation and User's Guide for details on how to framelock and/or genlock multiple Sun XVR-4000 graphics accelerators.
Copyright © 2003, Sun Microsystems, Inc. All rights reserved.