| Sun StorEdge 6130 Array Release Notes |
| Sun StorEdge 6130 Array Release Notes |
This document contains important information about the Sun StorEdge 6130 array that was not available at the time the product documentation was published. Read this document so that you are aware of issues or requirements that can impact the installation and operation of the Sun StorEdge 6130 array.
The Release Notes consist of the following sections:
Additionally, the following document is appended to the back of these notes: Installing Array Modules in a Telco Rack
Release 1.1 includes the following changes:
|
Note - Sun recommends that all users upgrade to release 1.1 as this release fixes an NVSRAM password problem and adds firmware support for SATA disk drives. |
The online help describes the main features of the Sun StorEdge 6130 array. This section provides additional information about features not detailed in the help.
The Sun StorEdge 6130 array offers three premium features:
When you purchase premium features, you receive a license certificate. Follow the procedure on the license certificate to contact the Sun Licensing Center for license information and to register the license information with the Sun StorEdge 6130 array.
The array does not require a license for up to eight storage domains. If you plan to use more than eight storage domains, contact your sales representative for information about purchasing additional license certificates.
The Sun Storage Automated Diagnostic Environment is included on the Sun StorEdge 6130 Host Installation Software CD. The two components of the Sun Storage Automated Diagnostic Environment, the base package and the management station graphical user interface (GUI), are installed with the management software. Installation procedures for Sun Storage Automated Diagnostic Environment are included in these release notes and in the Sun StorEdge 6130 Array Getting Started Guide.
Refer to the following release notes for additional information about the Sun Storage Automated Diagnostic Environment:
Sun Storage Automated Diagnostic Environment Enterprise Edition Release Notes
(819-0431-10)
Disk scrubbing is a background process performed by the array controllers to provide error detection on the drive media. Disk scrubbing detects errors and reports them to the event log.
Before disk scrubbing can run, you must enable it on the array. Disk scrubbing then runs on all volumes on the array. You can disable disk scrubbing on any volume that you do not want to have scrubbed. Later, you can re-enable disk scrubbing for any volume on which you disabled it.
The advantage of disk scrubbing is that the process can find media errors before they disrupt normal drive reads and writes. Disk scrubbing scans all volume data to verify that it can be accessed. If you enable a redundancy check, it also scans the volume redundancy data.
To enable disk scrubbing on an array:
1. Click Sun StorEdge 6130 Configuration Service.
The Array Summary page is displayed.
2. Click the array for which you want to enable disk scrubbing.
The Volume Summary page is displayed.
3. Click Administration > General Setup.
The General Setup page is displayed.
4. Click the check box next to Disk Scrubbing Enabled and specify the number of days for which you want disk scrubbing to run.
To disable or re-enable disk scrubbing for an individual volume:
1. Click Sun StorEdge 6130 Configuration Service.
The Array Summary page is displayed.
2. Click the array on which you want to disable or re-enable disk scrubbing for a specific volume.
The Volume Summary page is displayed.
3. Select the volume on which you want to disable or re-enable disk scrubbing and do one of the following:
A hot-spare is a drive, containing no data, that acts as a standby in the storage array in case a drive fails in a RAID-1, RAID-3, or RAID-5 volume. The hot-spare adds another level of redundancy to the storage array. The Sun StorEdge 6130 array supports up to 15 hot-spares.
If a hot-spare is available when a disk drive fails, the hot-spare is automatically substituted for the failed disk drive, without intervention. The controller uses redundancy data to reconstruct the data from the failed drive onto the hot-spare. When you have physically replaced the failed disk drive, the data from the hot-spare is copied back to the replacement drive. This is called copyback.
If you do not have a hot-spare, you can still replace a failed disk drive while the storage array is operating. If the disk drive is part of a RAID-1, RAID-3, or RAID-5 volume group, the controller uses redundancy data to automatically reconstruct the data onto the replacement disk drive. This is called reconstruction.
A disk drive should be assigned as a hot-spare only if it meets the following criteria:
Information about individual disk drives is available on the Disk Summary page.
You can manually assign or unassign specific disk drives as hot-spares, or you can select the number of hot-spares you want and let the management software assign or unassign the disk drives automatically.
To manually assign or unassign a hot-spare:
1. Click Sun StorEdge 6130 Configuration Service.
The Array Summary page is displayed.
2. Click the array for which you want to assign or unassign a hot-spare.
The Volume Summary page is displayed.
The Disk Summary page is displayed.
4. Select the disk drive you want to assign or unassign as a hot-spare drive.
The Disk Summary page is displayed with the updated information.
When the management software assigns the hot-spares, it balances the request for spares across all trays within the array and ensures that the hot-spare drive is of the same type as the other disks in the same tray. It also verifies that the disk drives are unassigned, enabled, and in the optimal state.
To enable the management software to assign or unassign a hot-spare:
1. Click Sun StorEdge 6130 Configuration Service.
The Array Summary page is displayed.
2. Click the array for which you want to assign a hot-spare.
The Volume Summary page is displayed.
3. Click Administration > General Setup.
The General Setup page is displayed.
4. In the Array Hot-Spares Change field, select the number of hot-spares, from 0 to 15, that you want to assign to this array. Selecting a number larger than what is currently configured assigns additional hot-spares, while a smaller number unassigns hot-spares.
The management software assigns or unassigns the specified number of hot-spares. The management software balances the selection among trays within the array.
If a host is mapped to one or more volumes and you move the host from one host group to another, the mappings specific to the host are retained but mappings associated with the host group from which the host was moved are not retained. Instead, the host inherits any mappings associated with the new host group to which it is moved.
If you move a host from a host group that has no mappings and that has host members without specific mappings, the host group and hosts are moved to the default storage domain.
For example, suppose that two host groups are created on an array, Host Group 1 and Host Group 2. Host Group 1 has three member hosts: Host1, Host2, and Host3. Host Group 1 has no mappings, and Host1 is the only of its hosts with any mappings. Host Group 2 has two member hosts: Host4 and Host5. Host Group 2 is mapped to one volume, and Host4 and Host5 have no specific mappings.
When you move Host1 from Host Group 1 to Host Group 2, the following occurs:
When you create or expand virtual disks, the disk drives that participate in the virtual disk must all be of the same type, either SATA or Fibre Channel.
An array password provides access to an array. When you set the password, the management software stores an encrypted copy of the password in its array registration database. Thereafter, the management software can perform modification operations on the array without a password challenge.
You can change the array password at any time. Changing the array password causes the management software to automatically update the password stored in its array registration database.
Multiple management hosts can access a single array. Each management host has its own instance of management software, each of which has its own array registration database. For the management software to perform modification operations on an array, the password stored in the array registration database for that instance of the management software must match the password set on the array. When you change the array password on one management host, only the array registration database used by that management host is updated with the changed password. Before another management host can perform modification operations on that array, the array registration database for that management host must also be updated with the new password.
You may also need to update the password stored in the array registration database if the array was registered without a password or with an incorrectly typed password.
If the password stored in the array registration database does not match the array password, the following error message is displayed when you attempt a modification operation on the array: "The operation cannot complete because you did not provide a valid password."
To change the array password or update the array registration database with the current password:
1. Click Sun StorEdge 6130 Configuration Service.
The Array Summary page is displayed.
2. Click the array for which you want to change the password.
The Volume Summary page for that array is displayed.
3. Click Administration > General Setup.
The General Setup page is displayed.
The Manage Passwords page is displayed.
5. Select one of the following:
6. In the Old Password field (available only if you are changing the array password), enter the current password.
7. In the New Password field, enter the new password as an alphanumeric string of up to eight characters.
8. Enter the same new password in the Verify New Password field.
9. Click OK to apply your changes.
Software and hardware tested and qualified to work with the Sun StorEdge 6130 array is described in the following sections:
The management host on which the management software resides must meet the system requirements described in TABLE 1.
|
(Includes 300 Mbytes in the /opt directory and 200 Mbytes in the /var directory |
|
TABLE 2 lists the remote CLI clients, also called thin-scripting clients for remote management, available by platform. You can obtain the package, from the Sun Download Center (SDLC), http://wwws.sun.com/software/download/, or from the Sun StorEdge 6130 Host Installation Software CD (Solaris only).
TABLE 3 lists the data host platforms, patches, and host-bus adapter (HBA) drivers supported with this release of the software.
Multipathing software must be installed on each data host that communicates with the Sun StorEdge 6130 array. For Solaris OS data hosts, this software is part of the Sun StorEdge SAN Foundation Software. For data hosts running an operating system other than Solaris, use the Sun StorEdge Traffic Manager Software or other multipathing software listed by platform in Supported Data Host Platforms.
For data hosts running the Solaris OS, follow the instructions in the Sun StorEdge 6130 Array Getting Started Guide to install the software from CD. For hosts running other operating systems, download the software from the Sun Download Center (SDLC), http://wwws.sun.com/software/download/, or other URL indicated in TABLE 3.
If a data host needs multipathing software, you must install it before you install the patches.
For HBA drivers supported by Sun StorEdge Traffic Manager, go to the Sun Download Center (SDLC), http://wwws.sun.com/software/download/.
Download operating systems updates from the web site of the operating system company.
|
DMP Array Support Library (ASL) [1] |
|||||
The Sun software listed in TABLE 4 is compatible for use on data hosts with data paths or network connections to the Sun StorEdge 6130 array.
|
Solaris Volume Manager software (embedded in the Solaris 9 Operating System) |
|
The third-party software listed in TABLE 5 is compatible for use on data hosts with data paths or network connections to the Sun StorEdge 6130 array.
|
VERITAS Volume Manager with Dynamic Multipathing (DMP) for Solaris |
|
The Sun StorEdge 6130 array supports the web browsers listed in TABLE 6.
|
Note - The Sun StorEdge 6130 management software requires that you enable pop-up windows in your web browser. |
The Sun StorEdge 6130 array software and Storage Automated Diagnostic Environment application support the languages and locales listed in TABLE 7.
|
Note - Man pages are available only in English and Japanese. |
This release provides firmware support for SATA in the Sun StorEdge 6130 array.
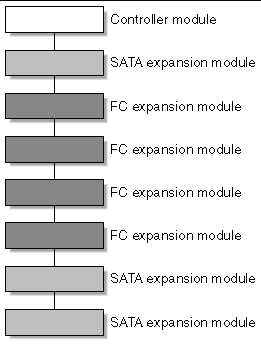
When a Sun StorEdge 6130 array includes both Fibre Channel (FC) and SATA disk drives, each expansion module must have either all SATA disk drives or all FC disk drives.
Cabling of SATA expansion modules is the same as the cabling for FC expansion modules. This information is provided in the Sun StorEdge 6130 Array Getting Started Guide.
The placement of SATA expansion modules in relation to FC expansion modules is critical to array performance. FC expansion modules must be grouped together. SATA expansion modules can be placed at either end or at both ends of the group of FC expansion modules, but must not be interspersed among FC expansion modules.
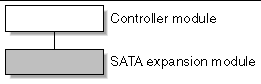
FIGURE >1 shows a 1x1 configuration with a SATA expansion module.
FIGURE 1 is an example of the correct placement of FC and SATA expansion modules in a 1x8 configuration. Note that the SATA expansion modules can be placed at either end of the grouping of FC expansion modules.
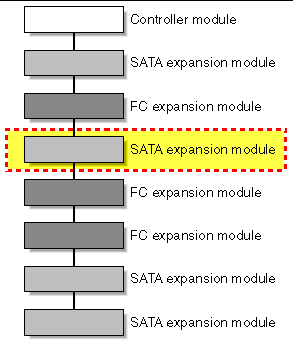
FIGURE 2 shows an incorrect grouping of FC and SATA expansion modules in a 1x8 configuration. The highlighted SATA expansion module should not be placed between FC expansion modules. Instead, it could be moved to either end of the group of FC expansion modules.
The array installation procedures are described in the Sun StorEdge 6130 Array Getting Started Guide that came with your array. This section describes release-specific steps for firmware and patch upgrades that you must perform:
The Sun StorEdge 6130 array is managed out-of-band by way of a standard Ethernet connection between the RAID controllers and your local area network (LAN).
The Sun StorEdge 6130 management software is distributed on the Sun StorEdge 6130 Host Installation Software CD that is shipped with the array. The management software consists of the following applications and tools:
Before you start the installation of the management software, check the machine for the following requirements:
The installation script verifies these requirements. If a requirement is not met, the script informs you or, in some cases, exits.
|
Note - If a version of Sun Web Console prior to 2.1 is installed on the management host, the script prompts you to upgrade to the current version. |
If you are installing the array and the management software for the first time, follow the entire installation and configuration procedure in the Sun StorEdge 6130 Array Getting Started Guide.
After the initial installation and configuration, you will be able to upgrade the management software and firmware with each release.
If your array has Sun StorEdge 6130 array release 1.0 of the management software and array firmware installed, you must upgrade to release 1.1 using the upgrade script on the Sun StorEdge 6130 Host Installation Software CD.
|
Note - Disk I/O must be quiesced prior to disk drive firmware updates. |
TABLE 1 lists version information for this release.
|
Localized versions - Configuration Service application and Configuration Service Online Help |
|
|
Localized versions - Sun Storage Automated Diagnostic Environment Software |
TABLE 2 lists firmware files for this release.
To upgrade the software and firmware:
1. Verify that you registered the arrays in the Sun Storage Automated Diagnostic Environment software after the previous installation.
2. Go to the Sun Storage Automated Diagnostic Environment software to review and acknowledge all existing alarms.
3. Log in to the management host as root.
4. Insert the Host Installation Software CD into a local drive.
5. Change to the /cdrom/cdrom0 directory:
If you downloaded the build software over the network, change to the directory where the software installed after you uncompressed and untarred the build.
6. Start the installation script by typing:
The -n option specifies a non-interactive upgrade. After asking whether you want to upgrade software or firmware, the script will complete the upgrade without pausing for questions.
7. Go to the Sun Storage Automated Diagnostic Environment software to review and clear any alarms that were logged for components upgraded during the upgrade process.
|
Note - The array will remain in a degraded state until all alarms are cleared. |
Use the downgrade command if you need to bring your array back to the previously installed firmware level. The downgrade command is an undo operation and will undo the most recent upgrade action on the system. For example, if you ran upgrade once to upgrade array A, and then ran upgrade again to upgrade arrays B and C, the first run of downgrade will downgrade B and C, and a second run of downgrade will downgrade array A.
You can use the downgrade command if you upgraded the array from Sun StorEdge 6130 array release 1.0 to release 1.1.
In this release, the downgrade command does not apply to SATA components.
To downgrade the array software and firmware:
1. Log in to the management host.
2. Change to the /cdrom/cdrom0 directory:
If you downloaded the build software over the network, change to the directory where the software installed after you uncompressed and untarred the build.
./downgrade -n
The -n option specifies a non-interactive downgrade. After asking whether you want to downgrade software or firmware, the script will complete the downgrade without pausing for questions.
Use the archive and restore commands to backup and restore all persistent files for the Sun StorEdge 6130 Host Installation Software CD.
The first time you use the archive and restore commands, run them from the CD. Thereafter, you can run them from:
/var/sadm/install/se6130
To back up and restore persistent files:
1. Insert Sun StorEdge 6130 Host Installation Software CD into the CD drive on the management host.
2. Change to the software directory.
cd location-of-your-software
/var/sadm/install/se6130
3. Archive the state of the management host:
./archive archive-location
./archive /tmp
An archive file is created in the archive file directory with the name SP_Personality.tar.Z.
Store the archive file somewhere other than on the local disk so that it is available in case of host failure.
|
Note - You can use the cron command to schedule jobs to create archive files automatically. |
4. Reinstall the management host software on the new host.
5. Restore the saved state in the archive file:
./restore archive-location
After installing software for the data hosts from the Sun StorEdge 6130 Host Installation Software CD, download from SunSolve the SSD driver for data hosts running the Solaris 8 and 9 Operating Systems.
|
Note - Patch 108974-41 requires patch 108528-29 or higher. If needed, apply patch 108528-29 or higher first. |
1. Download the 108974-41 patch from SunSolve.
unzip 108974-41.zip
4. Apply the patch with the patchadd command:
patchadd 108974-41
reboot -- -r
|
Note - Patch 113277-26 requires patches 112233-02 and 112834-02, which are already included in most versions of Solaris OS 9. If needed, apply patches 112233-02 and 112834-02 first. |
1. Download the 113277-26 patch from SunSolve.
unzip 113277-26.zip
4. Apply the patch with the patchadd command.
patchadd 113277-26
reboot -- -r
VERITAS Volume Manager 3.5 and 4.0 provide support for the Sun StorEdge 6130 array in the form of Array Support Library (ASL) software packages for Solaris OS 8 and 9 and IBM AIX 5.2. The ASL must be installed on the same host system as the Volume Manager 3.5 or 4.0 software to enable the software to recognize the Sun StorEdge 6130 array modules. Download the ASL and the accompanying ReadMe file for the Sun StorEdge 6130 array from the Sun Download Center or from http://support.veritas.com. The AIX ASL is only available from Veritas.
To download the ASL from the Sun Download Center:
1. Log in as superuser on the Sun server to be connected to the array.
2. Go to the All Products listing:
http://www.sun.com/software/download/allproducts.html
3. Under the V heading, click VERITAS Volume Manager Array Support Library (ASL).
4. Click Download to go to the Sun Download Center.
The page identifies the product you selected as VERITAS Volume Manager Array Support Library (ASL) for your platform and language.
5. If not previously registered, register:
a. Click the Register Now link at the bottom of the left column.
b. On the registration page, complete the required fields and click Register.
a. Type your user name and password in the left column, and click Login.
b. On the Terms of Use page, read the license agreement, click Yes to Accept, and click Continue.
7. Download the compressed zip file that contains the ASL package for the Sun StorEdge 6130 array and ReadMe file.
8. Use the unzip command to extract the files from the zip file.
9. Refer to the ReadMe file to determine how to install the VERITAS Volume Manager ASL.
To download the ASL from http://support.veritas.com:
1. In the Step 1 - Select Product Family window, select Volume Manager.
2. In the Step 2 - Select Product window, select Volume Manager for UNIX.
The Volume Manager for UNIX appears.
4. In the Downloads window, select the default All in each search category, and click GO. (Otherwise, you can refine your search to Drivers or other criteria).
A list of documents and files display for the product.
5. Scroll to the File list and select the appropriate ASL for the Sun StorEdge 6130 array.
A page displays with the ASL installation instructions.
6. Scroll down and select the Download Now button.
7. Follow the instructions to uncompress and install the ASL.
The following sections provide information about known issues and bugs filed against this product release:
If a recommended workaround is available for a bug, it follows the bug description.
This section describes known issues and bugs related to installing and initially configuring the Sun StorEdge 6130 array.
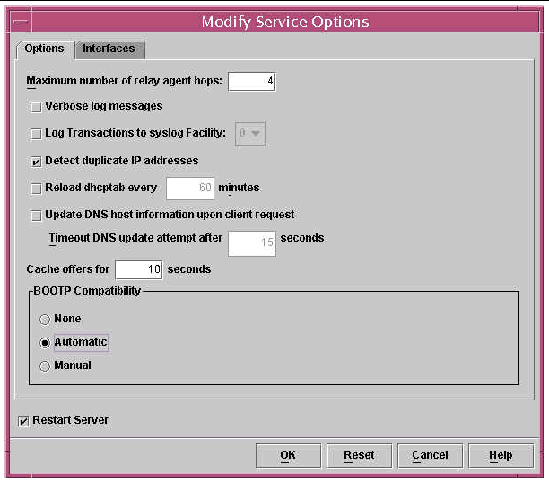
The following additional step is required for configuration of BOOTP services with the Solaris DHCP server utility according to the example in Appendix B of the Sun StorEdge 6130 Array Getting Started Guide:
On the Options tab of the Modify Service Options page, select the Automatic for BOOTP compatibility, as noted in FIGURE 1.
The Sun StorEdge 6130 Array Getting Started Guide describes a method of setting the IP address using the BOOTP services that are included in the DHCP server. BOOTP services are included with the DHCP server as a convenience. They are different services.
You can also make BOOTP services available using Solaris Operating System commands.
Bug 5084873 - When you use a Sun StorEdge 6130 array as a boot device, the host system boots its operating system from the array. There are known issues with using the array as a boot device using 1-gigabit host bus adapters (HBAs) in direct attach configurations. Therefore, 1-gigabit HBAs can be used with the Sun StorEdge 6130 array for nonboot applications only. If you want to use the Sun StorEdge 6130 array as a direct attached boot device, use it only with 2-gigabit HBAs supported by Sun.
In Fibre Channel switched configurations in which a Fibre Channel switch is connected between the host and a 6130 array being used as a boot device, both 1-gigabit and 2-gigabit Sun HBAs can be used.
This section describes general issues related to the Sun StorEdge 6130 array.
Bug 6196986 - Before you perform live firmware updates on a Sun StorEdge 6130 array, autofailback should be enabled on the host multipathing solution. If an autofailback feature is not supported or is not enabled, I/O paths to the Sun StorEdge 6130 array will not be restored to their original, preferred paths after the firmware update has been completed. Although I/O will continue, management applications may report the system as operating in a nonoptimal state until the I/O paths to the array are manually restored to their original, preferred paths.
Bugs 5102272, 5105909, 6183334, 6184159, 6196925, 6204602, 6197891 - When you run the array firmware upgrade or downgrade command, sometimes it initially returns an error.
Workaround - Rerun the command.
Bug 6203836 - If a volume failure on a Sun StorEdge 6130 array results from a failed disk drive drives, you must be careful when introducing replacement drives that were part of a volume in use by another Sun StorEdge 6130 array.
To avoid having the 6130 system incorrectly initiate a volume migration process with the newly introduced replacement drives, perform one of the following tasks:
Bug 5084996 - When run for the first time from one of the hosts in a multihost configuration, the format command may fail to detect all 256 or more LUNs created on the Sun StorEdge 6130 array.
Workaround - Wait a few minutes, and then execute a second format command.All LUNs should be now detected.
During bootup you may notice the battery light flashing for an extended period. The battery charger performs a series of battery qualification tests before starting a battery charge cycle. This series of tests occurs at subsystem power-up. The tests are automatically reinitialized approximately every 25 hours by a timer.
Each controller module contains a 4V lead acid battery pack for cache backup in case of power loss. The on-board battery is capable of holding cache up for seven days (168 hours) for a 256-megabyte cache. The battery is capable of holding cache up for three days (72 hours) for a 1-gigabyte cache. The service life of the battery pack is two years, at the end of which the battery pack must be replaced.
Bug 5090092 - Disk drive removal alarms are not cleared properly after the disk has been reinserted into the array.
Workaround - Disregard these alarms.
Bug 5093731 - In the event of a high temperature threshold being reached, to prevent temperature related damage and to protect data integrity, the 6130 array power supplies will terminate power to the array. This event will only occur during extreme, sustained, elevation of ambient room temperatures and typically will only occur with a simultaneous failure of one or both fans.
In the event of a high temperature warning message from the 6130 monitoring facilities, you should ensure air flow passages to the array are unobstructed and that ambient room temperature is not elevated. Should these issues not be immediately correctable, you should consider a manual shutdown of the array until the elevated room temperature issues are resolved.
You should ensure ambient room temperature monitoring and adequate cooling is in place at all times.
Bug 5089234 - When you remove an SFP from an array, the SFP software management object is also removed from the management software. Ideally, the management object would still be present, indicating that the SFP has been removed. When an SFP is inserted into the controller, the management object associated with that SFP reappears and the appropriate FRU monitoring is restored for that SFP.
Bug 5086807 - In Sun StorEdge 6130 array configurations using expansion modules, if one RAID controller or one of the inter-tray cables connecting the RAID controller to the expansion modules is removed, some expansion module data fields are reported incorrectly.
This results from the loss of one monitoring path to the expansion module. The incorrect data fields from the expansion module can cause the Sun Storage Automated Diagnostic Environment to incorrectly report a firmware revision change on the expansion modules.
Workaround - When the missing cable or missing RAID controller is replaced, full and accurate status reporting of the expansion trays is restored.
Bug 5110402 - For you to change a volume's RAID level, the volume cannot be a member of a virtual disk or a storage pool containing other volumes.
Bug 6180131 - Using a faulty expansion cable causes the management software to report the array health as Degraded and causes the Sun Storage Diagnostic Environment to report the error Drive tray path redundancy lost. However, the status LED on the front of the chassis does not signal an error and remains green instead of turing amber, as expected.
This section describes known issues and bugs related to the Sun StorEdge 6130 Configuration Service software.
Bug 6184925 - When a volume copy operation fails, you cannot successfully remove the copy pair nor successfully recopy the volume copy.
Bug 6202126 - During RAID-1 or RAID-5 reconstruction, the array health status is incorrectly reported as OK in the Configuration Service application while the Storage Automated Diagnostic Environment correctly reports volumes in degraded mode.
Bug 6202031 - When you create a volume copy, the target volume must have at least as much capacity as a source volume. If the volume selected as the target volume has a greater capacity than the source volume, the target volume will appear after the volume copy operation to have only as much capacity as the source volume when viewed from the host. However, the SSCS CLI displays the correct capacity of the target volume.
Bug 5103785 - After a volume copy process has been started, the management software reports that the volume copy pair has been created and it is currently in a read-only environment. However, it is still possible to mount the target LUN to create new files and directories. This should not be possible until after the volume copy process has been completed.
Workaround - Wait until the volume copy process is complete before you mount the target LUN to create new files and directories.
Bug 5103424 - The Remove Copy Pair button is enabled while a volume copy is in progress. If you click on this button while the volume copy is in progress, it produces no results.
Bug 5108139 - When creating a new volume, you can choose the method by which you select a virtual disk. When you select "Create Volume on a New Virtual Disk" and then "Define the Virtual Disks," but the size of the virtual disks you select (including the overhead of the RAID) cannot satisfy the volume's capacity requirements, the software returns the error message No volume candidates are available for volume creation but does not provide further information.
Workaround - Select the "Automatic" or "Create Volume on an Existing Virtual Disk" method of virtual disk selection to create a volume successfully.
Bug 5107055 - The maximum number of volumes or snapshots on a virtual disk is 256. The volume and snapshot creation wizards do not prevent you from trying to create a volume or a snapshot on a virtual disk that already has 256 volumes on it. The software returns the error message No volume candidates are available for volume creation but provides no further information.
Bug 5107060 - When a virtual disk defragmentation operation is in progress, a second defragmentation request returns a success message even though the firmware ignores the request.
Bug 5098638 - When you try to create a snapshot or a volume without enough available capacity, the management software returns the error message Unable to create snapshot with the RAID level selected instead of saying that there is not enough space on the array.
Bug 5084996 - When you run the format command under the Solaris OS to detect a large number of LUNs that have just been mapped to a Solaris system from a Sun StorEdge 6130 array, there may be some delay before the Solaris host actually detects and reports these newly added LUNs. This behavior typically happens only when more than 100 LUNs are being mapped to the Solaris system simultaneously.
When creating volumes, wait until all of the volumes have been created before issuing a format command. Otherwise, the format command might return an invalid number of LUNs.
Workaround - Wait approximately 20 minutes after the volumes have been created for all of the LUNs to be properly detected when you issue the format command.
Bugs 5106858, 5110029 - To monitor the health of the Sun StorEdge 6130 array, click Administration > General Setup. The Health field lists the health of the array. Possible values include:
OK - Indicates that every component of the storage array is in the desired working condition.
Degraded - Indicates that, although the management host can communicate with the storage array, a problem on the array requires intervention. For example, the array may have volumes that are not on the array's preferred I/O controller path. To correct this problem, click the Redistribute Volumes button. If the array status remains in the Degraded state, access the Sun Storage Automated Diagnostic Environment for further information on troubleshooting and correcting this problem.
Typically, multipath drivers move volumes from their preferred owner controller when a problem occurs along the data path between the host and the storage array. Redistributing the volumes causes the volumes to revert back to their preferred controllers.
Redistributing the volumes while an application is using the affected volumes causes I/O errors unless a multipath driver is installed on the data host. Therefore, before you redistribute volumes, verify either that the volumes are not in use or that there is a multipath driver installed on all hosts using the affected volumes.
Error - Indicates that the management host cannot communicate with the controllers in the storage array over its network management connection. Access the Sun Storage Automated Diagnostic Environment for information on troubleshooting and correcting this problem.
Bug 6174904 - The Snapshot Summary section of the Licensable Features Details - Snapshots page displays incorrect information, as follows:
When you create a volume and label it, you can start using the volume before it is fully initialized.
This section describes known issues and bugs related to the Sun StorEdge 6130 Array command-line interface (CLI).
Bugs 6175521 and 6175587 - The -f / --full-policy and -w / --warning-threshold arguments do not work when used alone in the sscs modify snapshot command. In order to modify the full policy or warning threshold, you must use both options together.
For example, the following command will update both the full policy and warning threshold for the snapshot db-snap as expected:
sscs modify -f failsnapshot -w 80 snapshot db-snap
If either option is used without the other, neither the full policy nor the warning threshold will be updated.
Bug 5105535 - When a volume copy operation is in progress, any attempt to perform a recopy operation should result in an error. However, if you try to perform a recopy operation while the original volume copy is in progress, the CLI returns a prompt with no error message. If you attempt the recopy from the browser interface, the software displays the following message: Success. The volume was successfully recopied.
Bug 6174028 - During a volume copy process, the target volume becomes inaccessible for any I/O operation. The format command on a Solaris 8 or Solaris 9 host displays the volume status as drive type unknown.
The cfgadm command incorrectly displays a message that the target volume is still available and does not mark it as "unusable."
This section describes known issues and bugs related to the 6130 array Sun Storage Automated Diagnostic Environment. Read the release notes that came with your Sun Storage Automated Diagnostic Environment software for a complete understanding of issues and bugs.
If additional Sun Storage Automated Diagnostic Environment arrays are present in the SAN, you must download and install SUNWstade patch 117650-10 and SUNWstadm patch 117654-10 to obtain the latest fixes for the Sun Storage Automated Diagnostic Environment product. These patches also include late-breaking enhancements to the Service Advisor.
To locate potential patches on SunSolve, go to:
http://sunsolve.com -> Patch Finder 116720 and 117654
Bug 6192999 - Applying patch 117650-12, which updates you to Storage Automated Diagnostic Environment 2.4.15.004 for Sun StorEdge 6130 array release 1.1, may cause the application to report FRU removal and addition events for most FRUs in a Sun StorEdge 6130 array. This results from a change in the decoding algorithm used to derive the serial number. This report will occur as soon as the device is monitored with the new software and will show up as a single alarm with a large number of aggregated FRU removal and addition events.
Workaround - Delete this alarm.
Bug 5109505 - Sun Storage Automated Diagnostic Environment slaves should be used only on the Sun StorEdge 6130 array data host. Therefore, the management host on which the management software resides, including the Sun Storage Automated Diagnostic Environment GUI package (SUNWstadm), must be designated as a Sun Storage Automated Diagnostic Environment master.
If you used the Sun StorEdge 6130 Host Installation Software CD to install the data or the management host, the installation scripts install the correct Sun Storage Automated Diagnostic Environment image.
Bug 5096265 - When you manually place a controller offline using the Sun Storage Automated Diagnostic Environment, monitoring applications may report this offline controller as "failed." This is expected behavior. After you place the controller back online, the controller state will change to "optimal."
Bug 5076153 - Sun Storage Automated Diagnostic Environment diagnostic results are not updated in the client UI if the data host or management station host is using Perl Version 5.8. However, the test results are updated when the test finishes.
The following error message appears:
Error on test-name: ERR: Invalid PID:
Workaround - Run the diagnostics from the command-line interface on the client, or simply wait for the test to reach completion.
Alternatively, use an older version of Perl.
Bug 6202140 - Even after you remove the FC cable that connects the data host to the Sun StorEdge 6130 array, the array topology still shows a connection between the data host and the array.
After installing the Sun Storage Automated Diagnostic Environment on a data host, enter the following command to configure the software as a slave agent and to synchronize the slave agent with the master agent on the management host. The management host software must be installed and the IP address defined before entering this command on the data host:
/opt/SUNWstade/bin/ras_install
Use the ras_install command only on data hosts, never on the management host that contains the management software with the master agent.
The ras_install script displays. Enter the following options:
. IP address of the management host
Following is the output from a sample ras_install script:
+----------------------------------+
| Installing the Package and Crons |
+----------------------------------+
? Are you installing a Master or a Slave Agent? (Enter M=master, S=slave, E=Empty Master)
[M/S/E]: (default=M) S
The address of the master must already be defined before a slave can be installed.
If the master has not been installed yet, abort this install and go install this package on the host that was selected to be the master.
? Enter the IP Name/Address of the Master Host Agent 10.8.88.135
- Testing communication with host '10.8.88.135' ..
- Communication successful.
- Starting the Storage A.D.E service (rasserv):
/opt/SUNWstade/rasserv/bin/apachectl startssl: ./rasserv started
- Setting up crons:
? Do you want to C=start or P=stop the Agent cron
[C/P] : (default=C) C
- cron installed.
- Testing access to rasserv (this test will timeout after 4 tries of 10 secs):
- ping '10.8.88.135' succeeded!
- 1/4 attempting to contact agent service...
- Contacted agent with hostid=80cffc87.
+-------------------------------+
| SUNWstade installed properly |
+-------------------------------+
- Sending monitored device-list to agent at 10.8.88.135
-- diag-lsi1.Central.Sun.COM already there
OK
This section describes known issues and bugs related to internationalization and language translation.
Bug 6201699 - After a unicode user name has been added to the acknowledge form, all alerts are missing from the Sun Storage Automated Diagnostic Environment GUI.
Workaround - Add only ASCII characters into the form.
6202600 zh_CN/zh_TW - In both Simplified and Traditional Chinese locales, the phrase "Reset Slave(s) to This Master" is translated incorrectly as "Reset Slave(s) to be the Master". This phrase is displayed on the Administration > General Setup > Configuration Utilities page of the Sun Storage Automated Diagnostic Environment application.
202516 zh_CN - In the Simplified Chinese locale, the phrase "Contact Information" is translated incorrectly as "Contract Information". This phrase is displayed on the Administration > General Setup > Site Information page of the Sun Storage Automated Diagnostic Environment application.
202513 zh_CN - In the Simplified Chinese locale, the phrase "Contract Number" is translated incorrectly as "Contact Number". This phrase is displayed on the Administration > General Setup > Site Information page of the Sun Storage Automated Diagnostic Environment application.
6202507 zh_CN - In the Simplified Chinese locale, the phrase "Some unexpected internal error occurs" its incorrectly translated as "Some unexpected external error occurs". This phrase is displayed under the Topology tab of the Sun Storage Automated Diagnostic Environment application.
BugID 6199399 - Some of tooltips in the French version of the Sun Storage Automated Diagnostic Environment application are not displayed correctly in Internet Explorer.
2. Click View -> Encoding -> Unicode (UTF-8) or View -> Encoding -> More -> Unicode (UTF-8) to set the UTF-8 encoding manually (even if it has already been set automatically by the application).
3. Open the Help window again.
The tooltips will be displayed correctly.
Bug 6199754 - The search utility for the Japanese version of the online help of the Sun Storage Automated Diagnostic Environment supports KATAKANA only. KANJI and HIRAGANA cannot be used for search.
Workaround: Use the Index or Glossary to search for words.
Bug 5095750 - Using the sscs command to create or view objects (such as pools or volumes) in mixed-language environments may result in pool, volume, or other object names with undisplayable characters.
When you use the sscs command in a mixed-language environment, the object names will appear properly only in the locale in which the objects were created.
For example, in the Japanese environment, depending on your shell type, execute one of the following:
LANG=ja; export LANG
The locale for a given sscs session is set when sscs login is first executed by a UNIX user, and is the locale for the duration of that session. Since sscs sessions are shared for multiple instances of a given UNIX user, any attempt to start another simultaneous sscs session with a different locale will fail. Preferably, run only one sscs session per UNIX user when operating in a multilocale environment.
This section describes known issues and bugs related to the online help or the command-line interface sscs manpage.
The Sun StorEdge 6130 Array Getting Started Guide provides incorrect instructions for viewing a description of the alarm symbols. For a description of the alarm symbols, see the Storage Automated Diagnostics Environment online help. Click the Search tab and type controls and indicators.
Corrections to Sun StorEdge Expansion Cabinet Specifications
The following table lists cabinet clearance and service access requirements and replaces Table 2-2 in the Sun StorEdge 6130 Array Site Preparation Guide.
The following table lists operating and nonoperating temperature, relative humidity, and altitude ranges for the Sun StorEdge Expansion cabinet. This table replaces Table 2-4 in the Sun StorEdge 6130 Array Site Preparation Guide
|
0.15 g on z-axis; 0.10 g on x- and y-axes; 5 to 500 Hz sinusoidal |
0.5 g on z-axis; 0.25 g on x- and y-axes; 5 to 500 Hz sinusoidal |
The following table lists operating and nonoperating relative humidity, and altitude ranges for the Sun Fire cabinet. The table also provides the optimum operating condition in the recommended operating environment. Operating computer equipment for extended periods of time at or near the temperature or humidity extremes is known to significantly increase the failure rate of hardware components. This table replaces Table 2-9 in the Sun StorEdge 6130 Array Site Preparation Guide
The following table lists the nonoperating environmental conditions of the module. This table replaces Table 3-3 in the Sun StorEdge 6130 Array Site Preparation Guide
The following URL for downloading software listed in the Sun StorEdge 6130 Getting Started Guide and the Sun StorEdge 6130 online help has changed:
http://wwws.sun.com/software/download/sys_admin.html
Use the following URL instead:
http://wwws.sun.com/software/download/index.jsp?cat=Systems%20Administration&tab=3
Bug 6175052 - The sscs list snapshot command in the manpage incorrectly provides Response Format detailed output when the specified volume is a reserve volume. The detailed output provides information about the snapshot's reserve volume. However, you cannot explicitly specify a particular reserve volume for which you want to view snapshot information.
Also, the Response Format output incorrectly cites Primary Volume output for the specified snapshot. This should be Base Volume output.
The online help erroneously states that a snapshot can be created on a virtual disk as long as the RAID level, the number of disks, and the disk type (either FC or SATA) of the virtual disk match the primary volume's profile.
The only requirement for creating a snapshot on a virtual disk is that the virtual disk must have enough capacity for the snapshot.
The following parameter has changed since publication of the Sun StorEdge 6130 Array Getting Started Guide. The default cache block size of the profiles was listed as 256 kilobytes. The actual default cache block size of the profiles is 16 kilobytes.
Bug 6189040 - The following procedure has changed since publication of the Sun StorEdge 6130 Array Getting Started Guide. If the array does not use your network's network time protocol server, you must set the array's clock manually.
1. Click Sun StorEdge 6130 Configuration Service.
The Array Summary page is displayed.
2. Click the array for which you want to set the time.
The Volume Summary page for that array is displayed.
3. Click Administration > General Setup.
The General Setup page is displayed.
4. Go to the System Time section.
5. Set the hour and minute, using a 24-hour clock.
6. Set the month, day, and year.
7. Click OK to apply your changes.
Following is a list of documents related to the Sun StorEdge 6130 array. For any document number with nn as a version suffix, use the most current version available.
You can search for this documentation online at:
|
Sun StorEdge 6130 Array Regulatory and Safety Compliance Manual |
||
|
Instructions for installing the Sun StorEdge Expansion cabinet |
Sun StorEdge Expansion Cabinet Installation and Service Manual |
|
In addition, the sun StorEdge 6130 array includes the following online documentation:
System overview and configuration information is covered in the online help included with the Sun StorEdge 6130 Configuration Service software
System maintenance, management, and basic troubleshooting is covered in the online help included with the Sun Storage Automated Diagnostic Environment software.
FRU replacement procedures with system information are available in this section of the Sun Storage Automated Diagnostic Environment interface.
Man page commands are available on a management host running the Solaris OS work station or on a remote CLI client.
You can obtain Sun network storage documentation at:
http://www.sun.com/products-n solutions/hardware/docs/Network_Storage_Solutions
You can also view, print, or purchase a broad selection of other Sun documentation, including localized versions, at:
http://www.sun.com/documentation
If you need help installing or using this product, go to:
http://www.sun.com/service/contacting
|
Installing Array Modules in a Telco Rack |
This section describes how to install the Sun StorEdge 6130 array in a Telco rack using Sun Telco rackmount kits. It contains the following procedures:
In addition to the information in these release notes, you will need the Sun StorEdge 6130 Getting Started Guide for cabling, power, and other installation instructions.
These installation procedures require the following items:
Use the following procedures to prepare for installation:
Unpack the rackmount kit and check the contents. Kits contain the following items.
Unpack the array module and check the kit contents as described on page 13 of the Sun StorEdge 6130 Array Getting Started Guide.
Install the modules starting with the first controller module at the bottom of the cabinet. Starting at the bottom distributes the weight correctly in the rack. Next install the expansion modules for the first controller module. If room remains in the rack, repeat for the next controller and expansion modules.
Select the rack in which you will be installing the array module. The Sun StorEdge Telco mounting rails are designed to fit two types of racks:
Install the rack as described in the installation instructions provided by the manufacturer.
Use the following procedures to install array modules in a Telco 2-post rack:
This procedure describes how to attach the rackmount rail kit to a Telco 2-post 3-inch width "C" channel frame.
You will mount each module with its horizontal center aligned with the frame of the Telco 2-post rack.
1. Insert four 12-24 screws (two in each post) in the front and back mounting holes of the left and right posts (FIGURE 2). Do not tighten at this time.
Use the lowest available mounting holes at the bottom of each post. Make sure that all four screws are aligned and mounted at the same height.

2. Align the open slot of the left mounting rail over the front and back screws of the left post, and press the rail down until it is seated over the screws (FIGURE 3). Repeat for the right rail.

3. Insert eight 12-24 screws (four in each post) in the lower mounting holes at the front and back of the left and right rails (FIGURE 4).

4. Using the #3 Phillips screwdriver, tighten all twelve screws (six on each side) at the front and back of both mounting rails to secure each rail to its post (FIGURE 5).

Install the controller module in the first empty slot at the bottom of the cabinet. If you are installing expansion modules, continue installing the modules from the bottom up.
After installing each module, you must connect its power cables and set its tray ID as described in Chapter 3 of the Sun StorEdge 6130 Array Getting Started Guide.
1. Unsnap and remove the left and right end caps on the array module to permit access to the screw mounting holes (FIGURE 6).

2. Using two people, one at each side of the array module, carefully lift and rest the module on the bottom ledge of the left and right rails (FIGURE 7).

|
Caution - Use care to avoid injury. An array module can weigh up to 95 pounds (45 kg). |

3. Carefully slide the array module onto the mounting rails until the front bezel of the module contacts the rail flange on each side (FIGURE 8).

4. Use the #2 Phillips screwdriver to insert and tighten four 10-32 screws (two per side) to secure the module to the front of the rack (FIGURE 9).

5. Replace the left and right end caps to hide the front mounting screws.
The end caps snap onto the front bezel of the array module.
6. At the back of the array module, install and tighten two 8-32 screws (one per side) through the rear mounting points (FIGURE 10).

This procedure describes how to attach the rackmount rail kit to a Telco 4-post 3-inch "C" rack. You can adjust the mounting rails to allow for a 12-inch to 14-inch space between the front and rear posts.
1. Insert eight 12-32 screws (two in each post) in the back mounting holes of the left and right posts (FIGURE 11). Do not tighten at this time.
Use the lowest available mounting holes at the bottom of each post. The screws in the back posts will be slightly lower than the screws in the front posts.

2. Loosen, but do not remove, the two hand knobs on the adjustable bracket at the rear of the left rail. Adjust the rear bracket of the left mounting rail to fit against the rear post, and then tighten the two knobs (FIGURE 12). Repeat for the right rail.
3. Align the open slot of the left mounting rail over the front and back screws of the left post, and press the rail down until it is seated over the screws (FIGURE 12). Repeat for the right rail.

4. Tighten the eight screws (four per side) at the front and back of both mounting rails to secure each rail to its post (FIGURE 13).

Install the controller module in the first empty slot at the bottom of the cabinet. If you are installing expansion modules, continue installing the modules from the bottom up.
After installing each module, you must connect its power cables and set its tray ID.
1. Unsnap and remove the left and right end caps on the array module to permit access to the screw mounting holes (FIGURE 14).

2. Using two people, one at each side of the array module, carefully lift and rest the module on the bottom ledge of the left and right rails (FIGURE 15).

|
Caution - Use care to avoid injury. An array module can weigh up to 95 pounds (45 kg). |

3. Carefully slide the array module onto the mounting rails until the front bezel of the module contacts the rail flange on each side (FIGURE 16).

4. Use the #2 Phillips screwdriver to insert and tighten four 10-32 screws (two per side) to secure the module to the front of the rack (FIGURE 17).

5. Replace the left and right end caps to hide the front mounting screws.
The end caps snap onto the front bezel of the array module.
6. At the back of the array module, use the #2 Phillips screwdriver to install and tighten two 8-32 screws (one per side) through the rear mounting points (FIGURE 18).

After you have installed all of the modules in the rack, you are ready to:
| Sun StorEdge 6130 Array Release Notes | 819-0034-11 |
Copyright © 2004, Sun Microsystems, Inc. All Rights Reserved.