| C H A P T E R 9 |
|
Planning Your Storage Configuration |
This chapter introduces you to the Sun StorEdge 6130 array storage components. It contains the following sections:
For more information about the concepts introduced in this chapter, see the appropriate topic in the online help.
The array management software provides access to both physical and logical storage components. The physical components include initiators, hosts, host groups, trays, and disks associated with a storage array. The logical components include volumes, virtual disks, pools, and snapshots.
TABLE 9-1 describes the physical and logical components of a storage array. For more information, see the online help.
FIGURE 9-1 shows the relationship of logical and physical storage components.
Storage domains enable you to partition storage, allowing hosts or host groups access to specific volumes. Hosts access volumes on the array through the physical host ports (or initiators) residing on host HBAs. Volume-to-LUN mapping allows you to specify the host or host group that can access a specific volume on your storage array. For more information about storage domains and LUN mapping, see the online help.
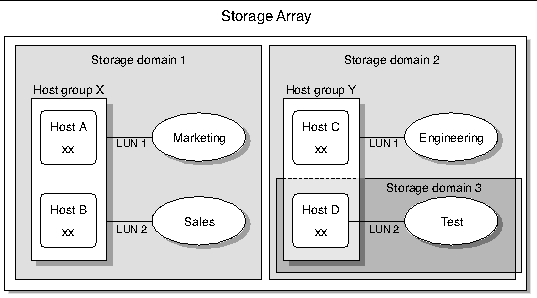
FIGURE 9-2 shows how storage domains can be used to partition storage. It depicts a storage array configured with three storage domains, Storage Domain 1, Storage Domain 2, and Storage Domain 3.

Storage Domain 1 consists of two volumes, Marketing and Sales, that are mapped to Host Group X. Host Group X contains two hosts, Host A and Host B. All initiators associated with Host A and Host B, within Host Group X, have access to volume Marketing by way of LUN ID 1, and to volume Sales by way of LUN ID 2.
Storage Domain 2 consists of one volume, Engineering, that is mapped to Host Group Y. Host Group Y contains two hosts, Host C and Host D. By virtue of being associated with any host within Host Group Y, all initiators associated with Host C and Host D have access to volume Engineering by way of LUN ID 1.
Storage Domain 3 consists of one volume, Test, that is mapped to Host D. All initiators associated with Host D have access to volume Test by way of LUN ID 2. Note that Host D is a member of Host Group Y; however, since volume Test is mapped directly to Host D and not to Host Group Y, Host D is the only member of Host Group Y that can access volume Test.
When configuring a storage array, you need to determine how to organize and allocate the total storage capacity into volumes and share those volumes among your data hosts. As you plan your storage configuration, it is important that you consider the following requirements for your site:
The Sun StorEdge 6130 array software is configured with a default storage profile, storage pool, and storage domain:
You must plan your configuration to determine what storage profile and storage pool to use. For more information, see Planning Volumes in the online help.
Before you create a volume, you should have a plan for how you want to allocate your storage. You should know the number of data hosts you are configuring and the storage capacity and performance needs of each data host.
The New Volume wizard guides you through the steps for creating a volume. When you create a volume, the wizard prompts you to enter or select the following information:
This section describes how to start to configure storage on the array. It guides you through the following steps:
1. Open your browser and enter the IP address of the management host using this format:
https://IP-address-management-host:6789
2. Log in as a user with the storage role.
The Sun Web Console page is displayed.
3. Click Sun StorEdge 6130 Configuration Service.
The Array Summary page is displayed.
The Sun StorEdge 6130 array provides several storage profiles that meet most storage configuration requirements. If the Default storage profile does not meet your performance needs, you can select one of several other predefined profiles, or you can create a custom profile.
To view the predefined storage profiles:
1. On the Array Summary page, click the array you want to configure.
The Volume Summary page is displayed.
The Storage Profile Summary page is displayed.
TABLE 9-2 describes the characteristics of the predefined storage profiles.
3. Select a profile that matches your storage requirements.
You will need the name of the storage profile later, when you create a storage pool.
|
Note - If you want to create a custom profile, click New on the Storage Profile Summary page. If you need information about any of the fields, click Help. |
Host groups enable you to designate a collection of hosts that will share access to a volume. You can map volumes to a host group or to individual hosts that have a logical unit number (LUN).
If you have many hosts to create, you may find it easier to create the hosts first and then to add the hosts to a host group.
Follow these steps for each data host on your network that you want to add to a host group.
1. Click Storage > Physical > Hosts.
The Host Summary page is displayed.
The Create New Host page is displayed.
3. Type a name for the new host, using a maximum of 30 characters.
Use a name that will allow you to recognize the data host on your network.
The host is created and added to the Host Summary page.
1. Click Storage > Physical > Host Groups.
The Host Group Summary page is displayed.
The New Host Group page is displayed.
3. Enter a name for the new host group, using a maximum of 30 characters.
4. Double-click the names of the available hosts you want to add to the group. You can also click Select All or Remove All to add or remove all of the available hosts.
The new host group is created and added to the Host Group Summary page.
To make storage available to a data host or host group, you create an initiator and associate it with a volume. An initiator is an FC port that is identified by a unique worldwide name (WWN) of a host bus adapter (HBA) installed on the data host.
You will need the WWN for the initiator that you want to associate with a volume. If the data host was auto-discovered by the management software, you can get the WWN from Storage > Physical > Initiators.
1. Click Storage > Physical > Initiators.
The Initiator Summary page is displayed.
The New Initiator page is displayed.
3. Enter a name for the new initiator, using a maximum of 30 characters.
4. Select an existing WWN, or enter a new WWN.
If you enter the WWN, the delimiting colons (:) of the 16-character hexadecimal WWN are optional.
5. Select the host name for the new initiator.
6. Select the host type for the new initiator.
The Initiator Summary page displays the initiator name, host name, host type, and WWN of the new initiator.
A storage pool is a collection of volumes with the same configuration.
1. Click Storage > Logical > Pools.
The Storage Pool Summary page is displayed.
The Create New Storage Pool page is displayed.
3. Enter a name for the new storage pool, using a maximum of 30 characters.
4. Select Default or another predefined storage profile that meets your storage needs.
See Selecting a Profile.
The new storage pool is displayed on the Storage Pool Summary page.
A volume is a "container" into which applications, databases, and file systems can store data. A volume is created from virtual disks that are part of a storage pool. Based on your selections, the array automatically allocates storage from different disks to meet your volume configuration requirements.
The New Volume wizard guides you through the steps for creating a volume.
1. Click Storage > Logical > Volumes.
The Volume Summary page is displayed.
The New Volume wizard is displayed.
3. Enter a name, capacity, and select a storage pool for the new volume, and click Next.
4. Select the method you want to use to create a virtual disk, and click Next.
5. Select Map Volume to one Host or Host Group and click Next to map the volume now.
If you select Do Not Map this Volume, you can map the volume after it is created. See the online help for more information about mapping a volume after a volume is created.
6. Select the name of a host or host group to which you want to map the volume, and click Next.
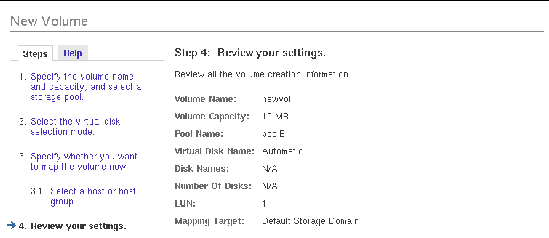
7. Review your selections for this volume.

8. If the values are correct, click Finish.
If you want to change any selections, click Previous to go back to the step that you want to change, or click Cancel to start over.
After you click Finish, the new volume is displayed on the Volume Summary page.
Copyright © 2004, Sun Microsystems, Inc. All Rights Reserved.