| Sun Fire V890 Server Diagnostics Guide |
| Sun Fire V890 Server Diagnostics Guide |
| C H A P T E R 1 |
|
Diagnostic Tools |
This chapter covers the diagnostic tools that are available for the Sun Fire V890 server and provides instructions on how to use these tools.
The following tasks are covered in this chapter:
The following information is also included:
The system provides both firmware-based and software-based diagnostic tools to help you identify and isolate hardware problems. These tools include:
 ) software
POST diagnostics verify the core functionality of the system, including the motherboard, CPU/Memory board, DIMMs, and PCI slots. You can run POST even if the system is unable to boot. For more information about POST, see About POST Diagnostics and Running POST Diagnostics.
OpenBoot Diagnostics tests focus on system I/O and peripheral devices. Like POST, you can run OpenBoot Diagnostics even if the system is unable to boot. For more information about OpenBoot Diagnostics, see About OpenBoot Diagnostics and Running OpenBoot Diagnostics.
SunVTS system exerciser is a graphics-oriented UNIX application that handles the continuous exercising of system resources and internal and external peripheral equipment. For more information about SunVTS software, see About SunVTS Software.
Sun Management Center (formerly Sun Enterprise SyMONTM) software enables you to monitor the system hardware status and operating system performance of your server. For more information about Sun Management Center software, see About Sun Management Center Software.
Remote System Control (RSC) software is a server management tool that provides remote system administration for geographically distributed or physically inaccessible systems. For more information about RSC, see About Sun Remote System Control Software.
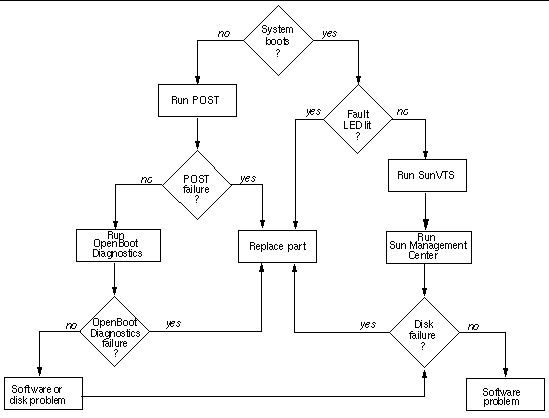
Which method or tool you use to diagnose system problems depends on the nature of those problems:
The following chart shows which tools you can use to diagnose hardware and software problems.
The POST diagnostic code resides in the OpenBoot PROM on the system I/O board. When you power on the system, POST runs automatically under certain conditions. For information about running POST, see Running POST Diagnostics.
POST tests the following system components:
OpenBoot diagnostic configuration variables, stored in the system nonvolatile random access memory (NVRAM), enable you to control certain aspects of POST testing. For information about the configuration variables, see OpenBoot Configuration Variables for POST.
POST reports its test results through detailed diagnostic and error messages. See OpenBoot Configuration Variables for POST for information about diagnostic and error messages.
By default, POST displays diagnostic and error messages through a tip connection or a local ASCII terminal attached to the system's serial port A (ttya). You can also redirect POST output to display remotely on a Remote System Control (RSC) console. If you redirect POST output to an RSC console, POST results will not display locally. See Displaying POST Diagnostic Results for information about redirecting POST output to an RSC console.
The system controller card runs its own POST diagnostics separately from the main POST diagnostics. RSC POST tests the basic functions of the system controller card. To view detailed diagnostic and error messages from RSC POST, you must attach an ASCII terminal directly to the RSC serial port before running RSC POST. For more information about RSC POST, see the Sun Remote System Control (RSC) User's Guide.
The following table lists and describes the OpenBoot configuration variables that enable you to control the operation of POST.
|
Note - Both POST and OpenBoot Diagnostics use the settings of the configuration variables diag-level, diag-switch?, and diag-trigger. Changing the values of these variables will affect both POST and OpenBoot Diagnostics operation. See OpenBoot Configuration Variables for OpenBoot Diagnostics for a complete listing and description of the configuration variables that control OpenBoot Diagnostics testing. |
To display the current and default values of all OpenBoot configuration variables, use the printenv command without specifying a variable.
The following is sample output from the printenv command.
To display the current and default values of a specific OpenBoot configuration variable, specify the printenv command and the variable name at the ok prompt.
To set or change the value of an OpenBoot configuration variable, use the setenv command.
When you power on the system, POST runs automatically under either of the following conditions:
You can also configure POST to run automatically after specific types of reset events by setting the values of the OpenBoot configuration variables diag-switch? and diag-trigger, as shown in the following table. Note that diag-level must be set to any valid value other than none. For more information, see OpenBoot Configuration Variables for POST.
This procedure explains how to run POST diagnostics. There are two parts to this procedure:
You can view POST status and error messages on a local ASCII terminal or through a tip connection. You can also view messages remotely on an RSC console. To view POST diagnostic messages remotely on an RSC console, you need to configure the RSC software before starting POST. For information about using the RSC software, see the Sun Remote System Control (RSC) User's Guide. For information about setting up an alphanumeric terminal or establishing a tip connection, see the Sun Fire V890 Server Owner's Guide.
|
Note - By default, POST diagnostics output displays locally on an attached terminal or through a tip connection. However, if diagnostics output is redirected to an RSC console, the output will not display locally until it is directed back to the local terminal or tip connection. For information about directing POST output to an RSC console or to a local terminal or tip connection, see the Sun Remote System Control (RSC) User's Guide and Displaying POST Diagnostic Results. |
To start POST diagnostics, follow these steps:
1. Turn the keyswitch to the Diagnostics position.
For information about the keyswitch position, see the Sun Fire V890 Server Owner's Guide.
The system runs the POST diagnostics.
POST displays status and error messages locally on an attached terminal, through a tip connection, or on an RSC console (if POST output has been redirected to the RSC console). For more information, see Displaying POST Diagnostic Results.
Upon completion of POST, the system will run OpenBoot Diagnostics. For more information about OpenBoot Diagnostics, see About OpenBoot Diagnostics.
As POST runs, it displays diagnostic status messages locally on an attached terminal, through a tip connection, or on an RSC console (if POST output has been redirected to the RSC console). By default, POST output displays locally on an attached terminal or through a tip connection.
To redirect POST output to an RSC console, follow these steps:
1. Type the following commands at the ok prompt:
2. To cause the changes to take effect, power cycle the system, or type:
If you redirect POST output to an RSC console, the POST results will not display locally on an attached terminal or through a tip connection. To redirect POST output to the terminal or tip connection, issue the diag-console command as shown in the following example:
See the Sun Remote System Control (RSC) User's Guide for more information.
When POST starts, it selects a master CPU to control test execution and error handling. If the master CPU fails, the CPU takes itself offline, and POST selects a new master if another CPU exists in the system.
The level of POST testing depends on the setting of the variable diag-level. See OpenBoot Configuration Variables for POST for more information.
The following is partial sample output of POST testing for four online CPUs: CPU1, CPU3, CPU5, and CPU7. The CPUs CPU0, CPU2, CPU4, and CPU6 are offline. In the sample output, CPU1 is the master CPU, and the OpenBoot Diagnostics configuration variable diag-level is set to max. The CPU being tested is indicated by 1>, 3>, 5>, or 7> at the beginning of each status line.
The remaining POST output would show the results of CPU and memory testing of CPU3, CPU5, and CPU7.
If POST detects an error, it displays an error message indicating the failing part. If POST detects an error that prevents the system from booting, POST halts execution and returns control to OpenBoot firmware. The last message displayed by POST prior to the ok prompt indicates the part you need to replace.
The following is a sample error message for a failed test at DIMM J7900.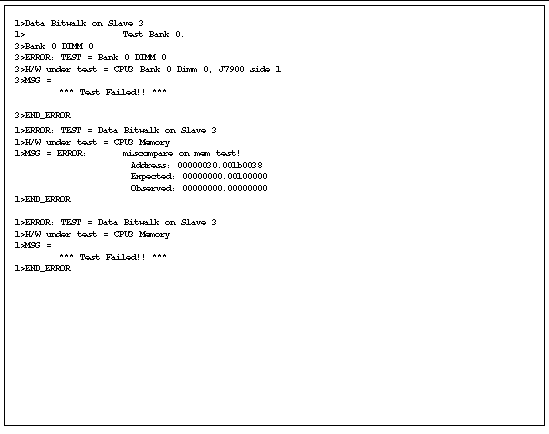
As shown in the preceding error message, POST reports memory errors by indicating the location ("J" number) of the failing DIMM. Use the following diagram to identify the location of a failing DIMM according to J number.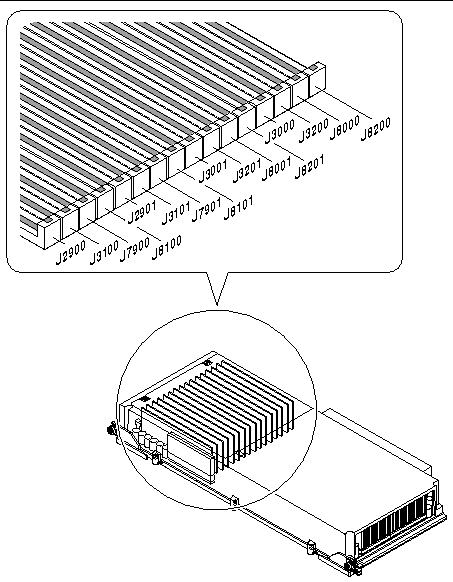
POST results are saved across power cycles. To display the results of POST testing, type .show-post-results at the ok prompt. The following is a sample of .show-post-results output.
The failed status of a device is maintained until POST diagnostics are run again and the faulty device passes. If for some reason you want to override a failed status, set diag-level to off and rerun the diagnostics. With diag-level set to off, no tests are run, and POST indicates a passed status for all devices.
OpenBoot Diagnostics code resides in the OpenBoot PROM on the system I/O board. OpenBoot Diagnostics can detect and isolate errors in the following system components:
OpenBoot Diagnostics also tests the following I/O interfaces:
You can run OpenBoot Diagnostics tests in the following ways:
OpenBoot Diagnostics reports test results through detailed diagnostic and error messages. See Sample OpenBoot Diagnostics Error Messages for information about error messages.
When executed automatically, OpenBoot Diagnostics displays status and error messages through a tip connection or a local ASCII terminal attached to the system's serial port A (ttya). You can also redirect OpenBoot Diagnostics messages to a remote RSC console. If you redirect output to an RSC console, you cannot display OpenBoot Diagnostics results locally. For more information about RSC, see Displaying OpenBoot Diagnostics Results.
When executed interactively from the ok prompt or the OpenBoot Diagnostics menu, OpenBoot Diagnostics displays status and error messages on any system console, including a local graphics console.
The OpenBoot firmware provides diagnostic configuration variables that you can set to control the operation of the OpenBoot Diagnostics tests. For information about the configuration variables, see OpenBoot Configuration Variables for OpenBoot Diagnostics.
The following table lists and describes the OpenBoot Diagnostics configuration variables that control the operation of OpenBoot Diagnostics.
|
Note - Both OpenBoot Diagnostics and POST use the settings of the configuration variables diag-level, diag-switch?, and diag-trigger. Changing the values of these variables will affect both POST and OpenBoot Diagnostics operation. See OpenBoot Configuration Variables for POST for a complete listing and description of the OpenBoot configuration variables that control POST testing. |
|
Determines the level of testing executed. Note: If diag-level is set to menus (for POST interactive operation), OpenBoot Diagnostics runs the default level (min) of testing. See OpenBoot Configuration Variables for POST for more information about the menus setting. |
|||
|
Performs no OpenBoot Diagnostics testing.
Note: If diag-level is set to off, OpenBoot Diagnostics returns a passed status for all
|
|||
|
Specifies the number of consecutive executions of OpenBoot Diagnostics tests that are run from the OpenBoot Diagnostics menu. The maximum value for diag-passes is >1,000,000. Note: The variable diag-passes has no effect outside the OpenBoot Diagnostics Menu. See OpenBoot ok Prompt Commands. |
|||
|
Determines which OpenBoot Diagnostics tests are run automatically after the reset event specified by the variable diag-trigger. |
|||
|
Executes all available self-tests, including tests on plug-in cards. (Same as executing test-all from the ok prompt.) |
|||
|
Diagnostics are only executed on power-on reset events, but the level of test coverage, verbosity, and output is determined by user-defined settings. |
|||
|
Diagnostics are executed upon next system reset, but only for those class of reset events specified by the OpenBoot configuration variable diag-trigger. The level of test coverage, verbosity, and output is determined by user-defined settings. |
|||
|
Specifies the class of reset event that causes diagnostics to run automatically. Note: Both POST and OpenBoot Diagnostics run at the specified reset event if the variable
|
|||
|
Reset that is caused by certain hardware error events such as RED State Exception Reset, Watchdog Resets, Software-Instruction Reset, or Hardware Fatal Reset. |
|||
|
Reset that is initiated by an operating system panic or by userinitiated commands from OpenBoot (reset-all or boot) or from Solaris (reboot, shutdown, or init). |
|||
|
Diagnostics are executed at Sun-specified levels, overriding but preserving user settings. |
|||
|
Normal mode, unless overridden by the panel keyswitch. Diagnostics execution depends entirely on the settings of diag-switch? and other user-defined OpenBoot configuration variables. |
|||
|
Note: If the panel keyswitch is in the Diagnostics position, the system will boot in service mode even if the service-mode? variable is false. |
|||
|
Customizes OpenBoot Diagnostics tests. Allows a text string of reserved keywords (separated by commas) to be specified in the following ways:
The following are the reserved keywords for the variable test-args: |
|||
|
Invokes built-in self-test (BIST) on external and peripheral devices. |
|||
|
Enables hot-plug controller tests. (Power cycles PCI slots.)
Warning: After the hot-plug test, the PCI cards in the slots tested are not usable until you reset the system. |
|||
|
Verifies external and peripheral device media accessibility. |
|||
|
Attempts to restore original state of the device if the previous execution of the test failed. |
|||
|
Suppresses messages announcing the name of every test run from the OpenBoot Diagnostics menu commands. (This keyword has no effect on status messages of tests run from the ok prompt.) |
|||
|
Continues executing the test until N errors are encountered. |
|||
|
Controls the amount and detail of OpenBoot, POST, and OpenBoot Diagnostics output. |
|||
|
Only error and fatal messages are displayed on the system console. Banner is not displayed. Note: Problems in systems with verbosity set to none might be deemed not diagnosable, rendering the system unserviceable by Sun. |
|||
|
Notice, error, warning, and fatal messages are displayed on the system console. Transitional states and banner are also displayed. |
|||
|
Summary progress and operational messages are displayed on the system console in addition to the messages displayed by the min setting. The work-in-progress indicator shows the status and progress of the boot sequence. |
|||
|
Detailed progress and operational messages are displayed on the system console in addition to the messages displayed by the min and normal settings. |
To display the current values of all OpenBoot configuration variables, use the printenv command at the ok prompt without specifying a variable name. To display the current values of the OpenBoot Diagnostics configuration variables, use the printenvs menu command at the obdiag> prompt. For more details, see OpenBoot Diagnostics Menu Commands.
obdiag> printenvs Variable Name Value Default Value diag-switch? true false diag-level min min test-args subtests diag-passes 10 1 obdiag> |
To set or change the value of a diagnostic configuration variable, use the setenv command at the ok prompt or at the obdiag> prompt. See OpenBoot Diagnostics Menu Commands for more information.
OpenBoot Diagnostics detects any device that has a self-test that supports the OpenBoot standard. These devices can include both components of the basic system and any optional device with a self-test that supports the standard. Any of these devices can be tested from the ok prompt using the test or test-all commands. The test and test-all commands allow you to specify a particular device for testing. For more information about performing tests using the ok prompt commands, see test Command and test-all Command.
|
Note - You should run OpenBoot Diagnostics tests at the ok prompt only after a power-on or system reset. You cannot run OpenBoot Diagnostics reliably after halting the operating system or aborting the operating system with the Stop-A keyboard command (or an equivalent abort key sequence). Therefore, in order to access the ok prompt and run OpenBoot Diagnostics, you must set the OpenBoot configuration variable auto-boot? to false and reset the system. For the detailed procedure, see Initiating OpenBoot Diagnostics. |
The test command enables you to test an individual device. At the ok prompt, type test and the full path name or device alias of the device, as shown in the following example:
To display the list of system device aliases, type devalias at the ok prompt.
You can use test-args keywords with the test command to fine-tune the execution of the test. See OpenBoot Configuration Variables for OpenBoot Diagnostics for more information about the test-args options. The following is an example of using the test-args keywords loopback and verbose with the test command:
When no device path is specified, the test-all command tests all devices with self-tests as detected by OpenBoot Diagnostics:
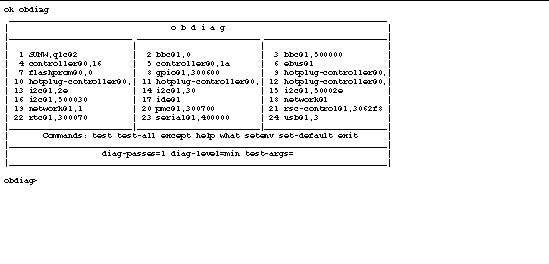
The OpenBoot Diagnostics menu is displayed when you issue the obdiag command at the ok prompt. OpenBoot Diagnostics detects each device with a self-test and displays that device name in the OpenBoot Diagnostics menu. The OpenBoot Diagnostics menu always includes the devices of the basic system. These devices include: bbc, controller, ebus, flashprom, gpio, hotplugcontroller, ide, i2c, network, pmc, rsc-control, rtc, scsi, serial, and usb.
If an optional plug-in device has a self-test that supports the OpenBoot standard, the OpenBoot Diagnostics menu also includes that device as one of the menu entries. Therefore, the menu entries may vary from system to system, depending on the optional devices installed in the system.
You invoke the OpenBoot Diagnostics menu by typing obdiag at the ok prompt. A sample OpenBoot Diagnostics menu is shown below.
For information about each OpenBoot Diagnostics test, see OpenBoot Diagnostics Test Descriptions. For a description of the interactive commands that allow you to run OpenBoot Diagnostics from the obdiag> prompt, see OpenBoot Diagnostics Menu Commands.
The following table describes the interactive OpenBoot Diagnostics menu commands that are available at the obdiag> prompt.
|
Exits the OpenBoot Diagnostics menu and returns to the ok prompt. |
|
|
Displays a brief description of each OpenBoot Diagnostics menu command and OpenBoot configuration variable. |
|
|
Displays the current value of diagnostics-related OpenBoot configuration variables. (See OpenBoot Configuration Variables for OpenBoot Diagnostics for information about the configuration variable values.) |
|
|
Sets the value for an OpenBoot configuration variable. (See OpenBoot Configuration Variables for OpenBoot Diagnostics for information about the configuration variable values.) |
|
|
Tests all devices displayed in the OpenBoot Diagnostics menu.
Note: Unlike the test-all command at the ok prompt, the test-all menu command at the obdiag> prompt does not allow you to specify a device path name. |
|
|
Displays the version, last modified date, and manufacturer of each self-test and the OpenBoot Diagnostics menu and library. |
|
|
Tests only the device or devices identified by the menu entry number (#) in the command line. Specify individual tests, separated by commas.
|
|
|
Tests all devices in the OpenBoot Diagnostics menu except those identified in the list. (Example: obdiag> except 3,5,10) |
|
|
Displays selected properties of the devices identified by the menu entry number (#) in the command line. The information provided varies according to device type. |
OpenBoot Diagnostics provides comprehensive diagnostic testing for the I/O subsystem, I2C subsystem, and other hardware devices. Tests available through OpenBoot Diagnostics are:
|
Note - For maximum testing of each device, set the diag-level variable to max; for limited testing, set diag-level to min. For some devices, the testing is the same at both the min and max settings. |
The following table lists the devices provided with a typical system and describes the self-test of each device. The table provides the device path name, a brief description of the device's self-test, and any special considerations involved in running the test.
|
Note - The test-args keywords verbose, subtests, debug, errors=N, and callers=N apply to all self-tests. |
Additional testing may be performed if your configuration includes an optional device that has an on-board self-test that supports the OpenBoot standard. Such optional devices include PCI interface cards that support parallel communication lines, audio devices, or any other device that is IEEE 1275 compatible and provides a method named "selftest." Examples of optional devices are:
When you power on the system, OpenBoot Diagnostics runs automatically under either of the following conditions:
You can configure OpenBoot Diagnostics to run automatically after specific types of reset events by setting the values of the variables diag-switch? and diag-trigger, as shown in the following table. Note that diag-level and diag-script must be set to any valid value other than none. For more information, see OpenBoot Configuration Variables for OpenBoot Diagnostics.
The setting for diag-script determines which tests are run at the reset event specified by diag-trigger. Valid settings for diag-script are:
See OpenBoot Configuration Variables for OpenBoot Diagnostics for information about the settings for diag-script.
The following sample output shows the results of OpenBoot Diagnostics tests when the variable diag-level is set to max, diag-script is set to normal, and no test-args keywords are specified.
OpenBoot Diagnostics runs automatically, without operator intervention, under the conditions described previously. However, you can also run OpenBoot Diagnostics in an interactive mode and specify which tests you want to perform. OpenBoot Diagnostics tests can be executed interactively in the following ways:
The following procedure describes how to run OpenBoot Diagnostics interactively from the obdiag> prompt. There are two parts to this procedure:
You need to set up a way of viewing OpenBoot Diagnostics error and diagnostic messages if your server is configured without a system console. Use the following guidelines to set up a way of displaying the messages for your particular installation:
|
Note - When executed automatically, OpenBoot Diagnostics output displays locally on an attached terminal or through a tip connection. However, if diagnostics output is redirected to an RSC console, the output will not display locally until it is directed back to the local terminal or tip connection. For information about directing OpenBoot Diagnostics output to an RSC console or to a local terminal or tip connection, see the Sun Remote System Control (RSC) User's Guide and Displaying OpenBoot Diagnostics Results. |
You should run OpenBoot Diagnostics tests interactively only after a power-on or system reset. You cannot run OpenBoot Diagnostics reliably after halting the operating system or aborting the operating system with the Stop-A keyboard command (or an equivalent abort key sequence). Therefore, in order to access the ok prompt and run OpenBoot Diagnostics, you must set the OpenBoot configuration variable auto-boot? to false and reset the system.
Perform the following steps to set the configuration variable auto-boot? and to run the OpenBoot Diagnostics tests interactively.
2. Set the OpenBoot configuration variable auto-boot? to false, type:
3. Reset or power cycle the system, type:
4. When the ok prompt appears, invoke OpenBoot Diagnostics, type:
The OpenBoot Diagnostics menu appears.
5. (Optional) When the OpenBoot Diagnostics menu and obdiag> prompt appear, set the configuration variables.
See OpenBoot Configuration Variables for OpenBoot Diagnostics for information about the variable values.
The following example shows how to set the value for the variable diag-level, which specifies the level of testing performed:
|
Note - If diag-level is set to off, OpenBoot Diagnostics returns a passed status for all tests, but no testing is performed. |
6. To execute one or more tests, enter the appropriate OpenBoot Diagnostics menu command and test numbers at the obdiag> prompt.
The following example shows the except command, which allows you to execute all tests except those tests you specify in the command:
For command usage and descriptions, see OpenBoot Diagnostics Menu Commands.
For information about the OpenBoot Diagnostics tests, see OpenBoot Diagnostics Menu and OpenBoot Diagnostics Test Descriptions.
By default, when you run OpenBoot Diagnostics interactively, the output displays locally on the system console. You can redirect OpenBoot Diagnostics output to display remotely on an RSC console.
To redirect output to an RSC console:, follow these steps
1. Type the following commands at the system ok prompt:
2. To cause the changes to take effect, power cycle the system, or type:
If you redirect OpenBoot Diagnostics output to an RSC console, the output will not display on the system console. To redirect OpenBoot Diagnostics output to the local system console or to a tip connection, issue the diag-console command as shown in the following example:
See the Sun Remote System Control (RSC) User's Guide for more information about redirecting output to an RSC console.
Using the OpenBoot configuration variable test-args, you can specify keywords to set reporting controls for diagnostic and error messages:
See OpenBoot Configuration Variables for OpenBoot Diagnostics and Error Messages for additional information about the test-args variable. The following is an example of how to use the variable test-args.
OpenBoot Diagnostics reports errors in a standard format. The following output shows the test command for the FC-AL subsystem issued from the obdiag> prompt and a sample error message.
SunVTS, the Sun Validation Test Suite, is an online diagnostic tool and system exerciser for verifying the configuration and functionality of hardware controllers, devices, and platforms.
SunVTS software lets you view and control a testing session over modem lines or over a network. Using a remote system, you can view the progress of a SunVTS testing session, change testing options, and control all testing features of another system on the network.
SunVTS software provides the following user interfaces:
You can run SunVTS software from any one of its interfaces.
The following documents provide information about SunVTS software. They are available on the Supplement CD for your specific Solaris release and on the web at http://docs.sun.com.
This document describes the SunVTS environment, including how to start and control the various user interfaces.
This document describes each SunVTS test, the various test options, and
command-line arguments.
This card gives an overview of the main features of the SunVTS graphical user interface.
This document is a supplement to the SunVTS documentation and describes new features, tests, and test enhancements that are developed in the SunVTS 5.1 Patch Set releases.
SunVTS software is an optional package that may or may not have been loaded when your system software was installed.
This procedure assumes that the Solaris operating environment is running on the Sun Fire V890 server, and that you have access to the Solaris command line. For more information, see the Sun Fire V890 Server Owner's Guide
1. Check for the presence of SunVTS packages. Type the following:
The pertinent packages are as follows.
2. (Solaris 8 Operating System only) Check for additional needed software.
This applies only if you intend to install and run SunVTS 5.1 software (or later compatible versions) under the Solaris 8 Operating System.
SunVTS 5.1 software requires additional packages that may not be installed with Solaris 8 software. To find out, type the following:
This tests for the presence of the following packages.
3. If necessary, load any missing packages.
Use the pkgadd utility to load onto your system any SunVTS and support packages that you determined you needed in Step 1 or Step 2.
For the Solaris 8 Operating System, the SunVTS and XML packages are included on the Software Supplement CD. The zlib packages are included on the Solaris primary installation CD in the Entire Solaris Software Group.
Note that /opt/SUNWvts is the default directory for installing SunVTS software.
4. Load SunVTS patches, if appropriate.
Patches to SunVTS software are available periodically on the SunSolve OnlineSM Web site. These patches provide enhancements and bug fixes. In some cases, there are tests that will not run properly unless the patches are installed.
For installation information, refer to the SunVTS Users Guide, the appropriate Solaris documentation, and the pkgadd man page.
If your system passes POST and OpenBoot Diagnostics testing and boots the operating system, yet does not function correctly, you can use SunVTS software to run additional tests. These tests verify the configuration and functionality of most hardware controllers and devices.
You will need superuser (root) access to run SunVTS tests.
This procedure assumes you will test the server remotely by running a SunVTS session from a remote system using the SunVTS graphical interface. For information about the SunVTS interfaces and options, see the SunVTS User's Guide.
1. Use the xhost command to give the Sun Fire V890 server access to the remote display.
On the remote system that will be running the SunVTS graphical interface, type:
Substitute the host name of the Sun Fire V890 server for server-hostname.
2. Log in to the Sun Fire V890 server as superuser (root).
3. Check whether SunVTS software is loaded on the Sun Fire V890 server.
SunVTS is an optional package that may or may not have been loaded when the server software was installed. For more information, see How to Check Whether SunVTS Software Is Installed.
4. To start the SunVTS software, type:
Substitute the name of the system you are using for system-hostname. Note that /opt/SUNWvts/bin is the default directory for SunVTS software. If you have installed SunVTS software in a different directory, use the appropriate path instead.
5. Fine-tune your testing session by selecting only the tests you want to run.
On the Test Selection panel, click to select and deselect tests. (A check mark in the box indicates the item is selected.) The following table lists and describes useful tests to run on the Sun Fire V890 server.
If SunVTS tests indicate an impaired or defective part, see the replacement procedures in the Sun Fire V890 Server Service Manual.
During testing, SunVTS software logs all status and error messages. To view these, click the Log button or select Log Files from the Reports menu. This opens a log window from which you can choose to view the following logs:
For further information, see the manuals that accompany SunVTS software. These are listed in the section Related Documentation.
Sun Management Center software is a convenient, single solution for managing multiple Sun systems, devices, and network resources. With its intuitive graphical interface based on JavaTM software, Sun Management Center offers powerful management capabilities that allow you to do the following:
Sun Management Center software is provided on a CD supplied in the Solaris media kit for your release. For information about installing and using Sun Management Center software, see the following documents provided with the Sun Management Center software:
Sun Remote System Control (RSC) software is a remote server management tool that allows you to monitor and control supported Sun servers over modem lines or over a network. The RSC software provides remote system administration for geographically distributed or physically inaccessible systems.
The RSC software works with the system controller card included in all Sun Fire V890 servers. The system controller card runs independently of the host server, and operates off of 5-volt standby power from the system's power supplies. This allows the system controller card to serve as a "lights out" management tool that continues to function even when the server operating system goes offline or the system is powered off.
The system controller card plugs in to a dedicated slot on the system I/O board and includes integrated serial and Ethernet interfaces. The card provides two ports that are accessible through an opening in the system rear panel:
Once RSC software is configured to manage your server, you can use it to run diagnostic tests, view diagnostic and error messages, reboot your server, and display environmental status information on a remote console. If the operating system is down, RSC can automatically notify you of any power failures, hardware failures, or other important events that may be occurring on your server.
RSC software provides the following system administration capabilities:
RSC complements existing Sun monitoring and diagnostic tools such as Sun Management Center, SunVTS, POST, and OpenBoot Diagnostics.
RSC offers the following user interfaces:
The GUI client application, based on Java software, runs on workstations using the the Solaris Operating System, Microsoft Windows 95, Windows 98, or Windows NT operating environments.
Sun RSC software is included on the Supplement CD for your specific Solaris release. For installation instructions, see the Solaris Sun Hardware Platform Guide provided in the Solaris media kit. For information about configuring and using RSC, see the Sun Remote System Control (RSC) User's Guide provided with the RSC software.
| Sun Fire V890 Server Diagnostics Guide | 817-5950-11 |
Copyright © 2004, Sun Microsystems, Inc. All Rights Reserved.