| Memory Module Installation and Removal Guide |
| Memory Module Installation and Removal Guide |
|
Memory Module Installation and Removal Guide for Netra CP2000/CP2100 Series cPCI Boards |
This document describes how to install a maximum of two stackable, single-wide or double-wide, memory modules on Netra CP2000 series and CP2100 series CompactPCI boards. In this document, the CP2000 series boards consist of CP2040, CP2060 and CP2080 boards and the CP2100 series consists of the CP2140 and CP2160 boards.
If a single-wide memory module is installed on the Netra CP2000/CP2100 board, the installation of one PMC card is supported on the board. If a double-wide memory module is installed on the Netra CP2000/CP2100 board, the installation of a PMC card is not supported on that board.
The memory modules are also referred to as memory cards or mezzanine modules in various other Netra CP2000/CP2100 board manuals and literature.
This document contains the following sections:
This section contains instructions for installing single-wide 256 MB, 512 MB or 1 GB memory modules on a Netra CP2000/CP2100 series board.
This section contains the following subsections:
This section provides information on the materials and tools required to perform installation or extraction.
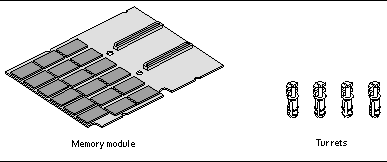
Memory boards are ordered separately for a Netra CP2000/CP2100 board that uses modular memory. Many boards ship with memory already installed. To obtain two memory modules, you need to order two memory board kits. Each memory board kit contains the following hardware (see FIGURE 1 and Single-Wide Memory Module Identification and Sizes for identification):
|
Note - Place the Netra CP2000/CP2100 board on an ESD protected surface prior to the memory module installation or extraction process. |

The Netra CP2000/CP2100 boards support two memory module kits. Details of the kits are listed below:
XCP2000-MEM-256MB (256 MB memory module - 2 in. x 4 in.) part no. 595-5940-xx This kit contains the components shown in FIGURE 1. They can each be identified by their part numbers as follows:
XCP2000-MEM-512MB (512 MB memory module - 2 in. x 4 in.) part no. 595-5944-xx This kit contains the components shown in FIGURE 1. They can each be identified by their part numbers as follows:
XCP2000-MEM-1GB (1 GB memory module - 2 in. x 4 in.) part no. 595-6710-xx
This kit contains the components shown in FIGURE 1. They can each be identified by their part numbers as follows:
TABLE 1 shows the single-wide memory cards supported by the Netra CP2000/CP2100 boards.
Before installing a Netra CP2000/CP2100 motherboard into any OEM equipment/chassis, install the memory modules onto the Netra CP2000/CP2100 board.
The Netra CP2000/CP2100 boards accommodate modular memory that can be stacked. The first memory board is installed directly on the Netra motherboard. The second memory board is installed on top of the first one. When modules of two different sizes are to be stacked one on top of the other, the module with the larger memory size must be placed at the bottom. Refer to the documentation for your Netra CP2000/CP2100 board product to determine the number of memory modules that can be installed on the board.
If you want to replace memory on a Netra CP2000/CP2100 board, remove the existing memory modules and install a replacement module, following the memory removal and installation steps described in this section.
|
|
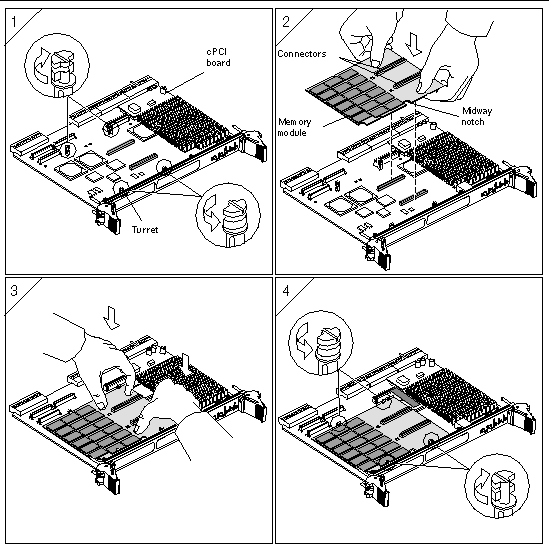
Refer to FIGURE 2 and the following instructions to install the memory module.
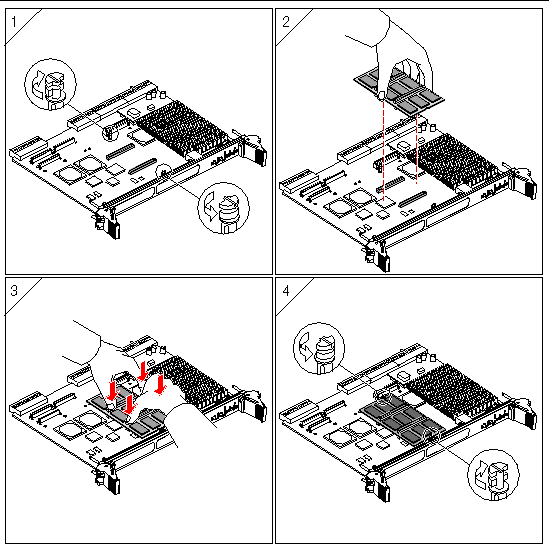
1. Rotate turrets to the position shown in FIGURE 2 Segment 1. Hold the memory module centered right over the memory connectors.
2. Align the module connectors with the memory sockets on the Netra CP2000/CP2100 board (see FIGURE 2 Segment 2). Make sure the module is right side up so that the connectors mate. While holding the connector by the long edge, orient the midway notch on the memory module towards the front panel of the cPCI board.
3. Seat the module firmly into position so that it fits onto the board connectors, while pressing down on the module with your fingers (see FIGURE 2 Segment 3).
The module connectors are fully engaged with the board connectors when you hear or feel them snap into place.

|
Caution - Do not apply excessive pressure to connectors. Doing so can fracture the connectors or the Netra circuit board. |
This procedure is an installation of one memory module on to a Netra CP2000/CP2100 board. If you wish to install a second memory module, follow Step 1 to Step 4. The only difference is that the connectors of the second memory module are positioned on the memory module connector sockets of the first module in a piggy-back style and then seated.
4. Rotate the turrets back to the position shown in FIGURE 2 Segment 4.
|
|
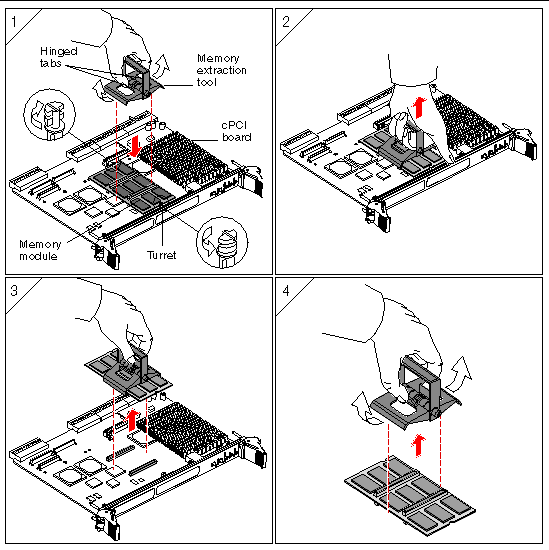
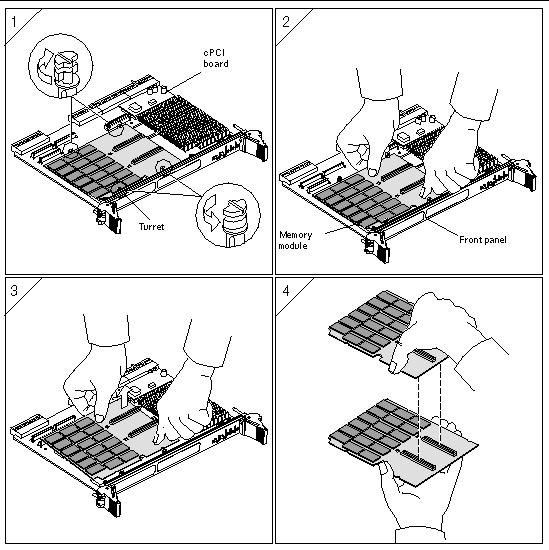
Refer to FIGURE 3 and the following instructions to remove the memory module.

|
Caution - Please follow the instructions below. If you do not follow the installation and removal instructions, you can damage the connectors. |
1. Pinch the hinged tabs of the memory extraction tool to open its jaws, position it over the memory module, and let go of the tabs so the tool grasps the module firmly (see FIGURE 3 Segment 1). Rotate turrets into the position shown in FIGURE 3 Segment 1.
2. Pull at the extraction tool handle while leveraging with your fingers on the faceplate to loosen, and pull out the module from the connectors on the Netra CP2000/CP2100 board (see FIGURE 3 Segment 2 and Segment 3). With your other hand, hold down the motherboard.
3. Remove the module from the jaws of the memory extraction tool by pinching the hinged tabs to open the extraction tool jaws (see FIGURE 3 Segment 4).
This procedure is an extraction of one memory module from the Netra CP2000/CP2100 board. If you wish to extract two modules from the board, follow Step 1 to Step 3. The only difference is that the connectors of the top memory module are positioned on the memory module connector sockets of the bottom module in a piggy-back style.
When two memory modules are installed on the Netra CP2000/CP2100 board, the lower module might get extracted when removing the top module. If this happens, separate the modules by gently prying the boards apart. Start with short ends of the modules. Try not to bend the modules, use only enough force to unmate the connectors.

|
Caution - Do not separate modules from each other by prying them apart at the extremities, because you could damage the modules. |
|
|
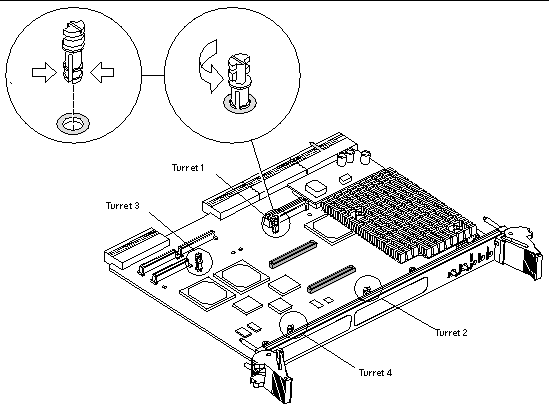
There are two turrets provided on a Netra CP2000/CP2100 board that are required for single-wide memory module installation. The following procedure is provided in case either of the turrets have to be replaced by one of the two spare turrets that are shipped with the memory module.
 Pinch the turret at the bottom and insert it into the turret mounting hole on the Netra CP2000/CP2100 board as shown in FIGURE 4.
Follow the information and illustrations on turret rotation as provided in the memory module installation or removal procedures earlier.

This section contains instructions for installing double-wide 1 GBor 2 GB memory modules on a Netra CP2000/CP2100 series board.
This section contains the following subsections:
This section provides information on the materials and tools required to perform installation or extraction.
Memory modules are ordered separately for a Netra CP2000/CP2100 board that uses modular memory. Many boards ship with memory already installed. Refer to the documentation specific to your Netra CP2000/CP2100 board to determine the memory capacity of the board.
To obtain two memory modules, you need to order two memory module kits. Each memory module kit contains the following hardware (see FIGURE 5 and Double-Wide Memory Module Identification and Sizes):
|
Note - Place the Netra CP2000/CP2100 board on an ESD protected surface prior to the memory module installation or extraction process. |
Details of the kit for the 1GBand 2 GB double-wide memory module for a Netra CP2000/CP2100 board are listed below:
CP2000/CP2100 Series CompactPCI Boards (817-0653-xx)
TABLE 2 shows the double-wide memory cards supported by the Netra CP2000/CP2100 boards.
Before installing a Netra CP2000/CP2100 motherboard into any OEM equipment or chassis, install the memory modules on the Netra CP2000/CP2100 board.
The Netra CP2000/CP2100 boards that accommodate modular memory have memory bus connectors on their upper and lower surfaces so that they can be stacked. The first memory module is installed directly on the Netra motherboard. The second memory module is installed on top of the first one.
When modules of two different sizes are to be stacked one on top of the other, the module with the larger memory size must be placed at the bottom.
If you want to replace memory on a Netra CP2000/CP2100 board, remove the existing memory modules and install a replacement module, following the memory removal and installation steps in this section.
|
|
Two turrets are pre-installed on the Netra CP2000/CP2100 board. Two additional turrets must be added to the board before installing the double-wide memory module. Turrets labeled 1 and 2 below are pre-installed on the board. Turrets labeled 3 and 4 below need to be installed.
To install a turret onto the board, pinch the turret at the bottom and insert it into the turret mounting hole on the Netra CP2000/CP2100 board as shown in FIGURE 6.
Follow the information and illustrations on turret rotation provided in the memory module installation or removal procedures.
|
Note - This procedure can also be used for installing replacement turrets. |
|
|
Refer to FIGURE 7 and the following instructions to install the double-wide memory module.

|
Caution - Follow the instructions below. If you don't follow the installation instructions properly, you can damage the connectors. |
1. Rotate the turrets to the position shown in FIGURE 7 Segment 1.
2. Grasp the memory module with two hands (see FIGURE 7 Segment 2).
3. Align the module connectors with the memory sockets on the Netra CP2000/CP2100 board. Make sure the module is right side up so that the connectors mate, and orient the midway notch on the memory module towards the front panel of the cPCI board (see FIGURE 7 Segment 2).
4. Seat the module firmly into position so that it fits onto the board connectors, while pressing down on the module with your fingers (see FIGURE 7 Segment 3).
The module connectors are fully engaged with the board connectors when you hear or feel them snap into place.

|
Caution - Do not apply excessive pressure to connectors. Doing so may fracture the connectors or the Netra circuit board. |
The above procedure describes an installation of one memory module on to the Netra CP2000/CP2100 board. If you wish to install a second memory module, follow Step 1 to Step 4. The only difference is that you position the connectors of the second memory module on the memory module connector sockets of the first module in a piggy-back style, and then seat the connectors.
5. Rotate the turrets back to the position shown in FIGURE 7 Segment 4.
|
|
Refer to FIGURE 8 and the following instructions to remove the memory module.

|
Caution - Follow the instructions below. If you don't follow the removal instructions properly, you can damage the connectors. |
1. Rotate the turrets into the position shown in FIGURE 8 Segment 1.
2. Place your hands on the module, as shown in FIGURE 8 Segment 2.
3. Gently pry the module up, one connector at a time, starting from the side farthest from the front panel (see FIGURE 8 Segment 3).
Use the hand closest to the front panel to hold the motherboard down while the other hand is lifting the memory module off.
The above procedure describes an extraction of one memory module from a Netra CP2000/CP2100 board. If you wish to extract two modules from the board, follow Step 1 to Step 3. The only difference is that the connectors of the top memory module are positioned on the memory module connector sockets of the bottom module in a piggy-back style.
When two memory modules are installed on a Netra CP2000/CP2100 board, the lower module might get extracted when removing the top module. If this happens, separate the modules by gently prying the modules apart (see FIGURE 8 Segment 4). Start with short ends of the modules. Try not to bend the modules, and use only enough force to unmate the connectors.

|
Caution - Do not separate modules from each other by prying them apart at the extremities, because you could damage the modules. |
| Memory Module Installation and Removal Guide | 817-0654-10 |
Copyright © 2003, Sun Microsystems, Inc. All rights reserved.


