| Sun Crypto Accelerator 4000 Board Installation and User's Guide |
| Sun Crypto Accelerator 4000 Board Installation and User's Guide |
| A P P E N D I X F |
|
Zeroizing the Hardware |
This appendix describes how to zeroize the Sun Crypto Accelerator 4000 board to the factory state which is the failsafe mode for the board.

|
Caution - You should use the procedures described in this appendix only if it is absolutely necessary. The zeroize command in vcaadm is appropriate if you need to remove all key material. Refer to Zeroizing a Sun Crypto Accelerator 4000 Board for details on the zeroize command. Also refer to the online manual pages for vcadiag(4) for removing all key material. |
In some situations, it may become necessary to return a board to failsafe mode, and clear it of all key material and configuration information. This can only be done by using the hardware jumper attached to the board.
|
Note - You can use the zeroize command with the vcaadm utility to remove all key material from a Sun Crypto Accelerator 4000 board. However, the zeroize command leaves any updated firmware intact. See Zeroizing a Sun Crypto Accelerator 4000 Board. Also refer to the vcadiag online manual pages. |
|
|

|
Caution - The board must not receive any electrical power while adjusting the jumper. |
2. Remove the computer cover to get access to the jumper located at the top middle of the board.
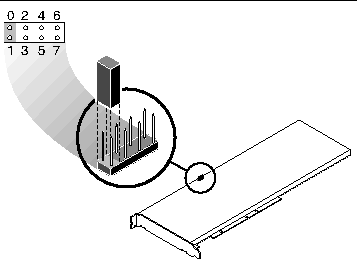
3. Place the jumper on pins 0 and 1 of the jumper block.
Pins 0 and 1 are the pins closest to the bracket and labeled with a "Z." There are four sets of two pins and the jumper should only be placed on the 0 and 1 pin set as shown in FIGURE F-1.

|
Caution - You cannot use the Sun Crypto Accelerator 4000 board with the jumper on pins 0 and 1. |
6. Remove the jumper from pins 0 and 1 of the jumper block and store the jumper in the original location.
8. Connect to the Sun Crypto Accelerator 4000 board with vcaadm.
vcaadm prompts you for a path to upgrade the firmware.
9. Type /opt/SUNWconn/cryptov2/firmware/sca4000fw as the path for installing the firmware.
The firmware is automatically installed and you are logged out of vcaadm.
10. Reconnect to Sun Crypto Accelerator 4000 board with vcaadm.
vcaadm prompts you to either initialize the board with a new keystore, or initialize the board to use an existing keystore. See Initializing the Sun Crypto Accelerator 4000 Board With vcaadm.
| Sun Crypto Accelerator 4000 Board Installation and User's Guide | 817-0431-10 |
Copyright © 2003, Sun Microsystems, Inc. All rights reserved.

