| Sun Crypto Accelerator 4000 Board Installation and User's Guide |
| Sun Crypto Accelerator 4000 Board Installation and User's Guide |
| C H A P T E R 5 |
|
Configuring Sun ONE Server Software for Use With the Sun Crypto Accelerator 4000 Board |
This chapter explains how to configure the Sun Crypto Accelerator 4000 board for use with Sun ONE Web Servers. This chapter includes the following sections:
|
Note - The Sun ONE Web Servers described in this manual were previously named iPlanet |
This section provides an overview of the security features of the Sun Crypto Accelerator 4000 board as it is administered with Sun ONE Web Servers.
|
Note - To manage keystores, you must have access to the system administrator account for your system. |
Keystores and users must be created for applications that communicate with the Sun Crypto Accelerator 4000 board through a PKCS#11 interface, such as the Sun ONE Web Server.
Users, within the context of the Sun Crypto Accelerator 4000, are owners of cryptographic keying material. Each key is owned by a single user. Each user may own multiple keys. A user may want to own multiple keys to support different configurations, such as a production key and a development key (to reflect the organizations the user is supporting).
A keystore is a repository for key material. Associated with a keystore are security officers and users. Keystores not only provide storage, but a means for key objects to be owned by user accounts. This allows keys to be hidden from applications that do not authenticate as the owner. Keystores have three components:
A typical installation contains a single keystore with a single user. For example, such a configuration might consist of a single keystore web_server and a single user within that keystore, web_admin. This would allow the user web_admin to own and maintain access control of the server keys within that single keystore.
An administrative tool, vcaadm, is used to manage Sun Crypto Accelerator 4000 keystores and users. Refer to Managing Keystores With vcaadm.
Keystores appear to Sun ONE Web Servers as tokens. Token files are a technique for Sun Crypto Accelerator 4000 administrators to selectively present only specific tokens to a given application.
There are three keystores, engineering, finance, and legal. The following tokens are presented to the Sun ONE Web Server:
To override the default case, a token file must exist. Some applications cannot handle multiple tokens. Token files are text files that contain one or more token names, one per line.
A Sun ONE Web Server presents only the tokens listed in the token file. The methods of specifying token files are as follows (in order of precedence):
1. The file named by the environment variable SUNW_PKCS11_TOKEN_FILE
2. The file $HOME/.SUNWconn_cryptov2/tokens
3. The file /etc/opt/SUNWconn/cryptov2/tokens
If no token file exists, the Sun Crypto Accelerator 4000 software presents all tokens to Sun ONE Web Servers.
The following is an example of the contents in a token file:
|
Note - Comments are preceded by a pound sign (#) and empty lines are acceptable. |
If none of the files described in this subsection are found, then the default method described in Tokens and Token Files is used.
The bulk encryption feature for SunONE server software is disabled by default. You may want to enable this feature for securely transferring primarily large files.
To enable Sun ONE server software to use bulk encryption on the Sun Crypto Accelerator 4000 board, you simply create an empty file in the /etc/opt/SUNWconn/cryptov2/ directory named sslreg, and restart the server software.
# touch /etc/opt/SUNWconn/cryptov2/sslreg |
To disable the bulk encryption feature, you must delete the sslreg file and restart the server software.
# rm /etc/opt/SUNWconn/cryptov2/sslreg |
This section describes the following:
You are asked for several passwords in the course of enabling a Sun ONE Web Server. TABLE 5-1 provides a description of each. These passwords are referred to throughout this chapter. If there is any confusion about which password to use, refer to TABLE 5-1.
Before you can enable the board for use with a Sun ONE Web Server, you must first initialize the board and populate the board's keystore with at least one user. The keystore for the board is created during the initialization process. You can also initialize Sun Crypto Accelerator 4000 boards to use an existing keystore. Refer to Initializing the Sun Crypto Accelerator 4000 Board With vcaadm.
1. If you have not already done so, place the Sun Crypto Accelerator 4000 tools directory in your search path, for example:
$ PATH=$PATH:/opt/SUNWconn/bin $ export PATH |
2. Access the vcaadm utility with the vcaadm command or enter vcaadm -h hostname to connect vcaadm to a board on a remote host.
Refer to Using vcaadm.
$ vcaadm -h hostname |
3. Populate the board's keystore with users.
These user names are known only within the domain of the Sun Crypto Accelerator 4000 board and do not need to be identical to the UNIX user name that the web server process is using. Before attempting to create the user, remember that you must first log in as a vcaadm security officer.
4. Create a user with the create user command.
vcaadm{vcaN@hostname, sec_officer}> create user username Initial password: Confirm password: User username created successfully. |
The username and password created here collectively make the username:password (See TABLE 5-1). You must use this password when authenticating during a web server startup. This is the keystore password for a single user.

|
Caution - Users must remember this username:password. Without this password, users cannot access their keys. There is no way to retrieve a lost password. |
vcaadm{vcaN@hostname, sec_officer}> exit |
To enable Sun ONE Web Servers you must complete the following procedures, which are explained in detail in the next two sections.

|
Caution - These procedures must be followed in the order given. Failure to do so may result in an incorrect configuration. |
This section explains how to install and configure Sun ONE Web Server 4.1. This chapter includes the following sections:
You must perform these procedures in order. Refer to the Sun ONE Web Server documentation for more information about using Sun ONE Web Servers.
1. Download the Sun ONE Web Server 4.1 software.
You can find the web server software at the following URL:
This section includes instructions for one example, you may decide to configure your Sun ONE Web Server differently. The default path name for the server is: /usr/netscape/server4
Accept the default path during the Sun ONE Web Server installation. This document refers to the default paths. If you decide to install the web server software in a different location, be sure to note where you installed it.
4. Answer the prompts in the installation script.
Except for the following prompts, you can accept the default for ease of use.
a. Agree to accept the license terms by typing yes.
b. Enter a fully qualified hostname.domain.
c. Enter the Sun ONE Web Server 4.1 Administration Server password twice.
d. Press Return when prompted.
1. Start the Sun ONE Web Server 4.1 Administration Server.
Instead of running startconsole as setup requests, start a Sun ONE Web Server 4.1 Administration Server, use the following command:
# /usr/netscape/server4/https-admserv/start SunONE-WebServer-Enterprise/4.1SP9 BB1-08/23/2001 05:50 startup: listening to http://hostname.domain, port 8888 as root |
The response provides the URL for connecting to your servers.
2. Start the Administration graphical user interface (GUI) by opening up a web browser and typing:
http://hostname.domain:admin_port |
In the authentication dialog box enter the Sun ONE Web Server 4.1 Administration Server user name and password you selected while running setup.
|
Note - If you used the default settings during the Sun ONE Web Server setup, type admin for the User ID or the Sun ONE Web Server 4.1 Adminstration Server user name. |
The Sun ONE Web Server 4.1 Administration Server server window is displayed.
4. Create the trust database for the web server instance.
a. Select the Servers tab in the Sun ONE Web Server 4.1 Administration Server window.
b. Select a server and select the Manage button.
c. Select the Security tab near the top of the page and select the Create Database link.
d. Enter a password (web server trust database; see TABLE 5-1) in the two dialog boxes and select OK.
Choose a password of at least eight characters. You will use this password to start the internal cryptographic modules when the Sun ONE Web Server runs in secure mode.
You might want to enable security on more than one web server instance. If so, repeat Step 1 through Step 4 for each web server instance.
5. Execute the following script to enable the Sun Crypto Accelerator 4000 board:
# /opt/SUNWconn/bin/iplsslcfg |
This script prompts you to choose a web server. It installs the Sun Crypto Accelerator 4000 cryptographic modules for the Sun ONE Web Server. The script then updates the configuration files to enable the Sun Crypto Accelerator 4000 board.
6. Type 1 to configure your Sun ONE Web Server to use SSL and press Return.
7. Enter the path of the web server root directory when prompted and press Return.
Please enter the full path of the web server root directory [/usr/netscape/server4]: /usr/netscape/server4 |
8. Type y and press Return when prompted, if you want to proceed.
1. Restart the Sun ONE Web Server 4.1 Administration Server by typing the following commands:
# /usr/netscape/server4/https-admserv/stop # /usr/netscape/server4/https-admserv/start |
The response provides the URL for connecting to your servers.
2. Start the Administration GUI by opening up a web browser and typing:
http://hostname.domain:admin_port |
In the authentication dialog box, enter the Sun ONE Web Server 4.1 Administration Server user name and password you selected while running setup.
|
Note - If you used the default settings during Sun ONE Web Server setup, type admin for the User ID or the Sun ONE Web Server 4.1 Administration Server user name. |
The Sun ONE Web Server 4.1 Administration Server window is displayed.
4. To request the server certificate, select the Security tab near the top of the Sun ONE Web Server 4.1 Administration Server window (FIGURE 5-1).
The Create Trust Database page is displayed.
5. Select the Request a Certificate link on the left pane (FIGURE 5-1).
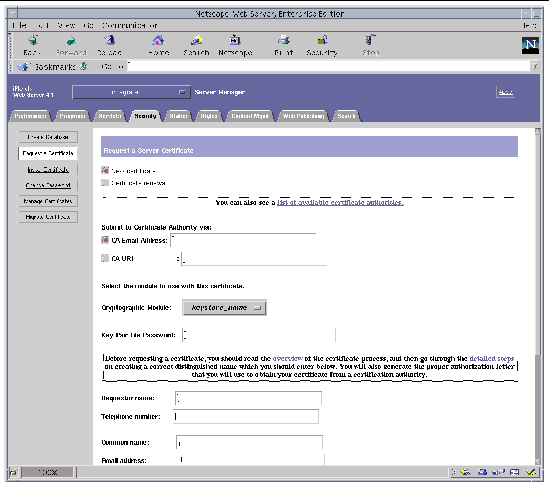
6. Fill out the form to generate a certificate request, using the following information:
If you can directly post your certificate request to a web-capable certificate authority or registration authority, select the CA URL link. Otherwise, select CA Email Address and enter an email address where you would like the certificate request to be sent.
b. Select the Cryptographic Module you want to use.
Each keystore has its own entry in this pull-down menu. Be sure that you select the correct keystore. Do not select SUNW acceleration only.
c. In the Key Pair File Password dialog box, provide the password for the user that will own the key.
This password is the username:password (TABLE 5-1).
d. Provide the appropriate information for the following requestor information fields:
e. Select the OK button to submit the information.
7. Use a certificate authority to generate the certificate.
8. Once the certificate is generated, copy it, along with the headers, to the clipboard.
|
Note - The certificate is different from the certificate request and is usually presented to you in text form. Keep this data on the clipboard for Step 5 of the following section. |
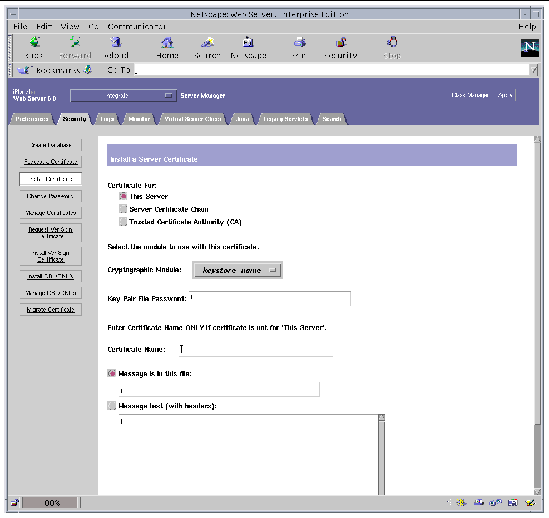
1. Select the Install Certificate link on the left side of the Sun ONE Web Server 4.1 Administration Server window.
Once your request has been approved by a certificate authority and a certificate has been issued, you must install the certificate in the Sun ONE Web Server.
3. On the left pane, choose the Install Certificate link.

4. Fill out the form to install your certificate:
|
Each keystore has its own entry in this pull-down menu. Be sure to select the correct keystore name. To use the Sun Crypto Accelerator 4000, you must select a module with the same name you assigned the keystore. |
|
|
This password is the username:password (TABLE 5-1). |
|
|
In most cases, you can leave this blank. If you provide a name, it will alter the name the web server uses to access the certificate and key when running with SSL support. The default for this field is Server-Cert. |
5. Paste the certificate you copied from the certificate authority (in Step 8 of the To Generate a Server Certificate) into the Message box.
You are shown some basic information about the certificate.
6. Select the OK button at the bottom of the page.
7. If everything looks correct, select the Add Server Certificate button.
On-screen messages tell you to restart the server. This is not necessary because the web server instance has been shut down the entire time.
You are also notified that in order for the web server to use SSL, the web server must be configured to do so. Use the following procedure to configure the web server.
Now that your web server and the server certificate are installed, you must configure the web server for SSL.
1. From the main Sun ONE Web Server 4.1 Administration Server page, select the web server instance you want to work with and select Manage.
2. If the Preferences tab is not selected at the top of the page, select the Preferences tab.
3. Select the Encryption On/Off link on the left side of the page.
The Port field in the dialog box should update to the default SSL port number 443. Alter the port number if necessary.
6. Apply these changes by selecting the Save button.
The web server is now configured to run in secure mode.
7. Edit the /usr/netscape/server4/https-hostname/config/magnus.conf file (hostname is the name of the web server) by adding the following line:
CERTDefaultNickname keystore_name:Server-Cert |
By default, the certificate you generated is named Server-Cert. If your certificate has a different name, be sure to use the name you chose instead of Server-Cert.
8. Select the server you want to administer and select the Apply button in the far upper right corner of the page.
This selection applies the changes through the Sun ONE Web Server 4.1 Administration Server.
9. Select the Load Configuration Files button to apply the changes you just made to the magnus.conf file.
You are redirected to a page that enables you to start your web server instance.
If you select the Apply Changes button when the server is off, an authentication dialog box prompts you for the username:password. This window is not resizable, and you might have a problem submitting the change.
There are two workarounds for this problem:
10. In the Sun ONE Web Server 4.1 Administration Server window, select the On/Off link on the left side of the window.
11. Enter the passwords for the servers and select the OK button.
You are prompted for one or more passwords. At the Module Internal prompt, provide the password for the web server trust database.
At the Module keystore_name prompt, enter the username:password for that keystore.
Enter the username:password for other keystores as prompted.
12. Verify the new SSL-enabled web server at the following URL:
https://hostname.domain:server_port/
This section explains how to enable the Sun Crypto Accelerator 4000 board for use with Sun ONE 6.0 Web Servers. This section includes the following:
You must perform these procedures in order. Refer to the Sun ONE Web Server documentation for more information about using Sun ONE Web Servers.
1. Download the Sun ONE Web Server 6.0 software.
You can find the web server software at the following URL:
This section includes instructions for one example, you may decide to configure your Sun ONE Web Server differently. The default path name for the server is: /usr/iplanet/servers
Accept the default path during the Sun ONE Web Server installation. This book refers to the default paths. If you decide to install the software in a different location, be sure to note where you installed it.
4. Answer the prompts in the installation script.
Except for the following prompts, you can accept the defaults for ease of use:
a. Agree to accept the license terms by typing yes.
b. Enter a fully qualified hostname.domain.
c. Enter the Sun ONE Web Server 6.0 Administration Server password twice.
d. Press Return when prompted.
1. Start the Sun ONE Web Server 6.0 Administration Server.
To start a Sun ONE Web Server 6.0 Administration Server, use the following command (instead of running startconsole as setup requests):
The response provides the URL for connecting to your servers.
2. Start the Administration GUI by opening up a web browser and typing:
http://hostname.domain:admin_port |
In the authentication dialog box, enter the Sun ONE Web Server 6.0 Administration Server user name and password you selected while running setup.
|
Note - If you used the default settings during Sun ONE Web Server setup, enter admin for the User ID or the Sun ONE Web Server 6.0 Administration Server user name. |
The Sun ONE Web Server 6.0 Administration Server window is displayed.
4. Create the trust database for the web server instance.
You might want to enable security on more than one web server instance. If so, repeat Step 1 through Step 4 for each web server instance.
a. Select the Servers tab in the Sun ONE Web Server 6.0 Administration Server window.
b. Select a server and select the Manage button.
c. Select the Security tab near the top of the page and select the Create Database link.
d. Enter a password (web server trust database [TABLE 5-1]) in the two dialog boxes and select OK.
Choose a password of at least eight characters. This will be the password used to start the internal cryptographic modules when the Sun ONE Web Server runs in secure mode.
5. Execute the following script to enable the Sun Crypto Accelerator 4000 board:
# /opt/SUNWconn/crypto/bin/iplsslcfg |
This script prompts you to choose a web server. It installs the Sun Crypto Accelerator 4000 cryptographic modules for the Sun ONE Web Server. The script then updates the configuration files to enable the Sun Crypto Accelerator 4000 board.
6. Type 1 to configure your Sun ONE Web Server to use SSL and press Return.
7. Enter the path of the web server root directory when prompted and press Return.
Please enter the full path of the web server root directory [/usr/iplanet/servers]: /usr/iplanet/servers |
8. Type y and press Return when prompted, if you want to proceed.
1. Restart the Sun ONE Web Server 6.0 Administration Server by typing the following commands:
# /usr/iplanet/servers/https-admserv/stop # /usr/iplanet/servers/https-admserv/start |
The response provides the URL for connecting to your servers.
2. Start the Administration GUI by opening up a web browser and typing:
http://hostname.domain:admin_port |
In the authentication dialog box enter the Sun ONE Web Server 6.0 Administration Server user name and password you selected while running setup.
|
Note - If you used the default settings during Sun ONE Web Server setup, enter admin for the user ID or the Sun ONE Web Server 6.0 Administration Server user name. |
The Sun ONE Web Server 6.0 Administration Server window is displayed.
4. To request the server certificate, select the Security tab near the top of Sun ONE Web Server 6.0 Administration Server window.
The Create Trust Database window is displayed.
5. Select the Request a Certificate link on the left pane of the Sun ONE Web Server 6.0 Administration Server window.

6. Fill out the form to generate a certificate request, using the following information:
If you can directly post your certificate request to a web-capable certificate authority or registration authority, select the CA URL link. Otherwise, select CA Email Address and enter an email address where you would like the certificate request to be sent.
b. Select the Cryptographic Module you want to use.
Each keystore has its own entry in this pull-down menu. Be sure that you select the correct keystore. Do not select SUNW acceleration only.
c. In the Key Pair File Password dialog box, provide the password for the user that will own the key.
This password is the username:password (TABLE 5-1).
d. Provide the appropriate information for the following requestor information fields:
e. Select the OK button to submit the information.
7. Use a certificate authority to generate the certificate.
8. Once the certificate is generated, copy it, along with the headers, to the clipboard.
|
Note - The certificate is different from the certificate request and is usually presented to you in text form. Keep this data on the clipboard for Step 5 of the To Install the Server Certificate. |
1. Select the Install Certificate link on the left side of the Sun ONE Web Server 6.0 Administration Server window.
Once your request has been approved by a certificate authority and a certificate has been issued, you must install the certificate in the Sun ONE Web Server.
3. On the left pane, choose the Install Certificate link.
4. Fill out the form to install your certificate:
|
Each keystore has its own entry in this pull-down menu. Be sure that you select the correct keystore name. To use the Sun Crypto Accelerator 4000, you must select a module in the form of keystore_name. |
|
|
This password is the username:password (TABLE 5-1). |
|
|
In most cases, you can leave this blank. If you provide a name, it will alter the name the web server uses to access the certificate and key when running with SSL support. The default for this field is Server-Cert. |
5. Paste the certificate you copied from the certificate authority (in Step 8 of the To Generate a Server Certificate) into the Message text box.
You are shown some basic information about the certificate.
6. Select the OK button at the bottom of the page.
7. If everything looks correct, select the Add Server Certificate button.
On-screen messages tell you to restart the server. This is not necessary because the web server instance has been shut down the entire time.
You are also notified that in order for the web server to use SSL, the web server must be configured to do so. Use the following procedure to configure the web server.
Now that your web server and the Server Certificate are installed, you must configure the web server for SSL.
1. Select the Preferences tab near the top of the page.
2. Select the Edit Listen Sockets link on the left pane.
The main pane lists all the listen sockets set for the web server instance.
a. Alter the following fields:
b. Select the OK button to apply these changes.
In the security field of the Edit Listen Sockets page, there should now be an Attributes link.
3. Select the Attributes link.
4. Enter the username:password to authenticate to the keystore on the system.
5. If you want to change the default set of ciphers, select the cipher suites under the Ciphers heading.
A dialog box is displayed for changing cipher settings. You can select either Cipher Default settings, SSL2, or SSL3/TLS (Transmission Layer Security). If you select the Cipher Default, you are not shown the default settings. The other two choices require you to select the algorithms you want to enable in a pop-up dialog box. Refer to your Sun ONE documentation on cipher selection.
6. Select the certificate for the keystore followed by: Server-Cert (or the name you chose if it is different).
Only keys that the appropriate keystore user owns appear in the Certificate Name field. This keystore user is the user that is authenticated with the username:password.
7. When you have chosen a certificate and confirmed all the security settings, select the OK button.
8. Select the Apply link in the far upper right corner to apply these changes before you start your server.
9. Select the Load Configuration Files link to apply the changes.
You are redirected to a page that allows you to start your web server instance.
If you select the Apply Changes button when the server is off, an authentication dialog box prompts you for the username:password. This window is not resizable, and you might have a problem submitting the change.
There are two workarounds for this problem:
10. In the Sun ONE Web Server 6.0 Administration Server window, select the On/Off link on the left side of the window.
11. Enter the passwords for the servers and select the OK button.
You are prompted for one or more passwords. At the Module Internal prompt, provide the password for the web server trust database.
At the Module keystore_name prompt, enter the username:password.
Enter the username:password for other keystores as prompted.
12. Verify the new SSL-enabled web server at the following URL:
https://hostname.domain:server_port/
| Sun Crypto Accelerator 4000 Board Installation and User's Guide | 817-0431-10 |
Copyright © 2003, Sun Microsystems, Inc. All rights reserved.
 Web Servers.
