Sun Management Center 3.5 Supplement for Starfire Servers Management Center 3.5 Supplement for Starfire Servers
|
| Sun Management Center 3.5 Supplement for Starfire Servers
|
| C H A P T E R 3 |
|
Setting Up Sun Management Center 3.5 Components for Starfire Systems |
Now that you have installed the Sun Management Center software, as described in the previous chapter, you are ready to set up the add-on components. The setup script runs automatically after you complete the installation unless you indicate that you do not want to run setup at that time.
To set up the add-on components separately from performing an installation, see To Run the Setup Script.
For more information, refer to "Setting Up Sun Management Center Component Layers" in the Sun Management Center 3.5 Installation and Configuration Guide.
For information about where the Starfire add-on components are installed, see TABLE 2-4.
The setup script detects which base Sun Management Center components are currently installed. For example:
You have the following Sun Management Center components installed Sun Management Center Server Sun Management Center Agent Sun Management Center Console |
Then the setup script asks you questions and provides information. Instructions for setting up each of the Starfire components are provided in the next sections.
You are prompted to confirm that you want to set up the Starfire domain add-on component:
The setup script queries the platform SSP SNMP agent in an effort to get the platform name for this Starfire domain and supply it without your intervention. For example:
Query the SSP for the Starfire platform name... The Starfire platform name is allsdsim3. |
2. If the query is unable to determine the SSP name, type the SSP name when prompted.
3. If the query is unable to determine the platform name from the SSP, type the platform name when prompted.
A reminder that the Sun Management Center agent port number for this domain must be correctly configured during the Starfire platform setup is displayed:
You are prompted to confirm that you want to set up the Starfire platform (SSP) add-on component:
Forwarding SSP snmpd traps to the Sun Management Center software requires stopping and then restarting the SNMP daemon. The setup script identifies this process for you and enables you to restart it automatically by answering y (for Yes) when prompted. For example:
If bringup or hpost processes are running, the message displays the process numbers. For example:
If you refuse to restart the SSP snmpd process when prompted, you must manually restart the SSP snmpd process before you start the Sun Management Center agents on this host. See Restarting the SSP snmpd Process for more information.
2. Type y (for Yes) when prompted to restart the SSP snmpd process.
The setup script stops the snmpd process, wait for it to be restarted, and display the new snmpd process number. The setup script usually determines the platform name automatically from SSP configuration files. For example:
Would you like to restart the SSP snmpd process now? [y|n|q] y Waiting for SSP snmpd process to restart... SSP snmpd restarted, process id 10644. SSP snmpd SNMP port 5050 platform name is: allxf2 |
3. If the setup script is unable to determine the platform name from the SSP, type the platform name when prompted.
|
Note - Be sure to enter the correct platform name. This name is used during Sun Management Center operations to access SSP information and identify the Starfire platform. |
The setup script automatically determines which SNMP port is configured to be used by the Sun Management Center agent and displays it. For example:
Checking Sun Management Center Agent configuration. Sun Management Center Agent port: 161 |
4. If the Sun Management Center agent is configured to use port 161, type an alternate network port when prompted to do so.
See Required Network Port Configuration for more information.
The setup script automatically determines if the platform agent port was properly configured by the base Sun Management Center setup file, and ensures that the configured port is not currently in use. For example:
Checking Sun Management Center Platform agent configuration. Verifying port number: 166 Sun Management Center Platform Agent port: 166 |
5. If the platform agent port is in use, select a different network port when prompted to do so.
See Required Network Port Configuration for more information.
If you modify the SNMP port for either the Sun Management Center agent or platform agent, the setup script prompts you to regenerate the Sun Management Center security keys. The Sun Management Center security keys must be regenerated before you start the Sun Management Center agents on this host if the SNMP port numbers are modified.
6. Type y (for Yes) to regenerate the security keys when prompted to do so:
The Sun Management Center agent and platform agent security keys must be regenerated because the agent port numbers used have been changed. Do you want to regenerate the security keys now? [y|n|q] y |
Set up the security keys as described in the "Security Seeds" section of Chapter 3 in the Sun Management Center 3.5 User's Guide. If you refuse to regenerate the Sun Management Center security keys when prompted, you are warned that you must manually regenerate them before starting Sun Management Center software.
The setup script asks you if your Starfire platform is configured with a spare SSP:
Is this Starfire platform configured with a spare SSP? [y|n|q] |
7. Type y (for Yes) if this platform has a spare SSP. Type n (for No) if this platform does not have a spare SSP.
The spare SSP configuration information is used to create Starfire topology objects. See Chapter 4 for more information.
8. (Optional) If you have a spare SSP, type the name of the alternate SSP when prompted. When setting up Sun Management Center software on the main SSP, the alternate SSP is the spare SSP. When setting up the spare SSP, the alternate SSP is the main SSP.
The script describes which ports to specify when configuring the Sun Management Center agent and platform agent on the alternate SSP:
The Starfire platform obtains information from each of its Starfire domains by checking the SNMP ports associated with them. This information is used to create Starfire topology objects and is required to access hardware configuration information gathered by the Starfire domain add-on component. See Starfire Topology Objects for more information.
The setup script displays the current default ports and prompts you to change the list of ports:
By default, Sun Management Center agents are installed on port 161. But due to port 161 conflicts, you may have configured the Starfire domain agents to use a different port or ports.
9. If all Starfire domain agents use the default port 161, type n for No. If you configured one or more other ports, type y (for Yes) and type the Starfire domain agent network port (or ports, separated by spaces) when prompted. For example:
Do you want to change the ports that will be checked? [y|n|q] y Use space to separate multiple port numbers, just press <Enter> to check no ports. Enter port numbers: 161 1161 |
Be sure that this list contains all the ports on which Starfire domain Sun Management Center agents are configured.
The setup script displays the added modules and completes the setup. For example:
This section describes how to set up the Starfire add-on software using the Sun Management Center 3.5 Setup Wizard. For more details about the entire software setup process, refer to Chapter 6, "Installation and Setup," of the Sun Management Center 3.5 Installation and Configuration Guide.
|
|
Set up the Starfire domain agent on any Starfire domain where you have installed it.
1. From a Starfire domain, type es-guisetup to start the Sun Management Center 3.5 Setup Wizard.
Once the Sun Management Center base software setup is complete, the Select Add-on Products panel appears with a list of add-on products by platform installed on your system. In this example, Starfire Monitoring is the product or platform.
The following add-on products are newly installed on this system and will be set up. - Starfire Monitoring |
The following Starfire Domain Setup panel appears:
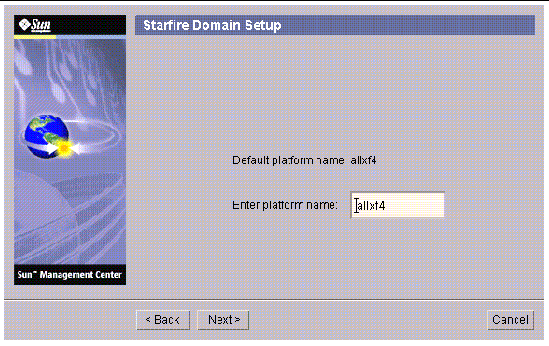
The setup script attempts to retrieve the platform name for this Starfire domain from the platform agent on the system service processor.
3. If the query is unable to determine the platform name from the SSP, type the platform name when prompted.
The Starfire Domain Setup panel displays this message.
Starfire domain setup is complete. When setting up SSP platform add port 161 to Starfire domain ports list. |
|
|
Set up the Starfire platform agent on any machine where you have installed it.
1. Type es-guisetup on a machine where the platform agent is installed to start the Sun Management Center Setup Wizard.
Once the Sun Management Center base software setup is complete, the Wizard displays the following message:
Select Add-on Products The following add-on products are newly installed on this system and will be set up. - Starfire Platform Administration |
The Starfire Platform Setup panel displays this message.
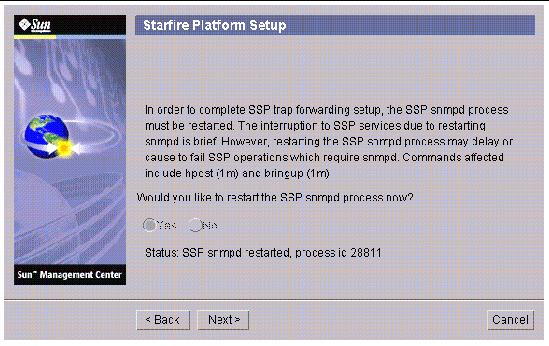
If you do not start this process now, you must manually restart the SSP snmpd process before you start the Sun Management Center agents on this host. See Restarting the SSP snmpd Process for more information.
Be sure to enter the correct platform name. This name is used during Sun Management Center operations to access SSP information and identify the Starfire platform.
The setup script automatically determines which SNMP port is configured to be used by the Sun Management Center agent and displays it.
6. If the Sun Management Center agent is configured to use port 161, type an alternate network port when prompted to do so; for example:

See Required Network Port Configuration for more information.
The setup script automatically determines whether the configured port is not currently in use.
8. If the platform agent port is in use, enter a different network port when prompted to do so.
If you modify the SNMP port, the setup script prompts you to regenerate the Sun Management Center security keys.

For more information about setting up security keys, refer to the Sun Management Center 3.5 User's Guide. If you choose not to regenerate the security keys now, you must manually regenerate them before starting Sun Management Center software.
The Starfire Platform Setup panel displays this message.
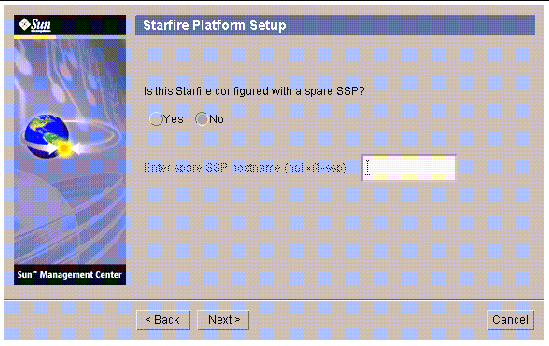
The spare SSP configuration information is used to create Starfire topology objects. See Chapter 4 for more information.
The Starfire Platform Setup Panel displays the current default ports and asks if you want to change the list of ports.

By default, Sun Management Center agents are installed on port 161. But because of port 161 conflicts, you might have configured the Starfire domain agents to use a different port.
Be sure that this list contains all the ports on which Starfire domain Sun Management Center agents are configured.
The setup script displays the added modules and completes the setup.
To make changes to SSP snmpd trap forwarding, the SSP snmpd process must be restarted after the SSP snmpd configuration file is changed. Changes are required to the SSP snmpd configuration file when the Sun Management Center package setup script for the Starfire Platform is run, and when the Sun Management Center package is removed.
The Sun Management Center package setup script for the Starfire Platform prompts you to automatically restart the SSP snmpd process. If you do not want the script to restart the SSP snmpd process, you must manually restart the SSP snmpd process before starting the Sun Management Center agents.
When the Sun Management Center Starfire platform package is removed, the trap forwarding entry is removed from the SSP snmpd configuration file. However, you must restart the SSP snmpd process before the changes in the configuration file are effective. The package remove script does not restart the SSP snmpd process. SSP snmpd traps continue to be forwarded until the SSP snmpd process is restarted.
If you are permanently removing Sun Management Center software from your SSP, rather than upgrading to a new release, be sure to restart the SSP snmpd process as described in Restarting the SSP snmpd Process.
The SSP snmpd process is essential to SSP functionality, and SSP software automatically restarts the SSP snmpd process if it detects that the process has died on a main SSP.
Restarting the SSP snmpd process causes a slight delay in SSP services. Do not kill the SSP snmpd process while either hpost(1M) or bringup(1M) are running, as it can cause those commands to fail.
|
Note - Once the SSP snmpd process has been killed and restarted, subsequent hpost(1M) and bringup(1M) commands are not affected. |
There are two ways to restart snmpd:
In both cases, the SSP software automatically restarts the SSP snmpd process.
1. Log in to the main SSP as superuser.
2. Find the snmpd process number by typing:
# ps -ef | grep snmpd |
A message similar to this is displayed:
root process_id 1 0 Jun 17 11:31 snmpd |
3. If snmpd is running, kill the snmpd process by typing:
# kill process_id |
where process_id is the process identification (pid) number shown in the results of Step 2.

|
Caution - Make sure you type the process_id number correctly. |
You can reconfigure the Starfire setup parameters at any time by running the setup script again. You must reconfigure the appropriate Starfire setup parameters if certain changes occur:
For information about where these components are located, see TABLE 2-4.
1. Log in as superuser and stop the components you are reconfiguring.
The command you use to stop the component depends on which component you are reconfiguring. TABLE 3-1 shows a list of Starfire components and the commands used to stop them.
2. Type the appropriate command from TABLE 3-1.
3. Run the setup script to set up the component layers:
# /opt/SUNWsymon/sbin/es-setup |
|
Note - If you installed the Sun Management Center software in a different directory than /opt, use that directory instead. |
4. Follow the instructions in Setting Up the Starfire Add-On Software Using the CLI.
5. Restart the components that you stopped.
This section describes how to update multiple hosts at once using Agent Update. The Agent Update process itself must be run on the Sun Management Center server machine. You also need to ensure that Sun Management Center 3.5 agents are running on all the target hosts.
To use Agent Update to fully install and set up the Starfire platform agent modules, you must create an Agent Update configuration file for the module on the target hosts, before you run the Agent Update Process on the Sun Management Center server machine.
|
|
1. Ensure the Starfire platform agent modules are installed on the target hosts.
2. Ensure that the Starfire platform agent modules are set up on the target hosts using either the es-setup script or the es-guisetup Wizard.
After this has been done, subsequent platform agent setup operations using Agent Update will work automatically, using the host-specific information provided initially.
Using the Agent Update process, create an Image File of the add-on components to be distributed to the target machines, and then add a New Job to Manage Jobs Task list to be run when you specify.
Using Agent Update you can update the following configurations:
This procedure applies only to updating from Sun Management Center 3.5 add-on software.
1. Create an Image File of the desired Starfire add-on components to be distributed to the desired agent machines using one of the base Sun Management Center scripts es-gui-imagetool or es-imagetool.
Refer to Chapter 8, "Post-Installation Tasks," in the Sun Management Center 3.5 Installation and Configuration Guide for detailed instructions about using either the Wizard or the CLI Image Tool.
2. From your main Sun Management Center console window, select the Manage Jobs... option from the Tools menu.
The system displays the Manage Jobs panel (FIGURE 3-7), which allows you to distribute the Image File.
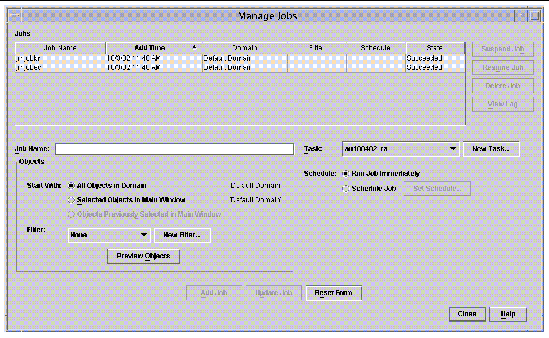
3. In the Manage Jobs panel, select the New Task... button.
The system displays the New Task panel (FIGURE 3-8), which allows you to specify the Agent Update Image File to distribute.
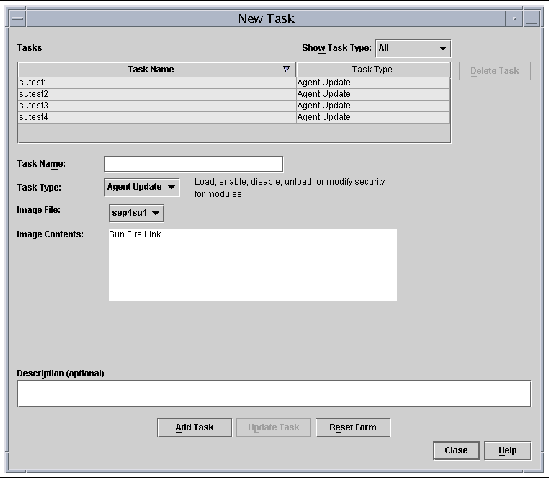
4. In the New Task panel (FIGURE 3-8), do the following:
a. Select Agent Update for the Task Type.
b. Select the Image File you created in Step 1.
5. In the Manage Jobs panel (FIGURE 3-7), do the following:
b. Select the Task you created in Step 4.
c. Do one of the following to schedule when you want the Task to run.
d. Do one of the following to select the objects (agent machines) to which you want to distribute the Image File.
e. Preview the objects (agent machines) you have selected and redo your selections if necessary.
The job starts and distributes the Image File to the objects (agent machines) you selected. When the job is running, it appears in the Job list of the Manage Jobs panel. The panel shows the status of the job when running and when complete.
|
|
This procedure applies to either:
1. Log in as root on the Sun Management Center server machine.
2. Create an agent-update image using either of the image tools.
3. Download the file /opt/SUNWsymon/base/bin/agent-update.bin to each target machine's root directory.
If you installed Sun Management Center in a different directory than /opt, download /installdir/SUNWsymon/base/bin/agent-update.bin, where installdir is the install directory you specified.
4. Log in as root on the target machine.
5. Go to the directory where you downloaded agent-update.bin.
6. Type ./agent-update.bin -s server -r http-port -p image-name, where
7. Provide the security seed and the SNMPv1 community string.
The agent-update process prompts you for the security seed and the SNMPv1 community string.
The update process applies the update to the machine without prompting for further information.
When the update process completes, check the update status by viewing the log file /var/opt/SUNWsymon/log/agent-update.log on the server host.
|
Note - You need to re-run ./es-setup -F to set up the platform agent. |
The es-start command requires different command arguments, depending on which component you are starting.
1. On the SSP, start the Sun Management Center agents:
# /opt/SUNWsymon/sbin/es-start -al |
This starts both the regular and platform agents. The platform agent provides all the Starfire platform information to Sun Management Center software.
|
Note - If you installed the Sun Management Center software in a different directory than /opt, use that directory instead. |
2. For the Starfire domain with only the Sun Management Center agent layer installed, start the Sun Management Center agent:
# /opt/SUNWsymon/sbin/es-start -a |
|
Note - If you installed the Sun Management Center software in a different directory than /opt, use that directory instead. |
3. For the Sun Management Center server host that has all layers installed, start all the Sun Management Center components:
# /opt/SUNWsymon/sbin/es-start -A |
|
Note - If you installed the Sun Management Center software in a different directory than /opt, use that directory instead. |
|
Note - Upon rebooting, all Sun Management Center agents start automatically. |
# /opt/SUNWsymon/sbin/es-start -c |
|
Note - If you installed the Sun Management Center software in a different directory than /opt, use that directory instead. |
Refer to "Starting the Sun Management Center Software" in the Sun Management Center 3.5 Installation and Configuration Guide for more detailed information about startup procedures.
| Sun Management Center 3.5 Supplement for Starfire Servers
| 816-7379-10 |
Copyright © 2003, Sun Microsystems, Inc. All rights reserved.
