| C H A P T E R 5 |
|
Using the SunVTS TTY User Interface |
This chapter describes how to run a test session using the SunVTS TTY UI. The procedures are written in a step-by-step form so you can use them to become familiar with SunVTS using the SunVTS TTY UI. This chapter is divided into the following sections:
|
Note - This chapter assumes that you have already performed the following procedures:
|
See Appendix A for descriptions of each SunVTS window and dialog box.
This section describes how to use the fundamental features of the SunVTS TTY UI to perform diagnostic testing on a system. For information about using more advanced features, see Using Additional Features With the SunVTS TTY UI.
The SunVTS TTY UI is an ASCII based, screen-oriented interface that does not require a graphical window environment. Most of the control and monitoring options that are available in the SunVTS graphical interfaces are also available in the TTY interface.
You can use the TTY interface to run SunVTS from a serial terminal, or through a graphical window tool such as a shell tool, command tool, or CDE terminal window.
The procedures in this section explain how to use the TTY main window:
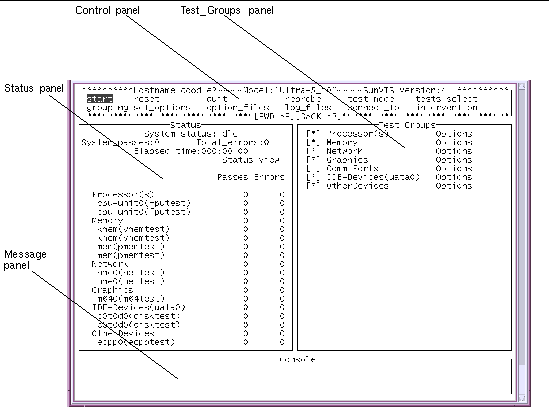
Use keyboard commands instead of mouse and pointer action to control SunVTS in the TTY UI. The following table lists the keyboard commands and explains how to use them.
1. Identify the current state of SunVTS in the Status panel.
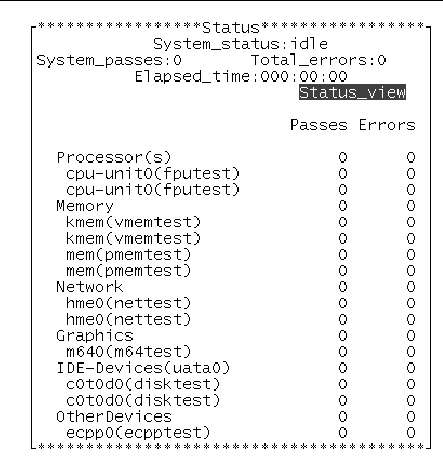
System_status--provides the following status of SunVTS:
Stopping--is momentarily FIGURE 5-11 Task Manager Window (TTY)

5. In the Task Manager menu, enter a task name in the Task File text field.
6. Select Store and press return to save the task.
Your task is created with the test configuration you specified in Step 1.
7. Repeat this procedure as needed to create the all the tasks you plan to use in a sequence.
1. Select List... from the Task Manager menu (FIGURE 5-11) and press return.
The Tasks Available menu is displayed with the list of Available Tasks. If this is the first time that the Deterministic Scheduler is used, you must create a minimum of one task before any tasks are available to view.
2. To see the test session configuration for a particular task, select the task, and press return.
3. Select Load and press return.
The SunVTS Status panel shows the SunVTS test configuration associated with the selected task.
1. Select List... from the Task Manager menu (FIGURE 5-11) and press return.
2. Select the task you plan to modify, and press return.
3. Select Load and press return.
The SunVTS Status panel shows the SunVTS test configuration associated with the selected task.
4. Change the test configuration in the main window.
5. In the DSched Task Manager menu, select Store.
1. Select List... from the Task Manager menu (FIGURE 5-11) and press return.
2. Select the task you plan to delete, and press return.
3. Select Remove in the Task Manager menu, and press return.
4. Select OK in the confirmation menu, and press return.
1. Invoke the Sequence Manager menu by selecting the Sequence Manager (FIGURE 5-12) in the DSched Control menu (FIGURE 5-10).

2. Enter the name of the sequence file you want to create in the Sequence Name text field.
By default, the Deterministic Scheduler displays the text field with a .sequence suffix. This filename suffix is not mandatory.
3. Select Task Insert/Delete -> Insert Tasks in the Sequence Manager menu.
4. Select Insert Tasks and press return.
The Tasks Available menu is displayed.
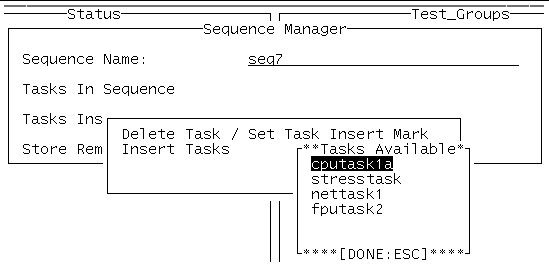
5. Select a task from the list and press return.
This displays a menu with Insert Task as the only choice.
The task you selected is inserted into the sequence.
The order in which you add tasks is the order they will be run in the sequence, with the first added task running first, and the last task running last. However, you can insert tasks into specific places in your list of tasks as described later in this section.
7. Repeat Step 5 and Step 6 to add additional tasks into the sequence.
8. Select Store in the Sequence Manager menu (FIGURE 5-13) and press return.
Your sequence is saved for future use. To run the sequence see To Run the Sequence.
|
Note - Select Close in the Sequence Manager menu to move back to the DSched Control menu. |
1. Display the Sequence Manager menu (accessed from dsched➤Show DS➤Sequence Manager menu).
2. Select List... in the Sequence Manager menu and press return.
3. Highlight the sequence you want to see, and press return.
If the list is long, use control-F (forward) and control-B (backwards) to scroll through the sequences.
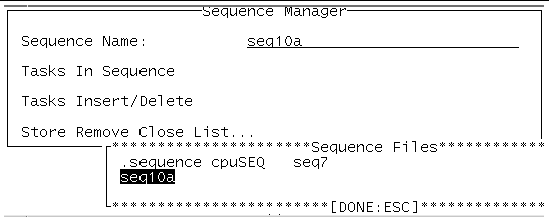
4. You can view the list of tasks available in this sequence by selecting Tasks In Sequence in the Sequence Manager menu.
1. Display the Sequence Manager menu (accessed from dsched➤Show DS➤Sequence Manager menu).
2. Select list... in the Sequence Manager menu and press return.
The list of sequences is displayed.
3. Select the sequence you plan to modify and press return.
4. Select Task Insert / Delete and press return.
The Tasks In Sequence menu is displayed with a list of tasks in the sequence.
5. Select Delete Task/Set Task Insert Mark and press return.
The list of tasks for this sequence is displayed.
6. Select the task you want to delete and press return.
A menu with two choices is displayed.
7. Select Delete Task and press return.
The selected task is deleted from the sequence.
8. Repeat the above steps to remove additional tasks as desired.
9. Use the <Esc> key to move back to the Sequence Manager menu.
10. Save your changes by selecting Store and press return.
11. Select ok and press return.
12. Select Close to exit the Sequence Manager menu.
1. Display the Sequence Manager menu (accessed from dsched➤Show DS➤Sequence Manager menu).
2. Select list... in the Sequence Manager menu and press return.
The list of sequences is displayed.
3. Select the sequence you plan to modify and press return.
4. Select Task Insert/Delete Task and press return.
5. Delete Set Task Insert Mark and press return.
The list of tasks for this sequence is displayed.
6. Use the arrow keys to select the task that is directly above the place where you want the new task inserted, and press return.
7. Select Set Insert Mark, and press return.
This marks your insertion point. Any task you add after this step, in this sequence, will be inserted below this insertion mark.
8. Use the <Esc> key to move back to the Insert Task menu.
9. Select Insert Task and press return.
The list of available tasks is displayed.
10. Select the task you want to add and press return.
11. With Insert Task highlighted, press return.
The task is inserted below the insert mark.
12. Repeat Step 10 and Step 11 for all the tasks you want to add.
13. Use the <Esc> key to move back to the Sequence Manager menu.
14. Save your changes by selecting Store and pressing return.
15. Select ok and press return.
16. Select Close to exit the Sequence Manager menu.
1. Display the Sequence Manager menu (accessed from dsched➤Show DS➤Sequence Manager menu).
2. Select list... in the Sequence Manager menu and press return.
The list of sequences is displayed.
3. Highlight the sequence you want to delete, and press return.
4. Select Remove in the Sequence Manager menu and press return.
5. Select ok and press return.
The selected sequence is deleted from the Deterministic Scheduler.
|
Note - The tasks associated with the deleted sequence are not deleted. |
6. Select Close to exit the Sequence Manager menu.
1. Invoke the Sequence Runner menu by selecting Seq Runner in the Start DS menu.
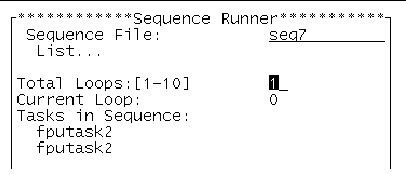
2. Select the sequence that you want to run by selecting List... , highlighting the sequence, and press return.
3. Change the Total Loop value to the number of times you want to repeat the sequence of tests.
|
Note - The default and minimum number of Total Loops value is 1. You can change the Total Loop value to the desired value, up to a maximum of 10 loops. |
4. Select the Start button at the bottom of the Sequence Runner menu start the sequence.
While testing is underway, you can do any of the following:
Monitor the test progress in the TTY Status panel. All test results are logged in the SunVTS log files.
Suspend and resume the sequence by selecting the Suspend and Resume commands in the Sequence Runner menu.
Close the Sequence Runner menu by selecting the Quit DS UI from the Quit DS menu. Testing will continue, and results will be displayed in the TTY Status panel.
|
Note - When the Deterministic Scheduler is running, the selection of Show DS displays the Sequence Runner menu. Otherwise, this selection causes the Start DS menu to display. |
1. Use the Reset in the main window to reset the Status panel and Deterministic Scheduler.
The TTY Status panel test statistics and the Deterministic Scheduler current loop count are reset.
1. To quit the Deterministic Scheduler when you are done, select dsched Quit DS Options
 Quit DS.
Copyright © 2002, Sun Microsystems, Inc. All rights reserved.