| Cluster Platform 280/3 Installation and Recovery Guide |
| Cluster Platform 280/3 Installation and Recovery Guide |
| A P P E N D I X F |
|
Configuring the Sun Ray Server Software on the Management Server |
The Sun Ray server software is preinstalled on the Cluster Platform management server. To use this feature you must:
This appendix provides the settings and cable connections required to set up and configure the Sun Ray server software with an optional Sun Ray appliance.
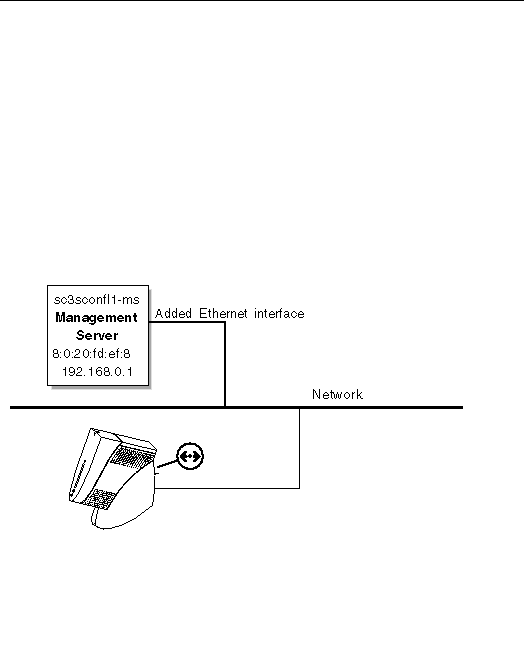
FIGURE F-1 shows the management server with an additional Ethernet interface used for the interconnect.
1. Access the configuration file from the management server.
# cd /opt/SUNWut/sbin # ./utconfig |
2. Type y to run the configuration script to install the Sun Ray server software:
3. Enter the administrator password to access the Sun Ray server:
Enter UT admin password: abc123 Re-enter UT admin password: abc123 |
4. Type y to configure the Sun Ray server:
Configure Sun Ray Admin Server 1.0 ([y]/n)? y |
5. Type the port number to access the Sun Ray server.
Enter Sun Ray Admin Server port number [1660]: 1660 |
6. Type the user name to access the CGI server:
Enter CGI username [utwww]: utwww |
7. To enable remote administration for the Sun Ray server, type y. Otherwise,
type n:
Enable remote server administration? (y/[n])? y |
8. Type n to disable SSL (Secure Socket Layer) connectivity.
Selecting remote administration without SSL poses a potential security risk and is not advised. Enable Secure Socket Layer (SSL) connection ? ([y]/n)? n |
9. Type y to configure controlled access mode:
Configure Controlled Access Mode? (y/[n])? y |
Enter user prefix [utcu]: utcu |
11. Type the starting range for the user ID:
Enter userID range start [150000]: 150000 |
12. Enter a value for the number of users accessing system administration:
Enter number of users [25]: 25 |
|
Note - Refer to the Sun Ray Server 1.3 Installation Guide, included with your Sun Ray*. |
*Available if you purchased the Sun Ray option.
13. Type y to configure the Sun Ray server for a failover group. Otherwise, type n:
Configure this server for a failover group? (y/[n])? n |
14. Wait for the Sun Ray server configuration to complete. Type y to continue with the configuration:
15. Type the following at the Sun Ray server:
# ./utadm -a Ethernet-interface |
16. Verify the configuration files, services, and network addresses. To accept the configuration files, type y. To change any of the values, type n, and enter information at the prompts.

|
Caution - To select a different IP address, type n, and enter the IP address for your enterprise. |
17. Wait for the setup of the configuration files.
18. Create user accounts on the management server.
|
Note - If you need to log into the management server as root, you must edit the /etc/default/login file and comment out CONSOLE=/dev/console. |
| Cluster Platform 280/3 Installation and Recovery Guide | 816-2145-12 |
Copyright © 2002, Sun Microsystems, Inc. All rights reserved.
