| Oracle® Data Guard Broker 11g Release 1 (11.1) Part Number B28295-01 |
|
|
View PDF |
| Oracle® Data Guard Broker 11g Release 1 (11.1) Part Number B28295-01 |
|
|
View PDF |
This chapter discusses the following topics:
The broker enables you to logically define a Data Guard configuration, consisting of a primary database and one or more standby databases. With the broker, you define a broker configuration that is a logical grouping of the databases, including redo transport services and log apply services. At the DBA's discretion, the broker controls the logical objects in the configuration, modifies their behavior at runtime, monitors the overall health of the configuration, and reports any health and other operational characteristics up through the Oracle Enterprise Management notification mechanisms if you are using Oracle Enterprise Manager, or through SHOW commands if you are using DGMGRL.
The broker supports Data Guard configurations consisting of a primary database, and up to nine standby databases that are either local to, or, remote from, the primary database. Any of those databases can be an Oracle Real Application Clusters (RAC) database.
A supported Data Guard configuration contains the following components:
From one to nine physical, snapshot, or logical (RAC or non-RAC) standby databases
Physical systems that host the primary and standby databases
Oracle Net Services network configuration that defines a connection between the databases
Standby (archived redo log files) destination parameters and configuration properties
Redo transport services that transmit the redo data from the primary database to the standby databases
Log apply services that apply redo data to the standby databases from the archived redo log files or standby redo log files
The Data Guard log apply services update standby databases with redo data that is transmitted automatically from the primary database by redo transport services. The archived redo log files and standby redo log files contain all of the database changes except for unrecoverable or unlogged changes. On physical standby databases, Redo Apply applies the redo data to stay transactionally consistent with the primary database. On logical standby databases, SQL Apply applies the redo data to stay transactionally consistent with the primary database. On snapshot standby databases, the redo data is received but not applied until the snapshot standby database is converted back to a physical standby database.
The broker's Data Guard monitor (DMON) process configures and maintains the broker configuration as a group of objects that you can manage and monitor as a single unit. Thus, when you enter a command that affects multiple databases, the DMON process:
Carries out your request on the primary database
Coordinates with the DMON process for each of the other databases, as required for your request
Updates the configuration file on the local system
Communicates with the DMON process for each of the other databases to update their copies of the configuration file
Through the DMON process, you can configure, monitor, and control the databases and the configuration together as a unit. If you disable the configuration, broker management of all of the databases in the configuration is also disabled. If you later enable the configuration, broker management is enabled for each database in the configuration.
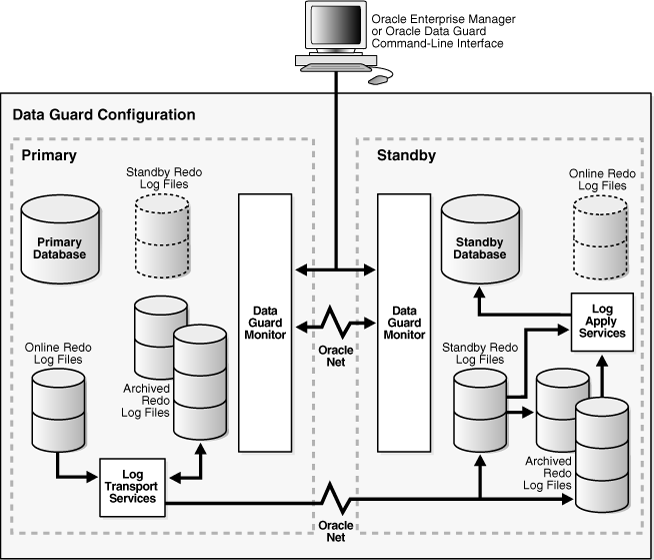
Figure 3-1 shows a broker configuration with a primary database and physical standby database.
On the primary database, the figure shows the redo transport services in addition to the following main components: the primary database, DMON, the online redo log files, and the archived redo log files. The figure also shows standby redo log files in outline form on the primary side; the standby redo logs are outlined to indicate they are currently inactive but have been configured in preparation for a switchover to the standby role.The physical standby database includes the following components: a standby database, log apply services, DMON, archived redo log files, and standby redo log files. The online redo log files on the physical standby database are outlined to indicate they are currently inactive but have been configured in preparation for a switchover to the primary role.
See Also:
Oracle Data Guard Concepts and Administration for more information about physical, snapshot, and logical standby databasesFigure 3-1 Oracle Data Guard Broker Configuration
Two copies of the configuration file are maintained for each database so as to always have a record of the last known valid state of the configuration. When the broker is started for the first time, the configuration files are automatically created and named using a default path name and filename that is operating-system specific. You can override this default path name and filename by setting the following initialization parameters for that database:
DG_BROKER_CONFIG_FILE1
DG_BROKER_CONFIG_FILE2
Note the following restrictions when setting the DG_BROKER_CONFIG_FILE1 and DG_BROKER_CONFIG_FILE2 initialization parameters:
These parameters can only be set or changed when the Data Guard broker is not running (DG_BROKER_START=FALSE).
These parameters must specify a raw device, ASM file, or cluster file system file that is shared for all Oracle RAC instances.
The Data Guard Broker works with databases that use either Oracle managed or user managed datafiles. These datafiles can reside on raw devices, a file system or an ASM disk group. The following section contains these topics:
You can change the configuration filenames dynamically by issuing the ALTER SYSTEM SQL statement. However, you cannot alter these parameters when the broker's DMON process is running. To change the names of these configuration files for a given database, perform the following steps:
Disable the broker configuration using the DGMGRL DISABLE command. See Section 3.5.
Stop the Data Guard broker DMON process using the following SQL statement:
SQL> ALTER SYSTEM SET DG_BROKER_START=FALSE;
Change the configuration filenames for the database:
SQL> ALTER SYSTEM SET DG_BROKER_CONFIG_FILE1=filespec1;
SQL> ALTER SYSTEM SET DG_BROKER_CONFIG_FILE2=filespec2;
Note:
If the broker is managing an Oracle RAC database, the value ofDG_BROKER_CONFIG_FILE1 and the value of DG_BROKER_CONFIG_FILE2 for each of the instances must point to the same set of physical files.The method of moving the files depends upon where they currently reside and where you want to move them to:
If the files reside on an operating file system, use operating system commands to move the files to their new location.
If the files reside on raw devices, manually transfer the files to their new location.
If the old or new location is an ASM disk group, use the DBMS_FILE_TRANSFER.COPY_FILE function to transfer the files to their new location.
Restart the Data Guard broker DMON process, as follows:
SQL> ALTER SYSTEM SET DG_BROKER_START=TRUE;
Enable the broker configuration using the DGMGRL ENABLE command or the Enable operation in the Data Guard management pages of the Enterprise Manager.
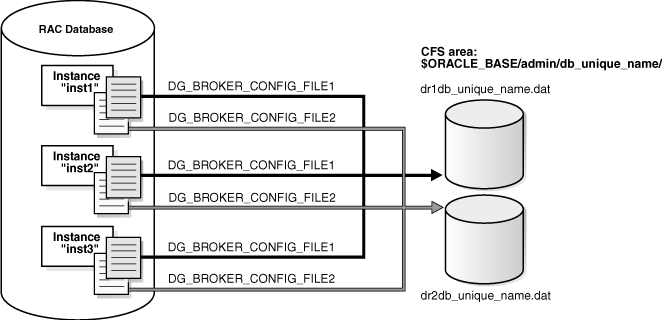
If the broker is managing an Oracle RAC database, the value of DG_BROKER_CONFIG_FILE1 and the value of DG_BROKER_CONFIG_FILE2 for each of the instances must point to the same set of physical files. In other words, all instances of the database must reference the same set of configuration files. The configuration files can be deployed using one of the following methods:
If cluster file system (CFS) is available, and the configuration files reside there, the DG_BROKER_CONFIG_FILEn parameters on all of the instances must be set to these files including the path to the CFS area. Figure 3-2 shows the set up for the broker configuration files on CFS. In this scenario, the parameters and value for all instances would be:
DG_BROKER_CONFIG_FILE1=$ORACLE_BASE/admin/db_unique_name/dr1db_unique_name.dat
DG_BROKER_CONFIG_FILE2=$ORACLE_BASE/admin/db_unique_name/dr2db_unique_name.dat
Figure 3-2 Broker Configuration Setup in a CFS Area
The broker's configuration files can also reside on an ASM disk group. Figure 3-3 shows the setup for the broker configuration files on ASM devices. In this scenario, the parameters and values would be specified, as follows:
ALTER SYSTEM SET DG_BROKER_CONFIG_FILE1 = '+DG/DIRECTORY/DR1.DAT' SCOPE=BOTH;
ALTER SYSTEM SET DG_BROKER_CONFIG_FILE2 = '+DG/DIRECTORY/DR2.DAT' SCOPE=BOTH;
Figure 3-3 Broker Configuration Setup with ASM
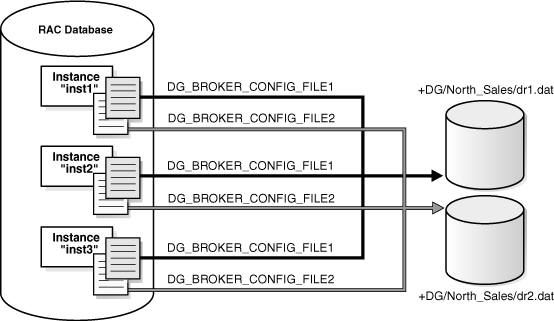
Because the configuration files must be explicitly named by the user, these configuration files are not Oracle Managed Files (OMF).To create the broker's configuration files on an ASM disk group, set the DG_BROKER_CONFIG_FILE1 and DG_BROKER_CONFIG_FILE2 initialization parameters to a string value that includes the name of an existing ASM disk group, an existing directory in that disk group, and the name of the configuration file itself.
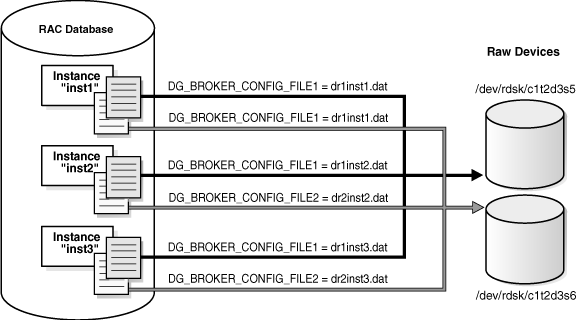
If CFS is not available and you are not using ASM, the files must be on raw devices. In this case, the parameter values on each of the instances must point to the raw devices. Figure 3-4 shows the set up for the broker configuration files on raw devices. On a UNIX system, you would set this up similar to the following on each node:
% ln -s /dev/rdsk/c1t2d3s5 dr1inst1.dat
% ln -s /dev/rdsk/c1t2d3s6 dr2inst2.dat
Figure 3-4 Broker Configuration Setup with Raw Devices
If the broker configuration files need to be on raw devices, set up two additional raw devices of 1MB each. Set up the value of the DG_BROKER_CONFIG_FILE1 and DG_BROKER_CONFIG_FILE2 parameters to point to the raw devices. A 1MB configuration file will accommodate 10 databases with a total of 45 instances between them.
You may need a larger device if the number of instances for this configuration exceeds 45 instances. You will need 15KB for each additional instance.
After setting up the configuration files, the DG_BROKER_START initialization parameter must be set to TRUE for each database to start the DMON processes.
By default, the DG_BROKER_START initialization parameter is set to FALSE. However, you can set the value in the following ways:
If you are using Oracle Enterprise Manager, it automatically sets the DG_BROKER_START initialization parameter to TRUE for new standby databases that it creates.
If you are using DGMGRL, you must explicitly set the DG_BROKER_START initialization parameter to TRUE; otherwise, the broker will not start. You can set the DG_BROKER_START initialization parameter with the following SQL statement:
SQL> ALTER SYSTEM SET DG_BROKER_START=TRUE;

System altered.

SQL> SHOW PARAMETER DG_BROKER_START

NAME               TYPE      VALUE
------------------------------------
dg_broker_start    boolean   TRUE
Whether you use Enterprise Manager or DGMGRL, set the value of the DG_BROKER_START initialization parameter to TRUE in the server parameter file on each primary and standby database. Doing so ensures that Data Guard Broker will start automatically the next time you start any instance of the database.
The broker helps you to create a new configuration or manage an existing configuration. Figure 3-5 shows the life cycle of a broker configuration.
Figure 3-5 Life Cycle of a Broker Configuration and Its Databases
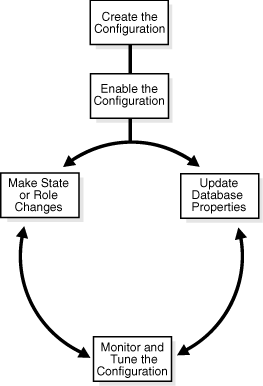
Create the Broker Configuration
When using Enterprise Manager, the Add Standby Database wizard can either add an existing (RAC or non-RAC) standby database into the configuration or create a new (RAC or non-RAC) standby database and add it to the configuration. The standby database can be a physical, logical, or snapshot database.
When using DGMGRL, the primary database and a standby database must already exist. You construct the standby database from backups of the primary database control files and datafiles, and then prepare it for recovery.
See Also:
Chapter 6 and Chapter 7 that describe the preparation requirements if you are using Enterprise Manager or DGMGRL, respectivelyEnable the Broker Configuration
A Data Guard configuration must be enabled to be managed or monitored by the broker. Conversely, you disable a configuration if you no longer want to manage it with the broker. When you disable a configuration, broker management of all of its databases is also disabled.
Note:
You can enable or disable the configuration using DGMGRL. You cannot disable the configuration using Enterprise Manager. You can enable the configuration using Enterprise Manager in the event that it was previously disabled using DGMGRL.A broker configuration, when first created using Enterprise Manager, is automatically enabled as soon as the Add Standby Database wizard completes.
A broker configuration, when first created using DGMGRL, is in a disabled condition. This means its constituent databases are not yet under active control of the broker. When you finish configuring the databases into a broker configuration with DGMGRL, you must enable the configuration to allow the broker to manage the configuration.
You can enable:
The entire configuration, including all of its databases
An individual standby database
You can easily disable a database if a problem occurs such that it cannot function properly in a broker configuration. Note that you cannot disable the primary database. You must disable the entire configuration to disable the primary database.
You may also want to disable a configuration temporarily, and then change some properties in the broker configuration without affecting the actual database properties. The changed properties will take effect when the configuration is enabled again for management by the broker.
Make Role Changes Within the Broker Configuration, As Needed
At any time, you can issue a single command to change the roles of the databases in the configuration. If some event renders the primary database unusable, you can fail over one of the standby databases to become the new primary database.
In addition, planned downtime for maintenance can be reduced because you can quickly switch over production processing from the current primary database to a standby database, and then switch back again after the planned maintenance.
See Also:
Chapter 5 for more information about role changesMake State Changes to the Databases, As Needed
When you enable a configuration for the first time, the broker, by default, starts redo transport services on the primary and starts log apply services on the standby (except for a snapshot standby).
At any time, you can issue a single command through Enterprise Manager or DGMGRL to change the state of the database. For example, you could bring the primary database into a TRANSPORT-OFF state to temporarily stop sending redo data to the standby databases. Then, you could issue another command to resume sending redo data to the standby databases.
See Also:
Chapter 4 for more information about database state changesUpdate Database Properties, As Needed
The broker enables you to set database properties, some of which correspond to database initialization parameters. You can change these properties to dynamically control such things as redo transport, standby file management, log apply, and to support the overall configuration protection mode. The broker records the changes in the broker configuration file for each database in the Data Guard configuration and propagates the changes to the related initialization parameters in the server parameter files, if needed.
Set Data Protection Modes, As Needed
The broker enables you to set the data protection mode for the configuration. You can configure the protection mode to maximize data protection, maximize availability, or maximize performance.
See Also:
Section 4.6 for information about managing data protection modesMonitor the Configuration
You can check the health of the configuration, display and update the properties of the databases, and set Oracle Enterprise Manager events.
Enterprise Manager also provides a dynamic performance page that automatically and dynamically refreshes chart data and status at specified intervals. The performance chart shows a graphical summary of how far behind and how much redo data is being generated and applied.
A key concept of management with the broker is the notion of enabling and disabling broker management of the databases in a broker configuration. The enable and disable operations are defined for databases that were incorporated into a broker configuration; you cannot perform these broker operations on databases that are not part of the broker configuration. This is because when you enable or disable a database in the broker configuration, you are effectively enabling or disabling the ability of the broker to:
Manage and monitor the specified database
Manage the profile information in the broker configuration file for each database
However, disabling a broker configuration does not affect current services and operations in the actual Data Guard configuration. For example, when you disable a broker configuration, redo transport services and log apply services in the Data Guard configuration continue to function unchanged, but you can no longer manage them through the broker interfaces.
In addition, disabling a database does not remove or delete its profile from the broker configuration file. You can still change the properties of a disabled database and later reenable your ability to manage with the broker using the DGMGRL ENABLE CONFIGURATION or ENABLE DATABASE commands, or the Enable option in the Data Guard management pages of Enterprise Manager.
Caution:
If you disable broker management of a standby database in the broker configuration, that standby database cannot be used by the broker as a failover target in the event of loss of the primary database.Disabling broker management of the configuration may be useful to do even though you are removing the broker's ability to monitor and control the databases. For example, it may be advantageous to disable a configuration temporarily in order to change one or more properties in the broker configuration all at the same time. When you change properties in a disabled configuration, it does not affect the actual database properties underneath because the changes are not applied to the running database until you reenable the configuration. For example, you might want to change the overall configuration protection mode and the redo transport services properties on a disabled configuration so that all changes are applied to the configuration at the same time upon the next enable operation.
A configuration status reveals the overall health of the configuration. Status of the configuration is acquired from the status of all of its databases.
The following list describes the possible status modes for a configuration:
The configuration, including all of the databases configured in it, is operating as specified by the user without any warnings or errors.
One or more of the databases in the configuration are not operating as specified by the user. To obtain more information, use the DGMGRL SHOW DATABASE <db-unique-name> StatusReport command or the Enterprise Manager display to locate each database and examine its status to reveal the source of the problem.
One or more of the databases in the configuration failed or may no longer be operating as specified by the user. To obtain more information, use the DGMGRL SHOW DATABASE <db-unique-name> StatusReport command or the Enterprise Manager display to locate each database and examine its status to reveal the source of the problem.
Unknown/Disabled
Broker management of the configuration is disabled and the broker is not monitoring the status of the databases in the configuration.