![]() Secure Global Desktop 4.31 Administration Guide
> Getting started
> Users and trusted Secure Global Desktop servers
Secure Global Desktop 4.31 Administration Guide
> Getting started
> Users and trusted Secure Global Desktop servers
| Read this topic to... |
|---|
|
When Secure Global Desktop is first installed, the initial connection between a Secure Global Desktop client and a Secure Global Desktop server is secured with SSL. However, after the user has logged in, the connection is downgraded to a standard connection. To be able to use SSL permanently for connections to Secure Global Desktop, you must enable Secure Global Desktop security services.
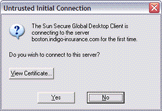
In addition to using SSL, Secure Global Desktop also requires users to authorize their connections to Secure Global Desktop so that they only connect to trusted servers. The first time a user connects to a Secure Global Desktop server, they see an Untrusted Initial Connection message advising that they are connecting to a server for the first time.

Note If there is a problem with the server's security certificate, a security warning displays before the Untrusted Initial Connection message.
Users should check these details before clicking Yes. Users should be shown how to check the details as follows:

If the details are correct, users can click Yes to agree to the connection.
Once a user has agreed to the connection, the hostname and
the fingerprint of the certificate are added to the hostsvisited file on the client device. The hostsvisited file is
stored in the same location as the user's profile cache.
The user is not prompted again about the connection unless there is a problem.
Note If you are using the classic webtop, the Java™ technology client prompts users every time it connects to a Secure Global Desktop server. The Native Client never prompts users.
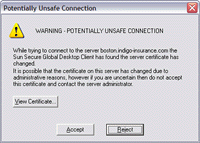
If there is a problem with the connection, for example because the fingerprint of the server certificate has changed, a Potentially Unsafe Connection message displays.

To ensure that users only connect to Secure Global Desktop servers that are trusted, Secure Global Desktop Administrators should:
tarantella security fingerprint command on each member of the array to obtain a list of fingerprints.hostsvisited file for additional securityIt is possible to use the hostsvisited file to restrict the Secure Global Desktop servers that the Sun Secure Global Desktop Client can connect to.
To do this you need to install a pre-configured hostsvisited file on the client device, for example:
<?xml version="1.0" encoding="UTF-8" ?>
<array>
  <allowhostoverride>0</allowhostoverride>
  <server peername="boston.indigo-insurance.com">
    <certfingerprint>51:B7:6D:FA:6E:3B:BE:ED:37:73:D4:9D:5B:C5:71:F6</certfingerprint>
  </server>
</array>
The easiest way to create a pre-configured hostsvisited file is to copy and edit an existing hostsvisited file. You have to add the <allowhostoverride> line manually.
Note If you omit <allowhostoverride> line, this only stops users from being prompted when they connect to any of the Secure Global Desktop servers listed in the hostsvisited file.
It does not prevent the Secure Global Desktop Client from connecting to other servers.
Copyright © 1997-2007 Sun Microsystems, Inc. All rights reserved.