| Oracle® Database 2 Day DBA 11g Release 1 (11.1) Part Number B28301-01 |
|
|
View PDF |
| Oracle® Database 2 Day DBA 11g Release 1 (11.1) Part Number B28301-01 |
|
|
View PDF |
As data is added to your database, the tablespace requirements for your database change. As a DBA, you must understand how to perform the following tasks to effectively manage the tablespaces and database storage:
You can create additional tablespaces to store user data, so that not all data is stored in the USERS tablespace. The following are some reasons to create additional tablespaces:
For certain users, groups of users, or applications, it may be convenient to keep all application data in a separate tablespace or set of tablespaces for backup and recovery or maintenance reasons. For example, suppose you must recover all application data from backup due to a hardware or software failure, and you want to perform an offline recovery. If the application data is kept in a separate tablespace, you can take just that tablespace offline and recover it, without affecting the operation of other database applications.
Some applications, such as those with large partitioned tables, may benefit from distributing data across multiple tablespaces. This approach allows the optimal use of the available storage because frequently accessed data can be placed on high performance disks, and infrequently retrieved data can be placed on less expensive storage.
To create a tablespace:
Go to the Database Home page.
At the top of the page, click the Server link to view the Server subpage.
In the Storage section, click Tablespaces.
The Tablespaces page appears, as shown in Figure 6-4.
For more information about a page, at any time, click Help.
Do one of the following:
To create a new tablespace, click Create (not shown in the screenshot).
To create a tablespace that is similar to an existing tablespace, in the Select column, select the tablespace whose attributes you want to reproduce. In the Actions list, select Create Like and then click Go.
The Create Tablespace page appears, showing the General subpage.
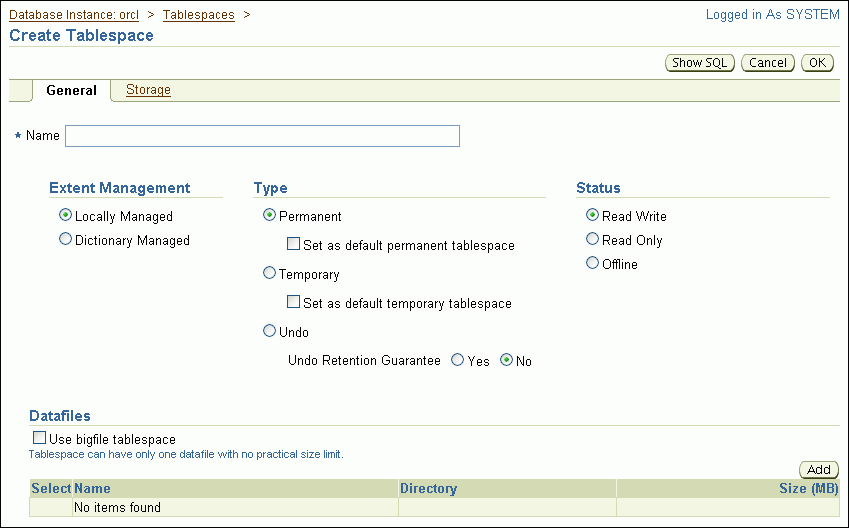
In the Name field, enter a name for the tablespace.
In the Extent Management section, select Locally Managed.
See "Locally Managed Tablespaces Compared to Dictionary-Managed Tablespaces".
In the Type section, select Permanent.
See "Tablespace Type".
In the Status section, select Read Write.
See "Tablespace Status".
In the Datafiles section, click Add to add one or more datafiles to the tablespace.
The Add Datafile page appears.
Note:
If you select Use bigfile tablespace, then the tablespace can have only one datafile. Bigfile tablespaces are used with very large databases that use Automatic Storage Management or other logical volume managers that support striping, RAID, and dynamically extensible logical volumes.In the File Name field, enter a file name. Accept the File Directory and File Size defaults.
In the Storage section, complete the following steps:
Select Automatically extend datafile when full (AUTOEXTEND).
Set a suitable increment, such as 10 MB.
This is the amount of disk space that is added to the datafile when it needs more storage space.
For Maximum File Size, do one of the following, depending on available storage:
Select Unlimited to permit the file to increase without limits.
Select Value, and then enter a value in KB, MB, GB, or TB.
Click Continue.
The Create Tablespace page returns.
(Optional) Toward the top of the page, click the Storage link to view the Storage subpage. Examine all of the default settings on this subpage.
See the online Help for more information about these settings.
Click OK to add the tablespace.
The Tablespaces page returns, showing the newly created tablespace.
See Also:
You can use Oracle Enterprise Manager Database Control (Database Control), to modify a tablespace. For example, you can extend it (by increasing datafile sizes or adding another datafile), set it to automatically extend, change its space usage alert thresholds, or change its status to Offline. When you get a critical or warning alert, you might need to extend a tablespace (if the alert is related to space available) or take it offline to recover it (if the alert is related to corrupted data or other serious errors).
This section contains the following topics:
See Also:
This section explains how to set a tablespace to automatically extend when it reaches its size limit. The following instructions assume that the tablespace was previously not an autoextending tablespace.
To set a tablespace to automatically extend:
Go to the Database Home page.
At the top of the page, click the Server link to view the Server subpage.
In the Storage section, click Tablespaces.
The Tablespaces page appears.
See Figure 6-4.
For more information about a page, at any time, click Help.
Select the tablespace for which you want to enable autoextend, and then click Edit.
The Edit Tablespace page appears.
Select the first datafile associated with the tablespace, and then click Edit.
The Edit Datafile page appears.
In the Storage section, complete the following steps:
Select Automatically extend datafile when full (AUTOEXTEND).
Set a suitable increment, such as 10 MB.
This is the amount of disk space that is added to the datafile when it needs more storage space.
For Maximum File Size, do one of the following, depending on available storage:
Select Unlimited to permit the file to increase without limits.
Select Value, and then enter a value in KB, MB, GB, or TB.
Click Continue.
The Edit Tablespace page returns.
Repeat Step 5 through Step 7 for each additional datafile associated with the tablespace.
Click Apply.
A confirmation message appears.
You receive an alert in Database Control when a space usage threshold for a tablespace is reached. There are two types of space usage alerts that you can enable: warning, for when tablespace space is somewhat low, and critical, for when the tablespace is almost completely full and action must be taken immediately.
For both warning and critical alerts, there are two ways to specify alert thresholds:
By space used (%)
When space used becomes greater than or equal to a percentage of total space, an alert is issued.
By free space (MB)
When remaining space falls below an amount (in MB), an alert is issued.
Free-space thresholds are more useful for large tablespaces. For example, for a 10 TB tablespace, setting the percentage full critical alert to as high as 99 percent means that the database would issue an alert when there is still 100 GB of free space remaining. In many cases, 100 GB remaining would not be a critical situation, and the alert would not be useful. For this tablespace, it might be better to use a free-space threshold, which you could set to issue a critical alert when 5 GB of free space remains.
For both warning and critical alerts for a tablespace, you can enable either the space used threshold or the free-space threshold, or you can enable both thresholds.
To change space usage alert thresholds for tablespaces:
Go to the Database Home page.
At the top of the page, click the Server link to view the Server subpage.
In the Storage section, click Tablespaces.
The Tablespaces page appears.
See Figure 6-4.
For more information about a page, at any time, click Help.
Select the tablespace whose threshold you want to change, and then click Edit.
The Edit Tablespace page appears, showing the General subpage.
Click Thresholds to display the Thresholds subpage.
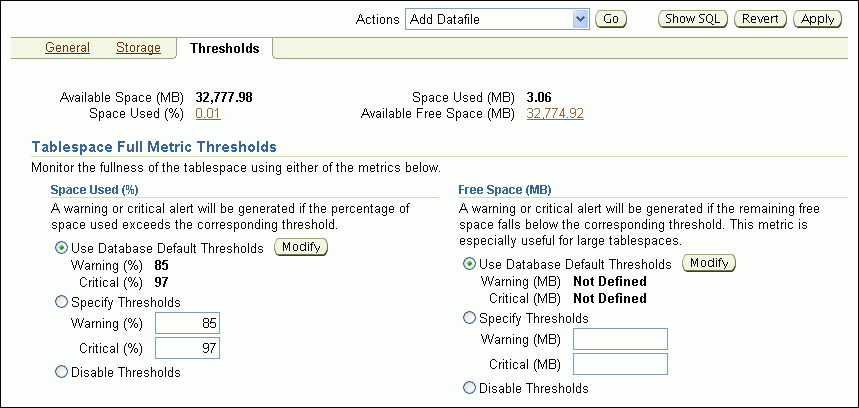
In the Space Used (%) section, do one of the following:
Accept the default thresholds.
Select Specify Thresholds, and then enter a Warning (%) threshold and a Critical (%) threshold.
Select Disable Thresholds to disable the percentage full thresholds.
In the Free Space (MB) section, do one of the following:
Accept the default thresholds.
Select Specify Thresholds, and then enter a Warning (MB) threshold and a Critical (MB) threshold.
Select Disable Thresholds to disable the threshold for free space remaining.
Click Apply.
A confirmation message appears.
You may want to take a tablespace offline for any of the following reasons:
To make a portion of the database unavailable while still allowing access to the remainder of the database
To make an application and its group of tables temporarily unavailable while updating or maintaining the application
To perform an offline tablespace backup (even though a tablespace can be backed up while online and in use)
To recover a tablespace after a hardware or software failure
To rename or relocate tablespace datafiles
To take a tablespace offline:
Go to the Database Home page.
At the top of the page, click the Server link to view the Server subpage.
In the Storage section, click Tablespaces.
The Tablespaces page appears.
See Figure 6-4.
For more information about a page, at any time, click Help.
Select the tablespace that you want to take offline, and then click Edit.
The Edit Tablespace page appears.
In the Status section, select Offline, make a selection from the Offline Mode list, and then click Apply.
For more information about the selections on this page, click Help.
A confirmation message appears.
Note:
To bring the tablespace back online, return to this page, and then, under the Status section, click Read Write.See Also:
Oracle Database Administrator's Guide for more information about taking tablespaces offline and for information about renaming or relocating datafiles.
After a tablespace has been dropped (deleted), the objects and data in it are no longer available. To recover them can be a time-consuming process. Oracle recommends performing a backup before and after dropping a tablespace.
To drop a tablespace:
Go to the Database Home page.
At the top of the page, click the Server link to view the Server subpage.
In the Storage section, click Tablespaces.
The Tablespaces page appears.
For more information about a page, at any time, click Help.
Select the tablespace that you want to drop, and then click Delete.
Database Control asks for confirmation that you want to delete the tablespace and delete the associated datafiles from the disk.
Click Yes to remove the tablespace.
See Also:
Over time, performing insert, update, and delete operations (also referred to as DML operations) on objects within a tablespace can create pockets of empty space that individually are not big enough to be reused. Collectively, these pockets can waste large amounts of space. The sparsely populated objects that result can suffer performance degradation during queries and DML operations.
Oracle Database enables you reclaim this empty space with the following two online operations—that is, operations that do not block queries or DML against affected objects while the operations are proceeding:
Online segment shrink
Online segment shrink operates on table segments and on the segments of the dependent objects of the table, such as indexes and partitions. For each segment, data is compacted to the front of the segment. Free space can either be returned to the tablespace or kept in the segment for future insert operations. Online segment shrink is permitted only on segments in a locally managed tablespace with automatic segment space management. Online segment shrink is an in-place operation; no additional free space in the tablespace is required.
Online table redefinition (also known as reorganization)
Reorganization relocates the table and its dependent objects in a different part of the tablespace. This operation has the desirable side effect of compacting the data for those objects. For this operation to succeed, however, the tablespace must already have free space equal to the size of the table and its dependent objects. Reorganization is the only permitted operation for dictionary-managed tablespaces or for locally managed tablespaces with manual segment space management.
The Segment Advisor generates recommendations for shrinking or reorganizing segments that have a significant amount of reclaimable unused space.
See Also:
Oracle Database Administrator's Guide for more information about online segment shrink and online redefinition of tables
The Segment Advisor identifies database objects that have unused space that you can reclaim. It performs its analysis by examining usage and growth statistics and by sampling the data in the object. By default, it is configured to run automatically at regular intervals, during all maintenance windows (time periods). You can also run the Segment Advisor manually.
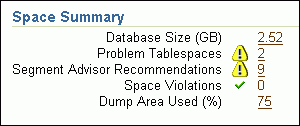
The regularly scheduled Segment Advisor task is known as the Automatic Segment Advisor. Results from the advisor are summarized on the Space Summary section of the Database Home page as Segment Advisor Recommendations. See Figure 6-5.
During each run of the Automatic Segment Advisor, only a subset of the segments in the database are analyzed. If you believe that particular segments may have reclaimable unused space, yet those segments do not appear among the Segment Advisor recommendations, the Automatic Segment Advisor may not have chosen them for analysis. You can run the Segment Advisor manually on those segments at any time. See Oracle Database Administrator's Guide for information about how the Automatic Segment Advisor selects tablespaces and segments for analysis.
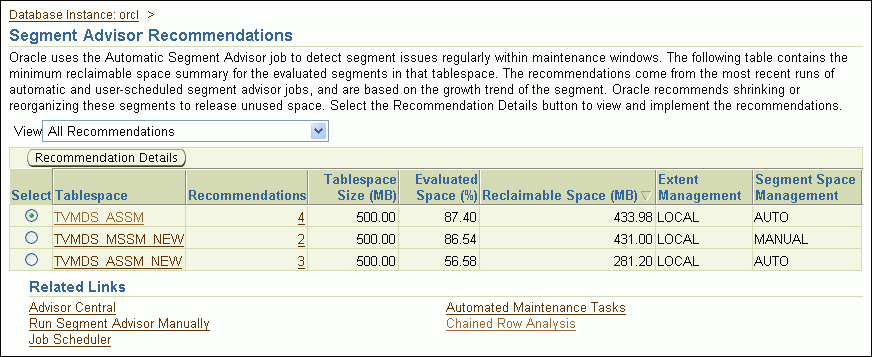
Segment Advisor recommendations are grouped by tablespace. Only tablespace names appear on the Segment Advisor Recommendations page in Database Control. If a tablespace contains any segments for which a shrink operation or reorganization is recommended, the tablespace appears on the Segment Advisor Recommendations page. This page estimates the amount of reclaimable space for each tablespace. If you request recommendation details for a tablespace, Database Control displays the segments in that tablespace for which recommendations were generated.
See Figure 6-6 and Figure 6-7.
A recommendation for a segment can be either a shrink operation or a reorganization operation. If you created the tablespace for a segment as locally managed with automatic segment space management, which is the default, the Segment Advisor recommends shrinking, if the segment is not one of the few segment types that are not eligible for shrinking. An example of such as segment is a table with function-based indexes. If the segment is not eligible for online segment shrink, or if its tablespace is dictionary-managed or was created with manual segment space management, the Segment Advisor recommends reorganization.
See Also:
Oracle Database Administrator's Guide for more information about maintenance windows
Each Segment Advisor recommendation includes a button that you can click to start the space reclamation process. Although space reclamation is an online process, it can consume significant resources, so it is recommended that you reclaim space during off-peak hours.
To view Segment Advisor recommendations and reclaim space:
Go to the Database Home page.
In the Space Summary section, click the numeric link adjacent to Segment Advisor Recommendations.
Figure 6-5 Home Page Space Summary Section
The Segment Advisor Recommendations page appears, showing recommendations from the most recent automatic and manual runs of the Segment Advisor.
Figure 6-6 Segment Advisor Recommendations Page
For more information about a page, at any time, click Help.
(Optional) In the View list, select Recommendations for Last Automatic Run to view recommendations from only the most recent automatic run of the Segment Advisor.
Select a tablespace, and then click Recommendation Details.
The Recommendation Details for Tablespace page appears. This page lists the tablespace segments for which online segment shrink or reorganization is recommended.
Figure 6-7 Segment Advisor Recommendation Details Page
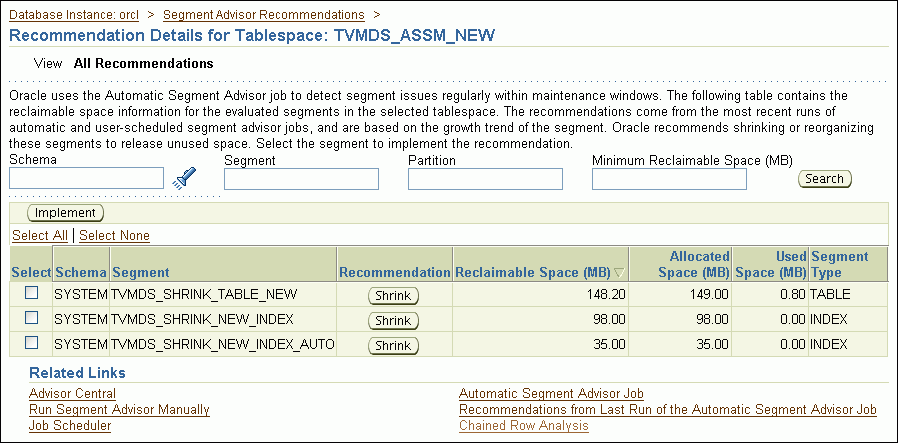
(Optional) Reduce the number of segments displayed in the segment list by entering search criteria in the fields Schema, Segment, Partition, or Minimum Reclaimable Space, and then clicking Search.
Examine the recommendation for each segment, and then proceed as follows:
If the recommendation for any segments is to reorganize, start reorganization for those segments by running subprograms from the DBMS_REDEFINITION PL/SQL package, using SQL*Plus. See Oracle Database Administrator's Guide for instructions.
If the recommendation for any segments is to shrink, proceed with Step 7 through Step 12 for those segments.
Do one of the following to select one or more segments to shrink:
To reclaim space in a single segment, click Shrink under the Recommendation column for that segment.
To shrink one or more segments, select the segments, and then click Implement.
On the Shrink Segment: Options page, accept Compact Segments and Release Space.
This option returns freed space to the tablespace. If you do not want to release the freed space to the tablespace, then choose Compact Segments. You can rerun the shrink process later to release the freed space.
Note:
Choose Compact Segments if you believe that you may have long-running queries currently in operation that involve the segments being shrunk. Long-running queries that were started before the shrink operation completes might attempt to read from blocks that have been reclaimed. This results in an error. Alternatively, you can schedule the shrink operation for an off-peak period in Step 10.Click Implement.
The Shrink Segment: Schedule page appears.
Note your job name, or replace it with a job name of your choosing. Under the heading Start, select Immediately.
Because the shrink operation can be resource intensive, you can also select Later and schedule the operation for an off-peak period.
Click Submit.
The Scheduler Jobs page appears, and shows the shrink job in the Running subpage.
Click Refresh to update the page until the job disappears from the Running subpage.
You can then switch to the History or All subpage to view the completed status of the job.
You can run the Segment Advisor manually. You do so when you want to analyze objects not selected for analysis by the Automatic Segment Advisor, or when you want more up-to-date recommendations on a tablespace.
See Also:
Oracle Database Administrator's Guide for more information about running the Segment Advisor