| Oracle® Database 2 Day DBA 11g Release 1 (11.1) Part Number B28301-01 |
|
|
View PDF |
| Oracle® Database 2 Day DBA 11g Release 1 (11.1) Part Number B28301-01 |
|
|
View PDF |
The steps involved in patching the Oracle software are as follows:
To select the appropriate patch set release for your environment, you need to know the following details about your Oracle environment:
Oracle Database version
Oracle home location
Hardware configuration
You can determine your Oracle Database version at the Enterprise Manager Database Control (Database Control) Database Home page.
To determine the Oracle Database version:
View the Version number under General on the Database Home page.
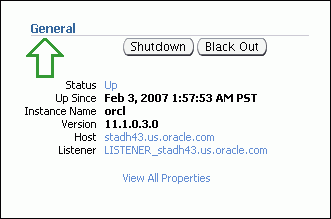
Your Oracle home is the operating system location of your Oracle Database installation.
To determine the location of your Oracle home:
In the General section of the Database Home page, click View All Properties.
The View All Properties page appears.
This page displays the path to your Oracle home.
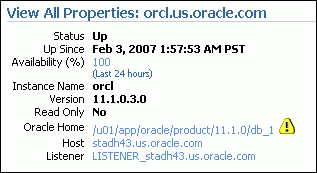
Click the path link next to Oracle Home.
The Oracle home: Oracle_home page appears, as shown in Figure 12-1.
This page displays the file directory of your Oracle home, along with the installed Oracle components and time of installation.
In the Products table, click one of the links in the Component column, for example, Oracle Database 11g 11.1.0.3.0.
The Oracle Component: component_name page appears.
This page displays the following information about the selected component:
Interim patches affecting component_name with a description and installation time for each patch
Components that component_name depends upon and their installation times
Components that component_name is used by and their installation times
In the Oracle Home Targets table, click one of the links in the Name column to display pages for the Enterprise Manager agent, database instance, and listener.
Your hardware configuration consists of your database computer and operating system. You need this information to select the appropriate Oracle Database patch or patch set.
To view information about your hardware configuration:
In the General section of the Database Home page, click the name of your Host.
The Host: host_name page appears.
This page displays the following information about your hardware configuration:
Operating system
Hardware platform
IP address
Number of CPUs
Memory size (MB)
Local file system (GB)
In the Configuration section, click the links to drill down to pages that describe your operating system, hardware platform, and local file system in more detail.
You can obtain patches and patch sets from OracleMetaLink at the following URL:
To download patches and patch sets from OracleMetalink, you must register using your customer support identifier, which your company obtains when it signs a support contract with Oracle. When you register with OracleMetaLink, you are given a user name and password that enables you to log in to this site from a Web browser.
Before you begin using the patching features of Database Control, you must configure your OracleMetaLink credentials. After you specify your OracleMetaLink credentials, an automated process called the RefreshFromMetalink job can search OracleMetaLink every day for patches that are applicable to your installed software. You also receive notification about critical patch advisories.
To set your OracleMetaLink login credentials:
Click the Setup link located at the top and bottom of most Database Control pages.
The Setup page appears.
Click Patching Setup.
The Patching Setup subpage appears.
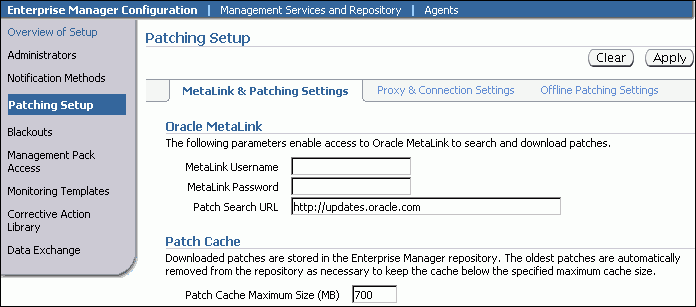
Enter the user name and password for logging in to OracleMetaLink in the MetaLink Username and MetaLink Password fields.
(Optional) Enter the maximum size of your patch cache in the Patch Cache Maximum Size (MB) field.
The patch cache is a temporary area where patches are stored. When the patch cache exceeds the specified maximum size, Database Control automatically performs a purge operation and tries to delete old patches until the patch cache is smaller than the specified maximum size.
Click Apply to set your OracleMetaLink credentials.
Applying a patch or patch set is the process of installing the staged, or locally stored, patch files in the Oracle home on the server. You must specify patching credentials before you can stage and apply a patch or patch set using Enterprise Manager.
To stage and apply patches and patch sets using the Patching wizard:
From the Database Home page, click Software and Support.
The Database Instance: instance_name page appears.
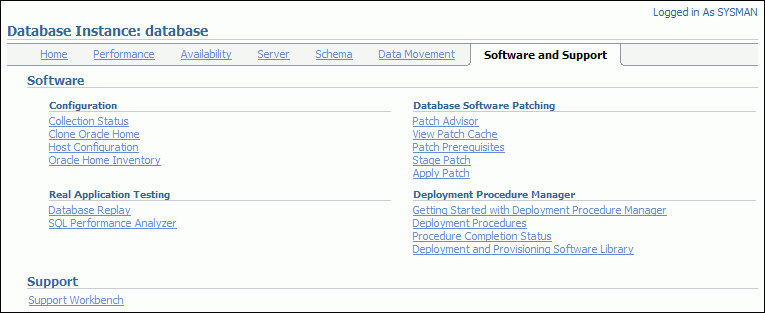
In the Database Software Patching section, select Apply Patch.
The Select Patches page appears.
Click Add Patches to search for new patches to apply.
The Search and Select Patches page appears.
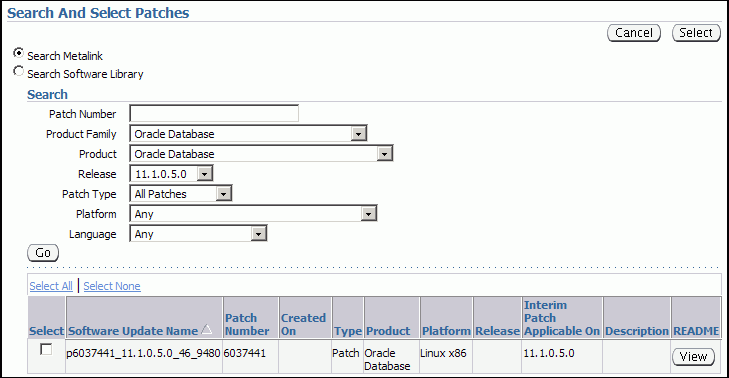
In the Search section, choose your current database release from the list of values in the Release list, for example, 11.1.0.5.0. From the Platform list choose the name that matches your installed operating system, for example, Linux x86. After you have made your selections, click Go.
You can optionally limit your search further by choosing different values for Product Family, Product, Patch Type, and Language, and then clicking Go.
(Optional) Select a patch or patch set and click View to view the patch details.
Select a patch or patch set and start the Patching wizard by clicking Select in the top right corner of the page.
The Select Patches page appears.
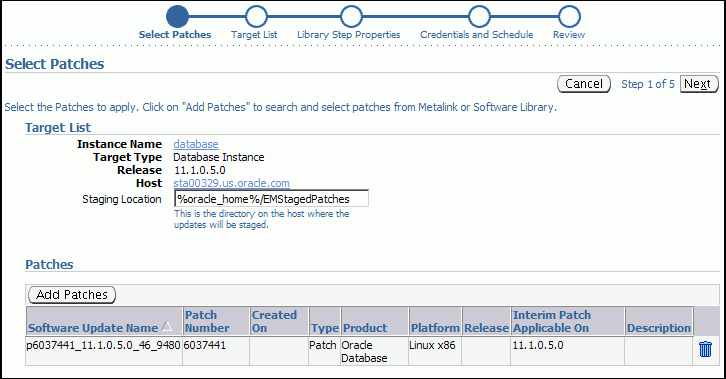
If the patch or patch set you selected in Step 5 does not appear in the Patches table, click Add Patch and repeat the search to locate the patch. When the patch or patch set you have selected is displayed in the Patches table, click Next.
The Credentials and Schedule page appears.
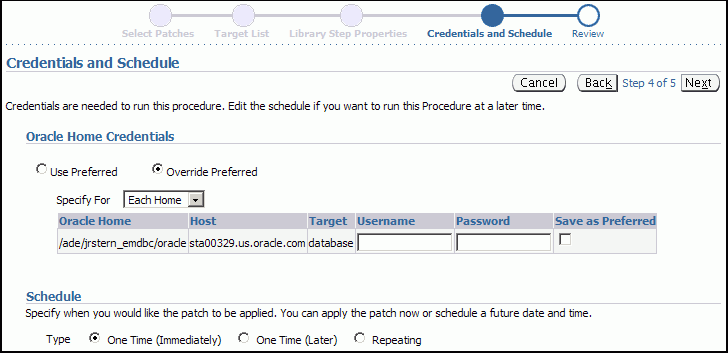
Enter the credentials for the operating system user that will perform the patching operation. If you have already configured Preferred Credentials, you can choose the Use Preferred option.
For the Schedule Type option, use the default value of One Time (Immediately). Optionally, you can choose to schedule the patching for a later time using the One Time (Later) option. Click Next to continue.
The Review page appears.
Review the information on this page. If any of the information is incorrect, you can click Back to return to a previous page and make corrections. When finished, click Finish to submit the job that patches the database.
The Deployment Procedure Manager page appears.

(Optional) To view the progress of the recently submitted patching operation, click Patch Oracle Standalone Database.
The Procedure Completion Status page appears.
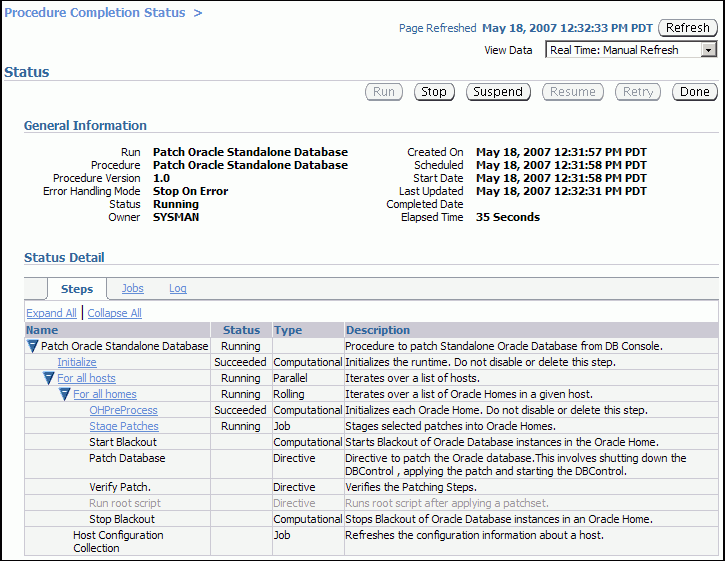
As part of the patching procedure, the database instance and Database Control are shut down and then restarted. After they have restarted, you must log in again and navigate to the Procedure Completion Status page to check the status.
After you have reviewed the status of each step, you can click Refresh to update the display if the procedure has not yet completed.
When you have finished viewing the results, click Done.
Click the Database tab.