| C H A P T E R 2 |
|
New SunVTS Features |
This chapter describes new features and user interface enhancements that are developed in Patch Set releases of SunVTS software.
There are two ways to install SunVTS software from the Solaris Software Supplement CD:
If you installed SunVTS software from a previous release, you should remove all packages associated with that release before installing the new SunVTS software. Remove the old SunVTS packages with the same method you installed the packages.
If you installed SunVTS using Web Start 2.0, you must also remove the software using Web Start 2.0. If you installed SunVTS with the pkgadd command, you must also remove the software with the pkgrm command.
You can use Solaris Web Start 2.0 to install SunVTS software after you have installed the Solaris operating environment.
|
|
1. Insert the Solaris Software Supplement CD into your CD ROM drive.
If your system is running Sun Enterprise Volume Manager , it should automatically mount the CD-ROM to the /cdrom/cdrom0 directory.
If your system is not running Sun Enterprise Volume Manager, mount the CD-ROM as follows:
2. In a terminal window, type:
3. When the Solaris Web Start GUI is displayed, select Next.
4. Select Default Install or Custom Install from the Solaris Web Start GUI.
a. If you want to install all of the default installed software, select Default Install, then select Next. SunVTS software is installed by default if you select Default Install. See the Solaris Sun Hardware Platform Guide for a list of what software is installed by default.
b. If you only want to install some of the software products, select Custom Install, then select Next. Select the software you want to install, then select Next.
Use the Product Registry utility (/usr/bin/prodreg) and select the product to be removed.
Refer to the SunVTS 5.1 User's Guide for details on using the pkgadd and pkgrm commands to install and remove SunVTS software.
In SunVTS 5.1 Patch Set 3 and later releases, a certain number of instances of fputest may run in Exclusive mode in parallel. Note that no two disparate tests may run in Exclusive mode at the same time. However, the same test can run in parallel on different devices in Exclusive mode. This test based parallelism is currently available for only the fputest. The concurrency of fputest in Exclusive mode is dynamically set with the optimal value based on system resources and is not user configurable. For all other tests, it is not executed in parallel even if the device has multiple instances; instead, they are executed in sequence.
This section describes how to use the Schedule Manager, which is a new feature introduced in SunVTS 5.1 Patch Set 2 (PS2). The Schedule Manager is designed to be used with the SunVTS graphical user interface from the Common Desktop Environment (CDE). For details on how to start the SunVTS graphical interface, refer to the SunVTS 5.1 User's Guide.
The Schedule Manager allows you to create schedules to perform tests at a specific time, periodically, at intervals, or on kernel idle. You can configure schedules to perform tests with standard options or an option file. If errors occur when running a schedule, the Schedule Manager indicates the cause.
The Schedule Manager allows you to configure a schedule to switch from one test mode to another at a specific time. Additionally, you can specify the duration to run the schedule or specify unlimited; the default is one hour. The schedule will run until all tests are run as per configuration or the specified time, whichever is less.
Schedules can be performed in the standard SunVTS kernel state. If the SunVTS kernel is not running, the Schedule Manager can invoke a SunVTS kernel session at a scheduled time. With the Schedule Manager you can also force a start of a schedule and stop the currently running schedule at a specified time.
The Schedule Manager allows you to create, edit, and delete schedules. Creating a new schedule requires selecting standard options or an option file. You must save schedules with a unique name. None and Untitled cannot be used as schedule names. If you try to save a new schedule or modify an existing one with a name already in use, the Schedule Manager will prompt you before overwriting. You can also view the details of all of the schedules in the SunVTS graphical interface.
From the main SunVTS Diagnostic window, select Scheduler Schedule Manager
 Create Schedule to bring up the Schedule Manager dialog box for creating, editing, or deleting schedules. Only one schedule can be run at a time. You can remove the currently running schedule and all schedules in the scheduler queue by selecting Scheduler
 Schedule Manager
 Clean All from the main window. The main SunVTS Diagnostic window indicates the currently running schedule.
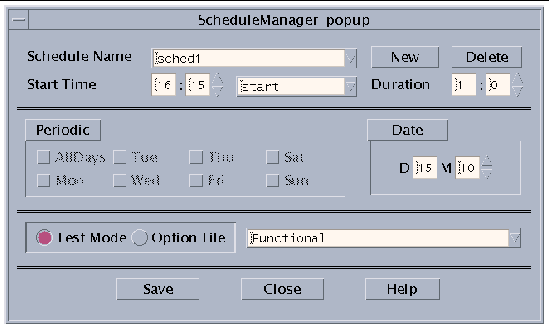
To reach the Schedule Manager dialog box below, select Scheduler Schedule Manager
 Create Schedule from the main SunVTS Diagnostic window. A list of the existing schedules and the standard options are displayed.

The following table describes the options listed in the Schedule Manager dialog box:
To bring up an existing schedule for viewing or editing, select a schedule in the Schedule Name drop-down menu, or enter the name of a schedule in the field.
Copyright © 2003, Sun Microsystems, Inc. All rights reserved.